

Protect Your Home with Timely Roof Repairs
Asphalt shingle roof repair is something every homeowner will likely face at some point. Here’s what you need to know right away:
Quick Guide to Asphalt Shingle Roof Repair:
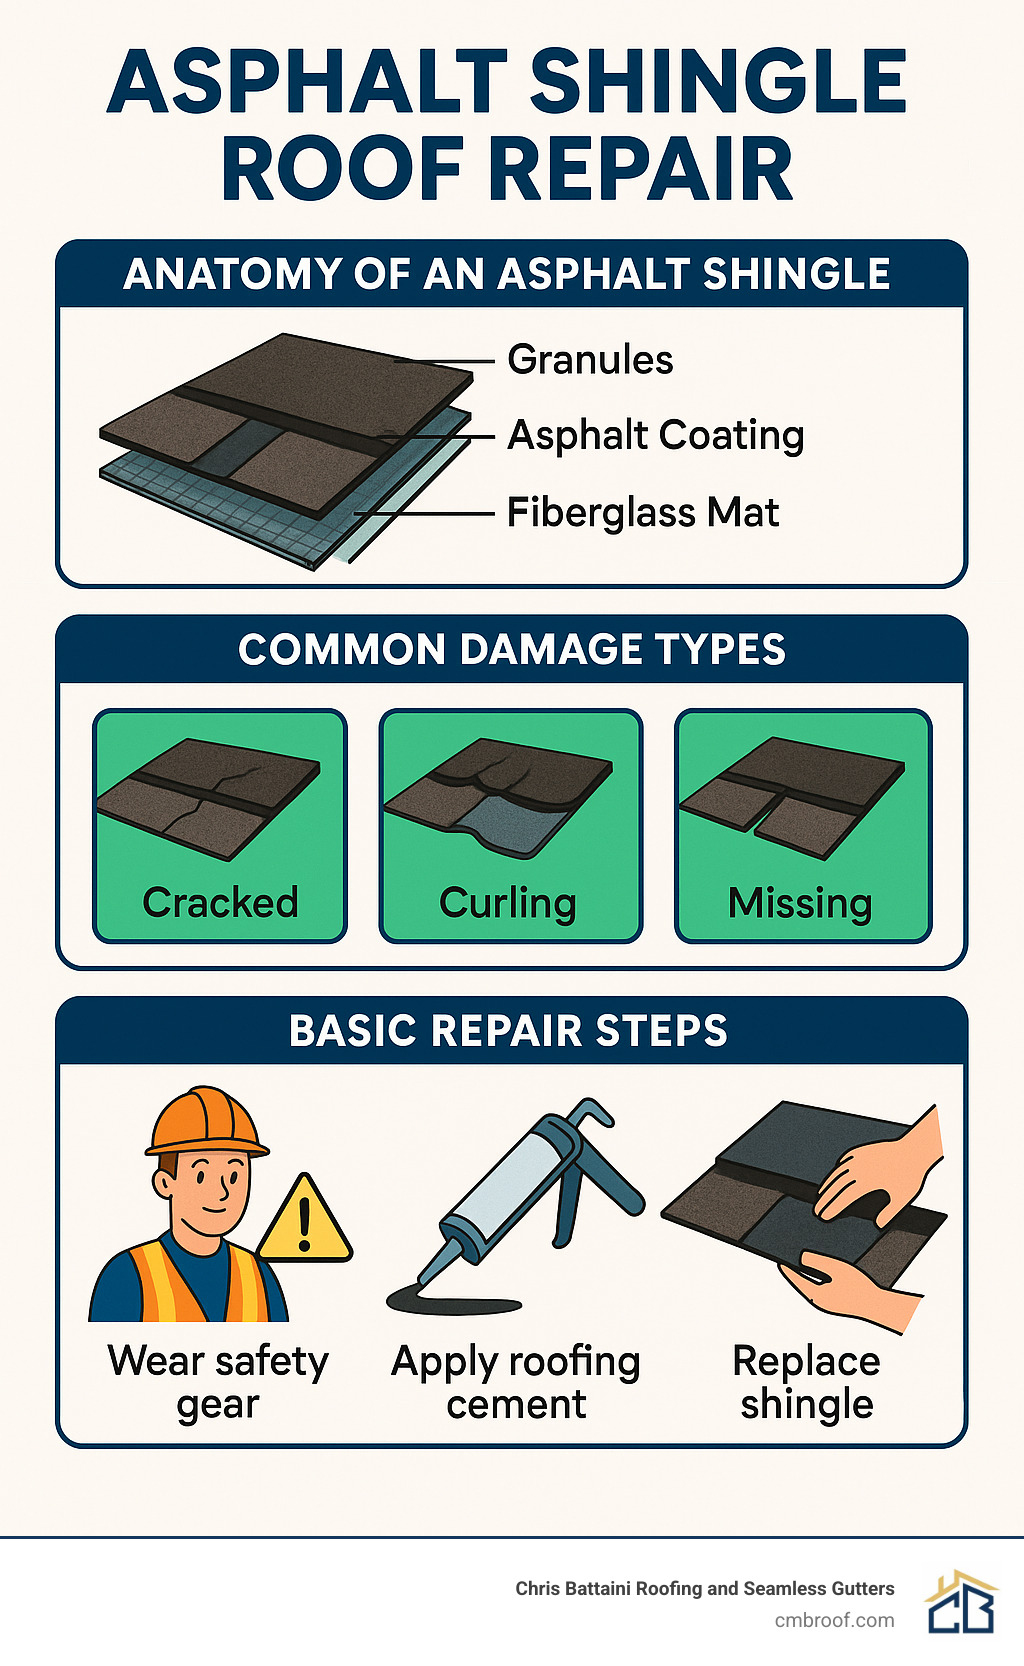
1. Inspect first – Look for missing, curled, or cracked shingles
2. Small repairs – Average cost $360-$1,830, with most homeowners spending about $950
3. DIY repairs possible for:
* Single damaged shingles
* Curled corners (use roofing cement)
* Minor cracks (apply sealant and granules)
4. Call professionals for:
* Steep roofs (safety risk)
* Widespread damage
* Structural issues
* When roof is over 20 years old
Your home’s roof is literally its first line of defense against the elements. When asphalt shingles become damaged, addressing the issue promptly can prevent costly water damage and extend your roof’s lifespan.
Asphalt shingles are the most common roofing material in America for good reason – they’re affordable, relatively easy to repair, and can last 15-30 years with proper maintenance. Whether it’s a few curled corners after a windstorm or a handful of cracked shingles from a fallen branch, timely repairs can save you thousands in potential interior damage.
As one roofing professional noted in our research: “Maintaining a sound roof literally tops the list of crucial home repairs: It keeps you and your family warm and dry, along with everything in your house.”
The good news? Many asphalt shingle repairs are straightforward enough for DIY-minded homeowners to tackle themselves, especially on shallow-pitched roofs. Others require professional expertise to ensure safety and proper installation.
Asphalt shingle roof repair helpful reading:
– asphalt roof replacement
– asphalt shingle roof leak repair
The 7 Most Common Types of Asphalt Shingle Roof Damage
Your roof takes a beating year after year. Here in New England, we see it all – scorching summers, freezing winters, and everything in between. After inspecting thousands of roofs throughout Berkshire County and Southern Vermont, we’ve identified seven damage types that pop up most frequently:
Granule loss happens when those tiny protective particles wash away from your shingles. Take a peek in your gutters – if you spot what looks like coarse black sand, your roof’s sunscreen is washing away, leaving the asphalt exposed to harmful UV rays.
Curling edges are telltale signs of aging or poor ventilation. When shingle corners start to lift and curl upward, they become perfect targets for our notorious New England wind storms. One strong gust can catch these lifted edges and cause even more damage.
Cracked tabs develop as shingles expand and contract through our dramatic seasonal temperature swings. That 80-degree summer day followed by a 40-degree night? Your roof feels that stress with every cycle, eventually leading to cracks in the asphalt.
Blown-off shingles leave your roof vulnerable in the worst way. After a windstorm, take a quick look at your yard – finding shingles on the ground means parts of your roof are now completely exposed to the elements. This requires immediate asphalt shingle roof repair.
Nail pops occur when roofing nails gradually work their way upward through the shingle surface. Our freeze-thaw cycles are particularly good at pushing these fasteners out, creating tiny holes where water can penetrate.
Flashing gaps develop around chimneys, vents, and roof valleys where metal flashing has pulled away from the surface. These intersection points are already vulnerable, and when the flashing fails, water finds its way in quickly.
Moss & algae growth might seem merely cosmetic, but they’re actually quite destructive. Moss acts like a sponge, holding moisture against your shingles and gradually lifting their edges, while algae slowly degrades the protective granule layer.
Why These Problems Matter
These issues threaten your home’s integrity in several important ways:
Water intrusion is the enemy of every homeowner. Even a pinhole-sized opening in your roof’s defense system can allow moisture to seep into your attic. As one of our senior installers often reminds customers, “Water is patient – it only needs the tiniest invitation to create thousands in damage.” Once moisture gets past your shingles, it can travel surprisingly far before showing up as a ceiling stain.
Energy loss hits your wallet directly. When your roof’s thermal barrier is compromised, your heating and cooling systems work overtime. During those bitter Berkshire County winters, heat escapes through damaged areas, while summer brings unwanted warmth into your living spaces.
Structural rot begins silently in your roof’s wooden decking. What starts as a simple shingle problem can quickly escalate to rotted plywood, compromised rafters, and even interior damage. We’ve seen small repairs balloon into major renovations simply because homeowners waited too long.
Catching these problems early through regular inspections saves both headaches and money. The difference between replacing a few shingles versus repairing water-damaged ceilings and insulation can be thousands of dollars.
How to Tell Your Roof Needs Attention
Your roof talks to you before it starts leaking—you just need to know the language. Catching problems early can save you thousands in repair costs and prevent damage to your home’s interior.
Early Leak Signs aren’t always as obvious as water dripping from your ceiling. Look for subtle discoloration on walls or ceilings, especially after heavy rain. These water stains often appear as yellowish or brownish rings that expand with each rainfall. By the time you see actual dripping, water may have been damaging your home for weeks or even months.
Attic Water Stains are your early warning system. On a sunny day, head up to your attic with a flashlight and look at the underside of your roof deck. Dark streaks, dampness, or mold growth are telltale signs that water is finding its way in, even if it hasn’t reached your living spaces yet.
“I check my attic twice a year—once in spring and once in fall,” shares a Berkshire County homeowner. “Last October, I spotted a small damp patch that would have gone unnoticed until it became a ceiling stain. Caught it just in time!”
Daylight Through Deck is another red flag you can spot from your attic. Turn off your flashlight and look for pinpricks of light coming through the roof boards. If sunlight can penetrate, so can rain and snow. These tiny openings tend to worsen over time, especially during freeze-thaw cycles.
Gutter Granules collecting in your gutters or at the end of downspouts indicate your shingles are shedding their protective coating. While some granule loss is normal (especially with new roofs during the first year), excessive amounts from an older roof signal advanced deterioration and the beginning of the end of your shingle’s useful life.
Sagging Lines across your roofline should never be ignored. A healthy roof has straight, even lines. When you notice dips, waves, or sags, it usually means the plywood decking beneath your shingles has weakened from moisture exposure. This requires immediate professional attention as it can lead to structural failure.
More info about roof inspection services
Quick At-Home Inspection Checklist
Not everyone is comfortable climbing on their roof—and that’s perfectly fine. Here’s how to keep tabs on your roof’s health while keeping your feet firmly on the ground:
Binocular Scan: Stand across the street from your home with a pair of binoculars. Slowly scan each section of your roof, looking for missing shingles, curling edges, or areas that appear darker or different in color from the rest. Pay special attention to areas around chimneys, vents, and valleys where different roof planes meet.
Ladder Check: If you’re comfortable using a ladder, set it up securely and climb just high enough to inspect your gutters and the edge of your roof. Look for granule buildup, cracked sealant, or loose shingles. Remember: never walk on a wet or steep roof without proper safety equipment—it’s simply not worth the risk.
Interior Ceilings: Make a habit of glancing up at your ceilings, particularly after heavy rain or snow melt. Focus on upstairs rooms, especially near chimneys, skylights, and exterior walls where roof intersections occur. Even the smallest water stain deserves investigation.
One of our Hampden County customers noted: “I used to ignore the black granules that appeared in my gutters every spring. Then I learned they were actually from my deteriorating shingles. That simple observation led me to find several damaged areas before they caused leaks inside my home.”
Regular inspection isn’t just about finding problems—it’s about peace of mind. When you know your roof is in good condition, you can rest easier during those heavy New England storms.
DIY Asphalt Shingle Roof Repair: Tools, Materials, and Step-by-Step Guide
Ready to tackle that damaged shingle yourself? With the right preparation, asphalt shingle roof repair can be a satisfying weekend project that saves you money while protecting your home. I’ve helped countless homeowners in Berkshire County get through their first DIY roof repair, and I’m happy to share what works.
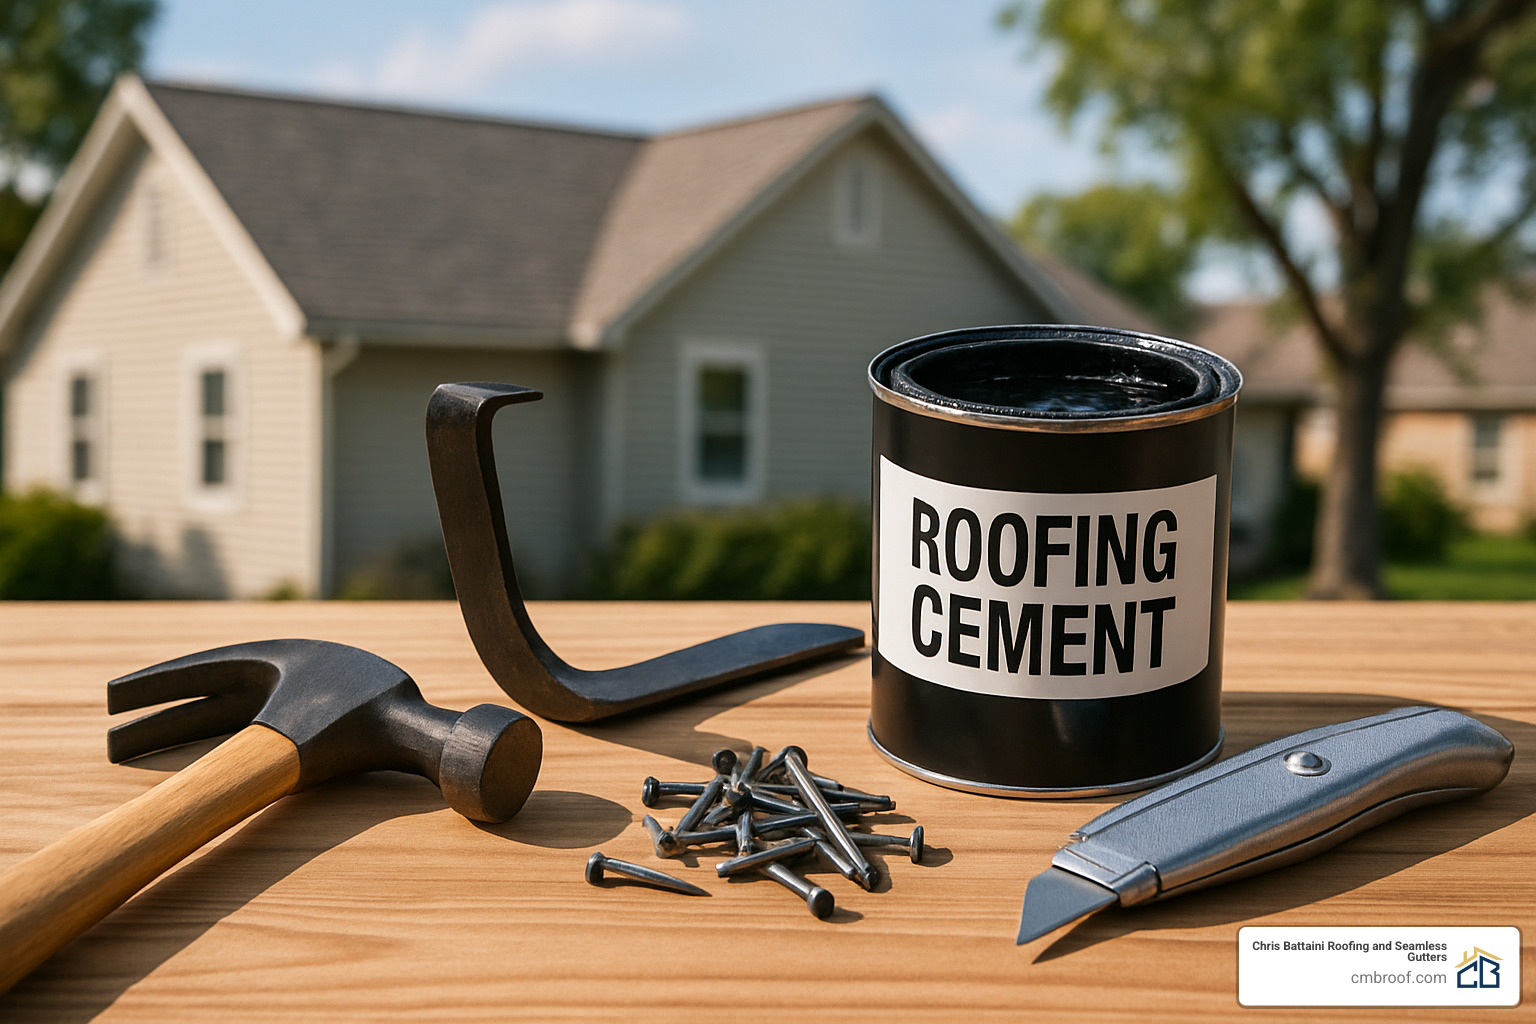
Must-Have Tools & Materials
Before you climb that ladder, make sure you’ve gathered everything you’ll need. There’s nothing worse than being halfway through a repair and realizing you’re missing a crucial tool!
For your asphalt shingle roof repair shopping list, start with a quality flat pry bar – this is your best friend for gently lifting shingles without cracking them. Add a hammer (smooth-faced works best), a utility knife with hook blade for clean cuts, and a caulking gun for applying roofing cement. Don’t forget a putty knife to spread that cement evenly.
As for materials, you’ll need matching replacement shingles that blend with your existing roof. “The holy grail is finding leftover shingles from your original installation,” as my colleague Tom likes to say. “They’ll give you a perfect match in both color and wear.” No leftovers? You’ll need to purchase a bundle for about $15-$20.
Grab some 1¼-inch roofing nails – they’re the perfect length to secure your shingles without puncturing through the roof deck. A tube or two of roofing cement (around $4 each) will help seal everything tight. And if you find any damaged underlayment, have some replacement material on hand.
7-Step Asphalt Shingle Roof Repair Walk-Through
Let me walk you through the repair process I’ve refined over years of asphalt shingle roof repair projects:
Choose the right day for your project – aim for a warm, dry afternoon when temperatures hover in the 60s°F. This makes the shingles pliable enough to work with but not so hot they’re fragile. I learned this lesson the hard way years ago trying to replace shingles on a frosty morning – the brittle shingles cracked like potato chips!
When you’re ready to start, gently lift the damaged area by sliding your pry bar under the row above the damaged shingle. You’re looking to break the seal strip’s adhesive bond and expose the nails holding your target shingle in place. Take your time here – rushing leads to cracked shingles and bigger repairs.
Next, remove the nails securing the damaged shingle. This requires lifting the shingle above it just enough to get your pry bar under the nail heads. Rock the bar gently to extract each nail without tearing surrounding materials.
With the nails gone, you can extract the damaged shingle by sliding it out. Take a moment to clean away any debris or old roofing cement from the exposed area – you want a clean surface for your replacement.
Now comes the satisfying part – sliding in the replacement shingle. Align it carefully with the surrounding shingles, making sure it’s pushed all the way up to maintain the proper exposure pattern. A misaligned shingle sticks out like a sore thumb!
Time to secure your new shingle with those 1¼-inch roofing nails. Follow the original nail pattern (typically 3-4 nails per shingle) and place them just below the seal strip of the row above. Drive them straight, but not so deep that you dimple the shingle.
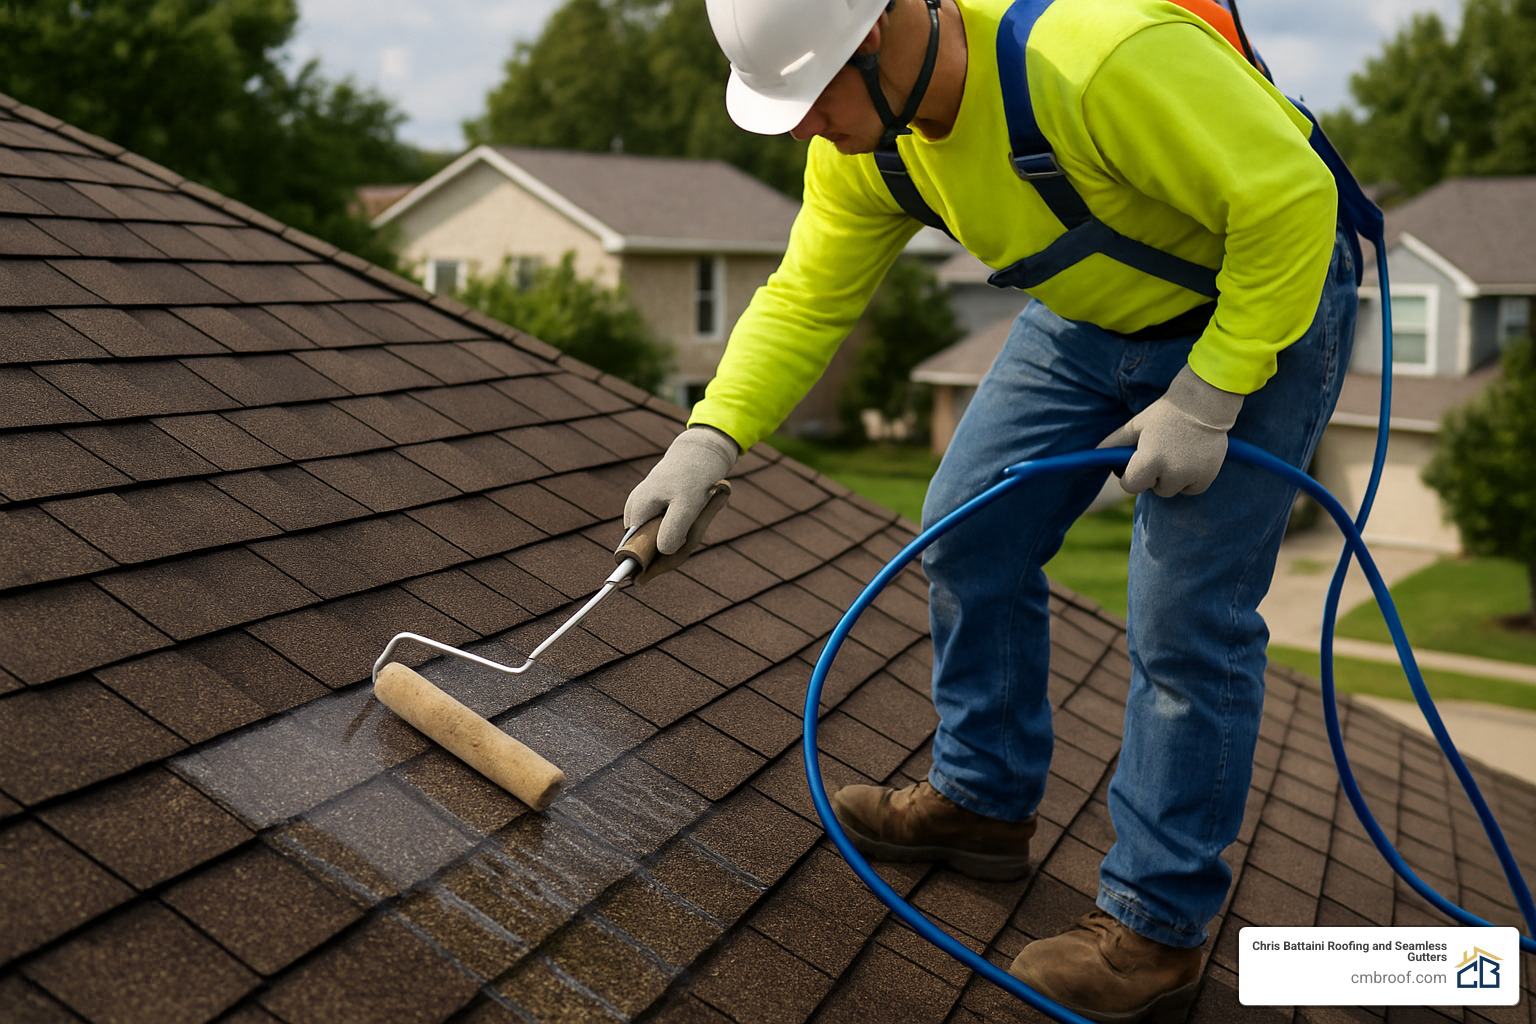
Finally, seal the edges by applying a dab of roofing cement under the corners and edges of your new shingle, then press down firmly. This replaces the factory adhesive that bonds shingles together during hot weather.

For shingles with just minor cracks, you can often avoid full replacement. Apply roofing sealant under the crack, press the shingle down, then add another bead over the crack. My favorite finishing touch? Sprinkle granules collected from your gutters over the wet sealant for a nearly invisible repair.
Safety First on the Roof
I can’t stress this enough – even a simple asphalt shingle roof repair can turn dangerous in seconds without proper safety measures.
If your roof has a pitch greater than 4:12 (meaning it rises 4 inches for every 12 inches of horizontal run), invest in a fall-arrest harness system. This isn’t just good advice – it’s what OSHA requires for professional roofers for good reason.
Pay careful attention to ladder footing as well. Your ladder should extend at least three feet above the roof edge and be secured at the top. Set it on firm, level ground following the 4:1 ratio – for every 4 feet of height, the ladder’s base should be 1 foot away from the wall.
Never work alone! Having a partner spotter hold the ladder and keep an eye on you throughout the repair can literally be a lifesaver. They’re also handy for passing up tools and materials so you don’t have to keep climbing up and down.
OSHA fall limits exist because falls from as little as 6 feet can be fatal. If your roof is steep or higher than one story, the small savings from DIY might not justify the risk. As my friend Jim, a 30-year roofing veteran, once told me after a close call on a seemingly “easy” repair: “I chose to forego safety equipment on a very shallow 3-in-12 pitch roof, but I would never recommend that to a homeowner. The risk isn’t worth the savings.”
Chris Battaini Roofing and Seamless Gutters services Berkshire, Hampden, Hampshire, and Franklin Counties in Massachusetts.
Repair vs. Replacement: Making the Smart Call
When facing roof troubles, many homeowners struggle with a crucial question: should I repair what I have or start fresh? Making the right decision about your asphalt shingle roof repair isn’t always straightforward, but I’m here to help you steer this choice.
Overlay vs. Tear-off Considerations
If you’re seeing widespread issues but your budget feels tight, you might be tempted by an overlay—installing new shingles directly over your existing ones. It’s like putting a fresh coat of paint over an old one, except with much bigger consequences.
“I thought an overlay would save me money,” shares one Berkshire County homeowner. “But my roofer showed me how it would actually cost more in the long run.”
Building codes typically limit homes to a maximum of two roofing layers. If you’ve already got two layers up there, your decision is made for you—a complete tear-off is your only legal option. This isn’t just bureaucratic red tape; it’s about safety.
When you choose an overlay, you miss the chance to inspect what’s underneath. Think of it like putting a bandage over a wound without cleaning it first—those hidden problems won’t heal themselves. The deck could be deteriorating while you’re none the wiser.
Weight is another serious concern, especially here in New England. Those extra shingles add approximately 2-3 pounds per square foot to your roof. During our heavy snow seasons in Berkshire County and Southern Vermont, that additional burden can stress your home’s structure.
| Consideration | Repair | Overlay | Complete Replacement |
|---|---|---|---|
| Cost | $360-$1,830 | $5,000-$9,000 | $8,000-$15,000+ |
| Lifespan Extension | 2-5 years | 10-15 years | 20-30 years |
| Warranty | Limited/None | Limited | Full manufacturer |
| Inspection of Deck | No | No | Yes |
| Weight Added | None | Significant | None (net) |
| Time to Complete | Hours | 1-2 days | 2-5 days |
| Addresses Underlying Issues | No | No | Yes |
Note: These are average costs based on internet data and not actual costs for Chris Battaini Roofing and Seamless Gutters.
A single layer of shingles also ventilates better, releasing heat more efficiently. This matters more than you might think—trapped heat can dramatically shorten your roof’s lifespan. Many roofing experts note that second-layer shingles often last only 75% as long as they would as a first layer.
Code & Warranty Triggers
Sometimes the decision gets made for you. Certain conditions automatically signal that it’s time for a full replacement:
That two-layer limit I mentioned? It’s a hard stop in most municipalities. If you’ve already got two layers, codes require complete removal before adding anything new.
When you walk on your roof and feel soft, spongy areas beneath your feet, that’s a red flag for rotten decking. This structural damage can’t be fixed with a simple repair or overlay—the decking itself needs replacement, which means removing everything above it first.
Don’t overlook your manufacturer warranty considerations. Many shingle warranties become null and void if you install new shingles over old ones or if your roof’s ventilation doesn’t meet their specifications. That 30-year warranty you’re counting on might be worthless if you choose an overlay.
As one industry expert from the Asphalt Roofing Manufacturers Association (ARMA) puts it: “If there are two layers already, the roof sags, deck boards are rotted/warped/gapped over 1/4 inch, or shingles are too uneven to flatten, complete replacement is necessary.”
The right choice often becomes clearer after a professional inspection. Getting an expert opinion can save you from making a costly mistake—either replacing a roof that could have been repaired or attempting repairs on a roof that’s reached the end of its useful life.
More info about Residential Roof Replacement Near Me
Budgeting, Safety & Hiring a Pro
Let’s talk dollars and sense when it comes to asphalt shingle roof repair. Understanding what you might spend helps you prepare your wallet—and decide whether to climb that ladder yourself.
Most homeowners end up spending between $363 and $1,916 when they hire professionals for asphalt shingle repairs. The national average hovers around $1,136, but don’t be surprised if your quote looks different. Simple, small repairs might cost as little as $150, while more extensive damage could push past $3,000.
When you hire a professional roofer, you’re typically looking at hourly rates between $45 and $65. That material prices have jumped 5-15% in recent years (thanks, inflation!), which affects your bottom line. And if that leak starts during Sunday dinner? Emergency service calls usually come with an additional $100-$300 surcharge—especially after hours or on weekends.
“The biggest mistake homeowners make is waiting until water is literally dripping onto their dining table,” says one roofing professional. “By then, what might have been a $400 repair has turned into a $1,500 headache.”

DIY repairs can certainly save you money on labor (which typically makes up about 70% of repair costs), but there’s a trade-off. That savings comes with risks to both your safety and your roof’s warranty. If you’re serious about DIY roof work, proper safety equipment isn’t optional—budget $200-$500 for a basic fall-arrest system. It’s an investment that could literally save your life if you plan to make roof repairs a regular part of your homeowner repertoire.
DIY vs Professional Roofer
So should you tackle that asphalt shingle roof repair yourself or call in the pros? Let’s weigh both sides.
The DIY approach offers obvious benefits: you’ll save significantly on labor costs, you can address problems immediately without waiting for an appointment, and you’ll pick up valuable home maintenance skills along the way. Many homeowners feel a genuine sense of accomplishment after successfully completing their first roof repair.
However, the downsides can’t be ignored. There’s the very real safety risk, especially on steep or high roofs. Improper installation might lead to even more damage down the line. You won’t have any workmanship warranty to fall back on if problems develop. And what seems like a quick weekend project can eat up days if you’re learning as you go.
On the flip side, hiring professionals brings expertise and proper techniques to your project. They come equipped with safety gear and training. Reputable companies like Chris Battaini Roofing and Seamless Gutters stand behind their work with solid warranties. The job gets done faster, and you don’t have to worry about disposing of old materials.
The main drawbacks? The higher cost is obvious, and during busy seasons (especially after storms), you might face scheduling delays. Quality can also vary between contractors, which is why checking references and reviews is crucial.
One homeowner’s experience serves as a cautionary tale: “I tried fixing a few shingles myself to save money. Two months later, I had water stains on my ceiling because I hadn’t properly sealed the edges. The professional repair cost twice what it would have initially. Lesson learned!”
When to Call in a Licensed Roofer
There are certain situations where DIY simply doesn’t make sense for your asphalt shingle roof repair:
Steep Pitch: If your roof has a pitch greater than 6:12 (meaning it rises 6 inches for every 12 inches of horizontal run), it’s dangerously slick for amateur repairs. Professional roofers have the harnesses, footwear, and experience to work safely on steep slopes.
Widespread Damage: When more than 30% of your roof shows damage, you’re beyond the patch-and-repair stage. A professional can properly assess whether you need partial or complete replacement.
Structural Sag: Any visible dipping or sagging in your roofline is a red flag for underlying structural problems. This requires expert evaluation before any shingle work begins.
Insurance Claim Help: Professional roofers know exactly how to document storm damage to maximize your insurance coverage. They speak the adjusters’ language and can be powerful advocates during the claims process.
As one veteran roofer wisely noted: “If you’re uncomfortable on a ladder or uncertain about any aspect of the repair, that’s your body telling you to call a professional. Listen to it.”
More info about Roof Repair Services
Note: These are average costs based on internet data and not actual costs for Chris Battaini Roofing and Seamless Gutters.
Preventive Maintenance & Life-Extending Treatments
The best asphalt shingle roof repair is actually preventing the need for repairs in the first place. With some regular attention, you can add years—even decades—to your roof’s lifespan.
Annual Inspections are your roof’s best friend. Schedule a professional look-over each spring to catch winter damage before it worsens. As one of our clients told us, “The $150 inspection saved me thousands in potential water damage by catching a small issue early.”
For homes in our windy Berkshire hills, Hand-Sealing Tabs can be a game-changer. Simply applying a quarter-sized dab of roofing cement under loose shingle tabs prevents them from lifting during those fierce winter nor’easters. I’ll never forget the homeowner who shared his family tradition: “Every Father’s Day, my kids and I spend the morning putting a little dab of roofing cement under any loose tabs. My 25-year-old roof still hasn’t needed replacement!”
That green stuff growing on your roof isn’t just unsightly—it’s damaging your shingles. For Algae Cleaning, a simple 50:50 mix of water and bleach applied with a garden sprayer works wonders. Just remember: never use a pressure washer on asphalt shingles! The force can strip away those protective granules, doing more harm than good.
For roofs showing their age but not yet needing replacement, Acrylic Coatings offer a middle-ground solution. These clear sealants refresh and protect weathered shingles at a fraction of replacement costs. One Springfield homeowner shared her experience: “I applied an acrylic coating to my 18-year-old roof for about $1,100, versus $25,000 for a complete replacement. Three years later, it still looks great and doesn’t leak!”
The newest innovation in roof preservation is Rejuvenation Sprays like Roof Maxx. These soy-based treatments restore flexibility to aging asphalt by replenishing oils that naturally deplete over time. While not a permanent fix, many homeowners report gaining 5+ years of additional roof life from a single application—a worthwhile investment when you’re trying to stretch your roof’s lifespan a bit longer.
Products That Extend Shingle Life
When it comes to prolonging your asphalt shingle roof, a few key products stand out from the crowd.
Roof Sealants are the workhorses of roof maintenance. These asphalt-based products (typically $15-$20 per bucket) restore waterproofing properties to aging shingles and seal those pesky hairline cracks that can lead to leaks. They’re particularly effective after repairing damaged areas to ensure water stays where it belongs—outside your home.
For homes that bake in summer sun, Reflective Coatings can make a significant difference. These white or aluminum-pigmented treatments reflect sunlight rather than absorbing it, reducing the thermal cycling damage that causes shingles to crack and curl. One North Adams customer noted, “After applying a reflective coating, my upstairs rooms stayed noticeably cooler in summer, and my shingles stopped curling at the edges.”
As shingles age, they lose essential oils that keep them flexible. Rejuvenators address this directly by replacing those oils, essentially giving your roof a second life. Think of it as moisturizer for your thirsty shingles! These treatments work best on roofs in the 10-15 year range—not brand new, but not at failure’s doorstep either.
A word of caution from our team: “These products can extend your roof’s life significantly when applied at the right time, but they’re not miracle workers. A roof with widespread damage or that’s already 25+ years old likely needs replacement, not rejuvenation.”
More info about Asphalt Shingle Roof Leak Repair
Frequently Asked Questions about Asphalt Shingle Roof Repair
How long do asphalt shingles really last?
The lifespan of asphalt shingles is a common concern for homeowners, and the answer isn’t as straightforward as you might hope. While manufacturers often advertise 25-30 year lifespans, the reality is a bit more nuanced.
Most asphalt shingles last between 15-30 years, with several factors affecting their longevity. Quality makes a significant difference – basic three-tab shingles typically serve you for 15-20 years, while premium architectural shingles can protect your home for 25-30 years or even longer with proper care.
Here in our Berkshire County and Southern Vermont service area, climate plays a crucial role. Our dramatic freeze-thaw cycles and heavy snow loads can reduce expected lifespans by about 20% compared to milder regions. I’ve seen 30-year rated shingles showing significant wear after just 22 years due to our harsh New England winters.
Installation quality is non-negotiable when it comes to roof longevity. Properly installed shingles with adequate ventilation consistently outlast poorly installed ones, sometimes by a decade or more. As one of my customers recently told me, “I learned the hard way that saving a few hundred dollars on installation cost me thousands in early replacement.”
With regular maintenance and prompt repairs, you can add 5+ years to your roof’s life. It’s like dental care – those regular checkups prevent bigger problems down the road!
Is a small leak an emergency?
That small drip might not seem urgent, but I’ve seen too many “minor” leaks turn into major headaches for homeowners who waited too long.
While not always requiring emergency weekend service (and the premium rates that come with it), small leaks deserve your prompt attention. Water is sneaky – it can travel several feet from the actual entry point, causing damage in unexpected places. I remember one customer who noticed a ceiling stain in their hallway, only to find the actual leak was coming from a completely different area of the roof.
Mold is another serious concern. Even small amounts of moisture can promote mold growth within 24-48 hours, potentially creating health hazards and expensive remediation needs. That critical 48-hour window for water damage means even “small” leaks deserve quick action.
During heavy rain or spring snowmelt, minor leaks can suddenly worsen as water finds the path of least resistance. At Chris Battaini Roofing and Seamless Gutters, we prioritize leak calls because we’ve seen how quickly water damage can escalate from a simple repair to a major restoration project.
If you find a leak, place a bucket under any drips and consider using a tarp if weather permits as temporary measures until proper asphalt shingle roof repair can be completed.
Can I match new shingles to a faded roof?
Matching new shingles to your weathered roof is one of the trickiest parts of asphalt shingle roof repair. After years of sun exposure, your existing shingles have faded from their original color, making perfect matches challenging – but not impossible.
Your best resource might be hiding in your own home. Check your attic, garage, or shed for leftover shingles from the original installation – these are your ideal match since they came from the same manufacturing batch. I always recommend homeowners store extra shingles for this very reason.
If you don’t have leftovers, many suppliers will provide sample shingles to test against your existing roof before you purchase a full bundle. This small step can save you from buying materials that look completely different once installed.
When replacing shingles, consider strategic placement. Start with less visible areas of your roof where color differences won’t be as noticeable. For more substantial damage, sometimes replacing an entire slope creates a more uniform appearance than scattered patches.
One of my customers shared a clever trick: “I collected colored granules from my gutters during cleaning and sprinkled them over my newly installed shingles. From the ground, you can barely tell which ones are new!” While not a perfect solution, it shows how a little creativity can help blend repairs into your existing roof.
Some weathering of your new shingles will occur naturally over time, gradually bringing them closer to the color of your existing roof.
Chris Battaini Roofing and Seamless Gutters serves Berkshire, Hampden, Hampshire, and Franklin Counties in Massachusetts.
Conclusion
Asphalt shingle roof repair is more than just a home maintenance task—it’s an investment in protecting the sanctuary you’ve built for yourself and your family. Whether you’ve tackled a simple DIY fix or called in professionals for more complex issues, timely repairs are your roof’s best friend and your wallet’s ally.
Your home deserves this attention. After all, those shingles work tirelessly through scorching summers, freezing winters, and everything in between to keep you safe and dry. Here’s what to remember as you move forward:
Regular inspections are like preventive medicine for your roof. By catching issues early—before that small crack becomes a cascade through your ceiling—you save yourself both stress and significant expense. Mark your calendar for a biannual roof check, especially after severe weather events.
When it comes to safety, there’s no room for compromise. Those YouTube videos make repairs look easy, but they don’t show the hospital visits from falls. If your roof is steep, high, or you simply don’t feel confident on a ladder, professional help isn’t an expense—it’s an investment in your wellbeing.
The financial perspective is clear: spending $360-$1,830 on timely repairs is substantially less painful than addressing water damage that’s seeped into your attic, walls, and belongings. As one homeowner told us, “I postponed a $600 repair and ended up with a $12,000 renovation. Never again.”
Accept preventive habits like clearing debris after storms, treating moss before it takes hold, and having loose tabs professionally sealed. These small efforts can add years to your roof’s life and thousands to your savings.
At Chris Battaini Roofing and Seamless Gutters, we’ve walked countless homeowners through the repair process across Berkshire County and beyond. Our approach is straightforward: we treat your home as if it were our own, with owner-led service on every job and craftsmanship that stands the test of time—backed by warranties that let you sleep soundly, even during the fiercest storms.
Whether you’re wondering if that small leak needs immediate attention, debating repair versus replacement, or simply want a professional assessment of your roof’s condition, we’re here to provide honest guidance without pressure.
More info about Asphalt Shingle Roofing
Chris Battaini Roofing and Seamless Gutters proudly serves Berkshire, Hampden, Hampshire, and Franklin Counties in Massachusetts.
