

Protecting Your Roof’s Edge: Why Drip Edge Matters
Aluminum drip edge installation is a critical step in protecting your home from water damage. For those looking for the quick answer:
Quick Guide: Installing Aluminum Drip Edge
1. Install drip edge on eaves FIRST, BELOW underlayment
2. Install drip edge on rakes SECOND, ABOVE underlayment
3. Overlap pieces by 2-3 inches
4. Nail every 12-18 inches (not too tight)
5. Leave 1/32″ gap for thermal movement
6. Ensure shingles overhang drip edge by ¼”-¾”
When it comes to roofing, small details make a big difference. That thin metal strip along your roof’s edge might seem minor, but it’s actually your first line of defense against water damage.
A properly installed drip edge directs rainwater away from your fascia and into your gutters, preventing rot, mold, and structural damage. Without it, water can seep behind your fascia board or under your shingles, leading to expensive repairs down the road.
Most building codes now require drip edge installation, and for good reason – it can extend your roof’s lifespan by up to 10-15 years by preventing water damage to the fascia and roof deck. The modest investment in quality aluminum drip edge pays off many times over by protecting your home’s structural integrity.
In this guide, we’ll walk through the entire process of installing aluminum drip edge, from selecting the right materials to finishing touches that ensure lasting protection.
Aluminum drip edge installation word roundup:
– attaching metal roofing
– metal roofing installation
Drip Edge 101: Purpose, Profiles & Building Codes
That thin metal strip along your roof’s edge isn’t just for looks—it’s your home’s first line of defense against water damage. A drip edge uses water’s natural properties of cohesion and surface tension to guide rainwater away from vulnerable areas. Without this simple yet effective barrier, water can sneak underneath your shingles and cling to your fascia board, setting the stage for rot and costly structural repairs down the road.
When shopping for drip edge, you’ll encounter three main profiles, each with its own strengths:
Type-C (L-style) is your basic, budget-friendly option with a simple L-shaped bend. It gets the job done but offers less protection when those Berkshire winds drive rain sideways toward your home.
Type-D (D-style) kicks things up a notch with an extended edge and hemmed lip (sometimes called T-style). This design keeps water further from your fascia and stands up better to our notorious New England wind-driven rain.
Type-F (F-style) features an extended flange that makes it perfect for retrofitting over existing roofing or for use on rake edges. Its wider face provides extra coverage for your fascia board.
Gone are the days when drip edge was considered optional. The International Residential Code (IRC) now mandates drip edge installation on new roofs and major replacements. Section R905.2.8.5 specifically requires drip edges along both eaves and rakes, made of corrosion-resistant material at least 0.019-inch (0.5 mm) thick, extending at least ¼ inch beyond the roof deck.
For those of us in Berkshire County and Southern Vermont, where winter brings heavy snow and ice, proper drip edge installation is particularly crucial. The IRC requires ice barrier membrane from the lowest edge to at least 24 inches inside the exterior wall line in regions prone to ice dams. The latest research on ice barriers continues to evolve as building science advances.
When and Where Each Profile Shines
Choosing the right profile isn’t one-size-fits-all—it depends on several factors:
For eaves (horizontal roof edges), Type-D often works best because it directs water further from the fascia. On rakes (sloped roof edges), Type-C or Type-F typically perform better.
Roof pitch matters too. If your roof has a steeper pitch (6:12 or greater), a Type-D profile provides better protection by keeping water at a safer distance from your fascia.
Need to bridge a gap between your gutter and fascia? A Type-D with its extended flange can help span that distance.
When it comes to starter course integration, Type-C plays nicely with traditional starter courses, while Type-D might require some adjustments.
For maximum fascia protection, Type-D creates more space between water flow and your fascia, significantly reducing rot risk.
In our Berkshire County climate, where winter brings significant snowfall and troublesome freeze-thaw cycles, we typically recommend Type-D drip edge, especially on eaves where ice dams love to form.
Code & Warranty Must-Knows
Ignore drip edge specifications at your peril—both the Asphalt Roofing Manufacturers Association (ARMA) and most shingle manufacturers have specific guidelines that, if not followed, can void your roof warranty. That’s an expensive mistake no homeowner wants to make.
The key specifications to remember include:
Material thickness matters—you’ll need minimum 24-gauge steel or 0.019-inch aluminum drip edge installation materials. If you’re going with copper, don’t use anything less than 0.69 mm (20 oz).
Always overlap sections by at least 2 inches to prevent water from finding its way between joints.
When it comes to fastening, space your nails no more than 12 inches apart (though some manufacturers allow up to 16 inches).
Ensure your drip edge extends at least ¼ inch beyond the roof deck to properly direct water away from the fascia.
Perhaps most importantly, get the sequence right: install drip edge at eaves FIRST (before underlayment), then install underlayment, and finally install drip edge at rakes OVER the underlayment. This layering ensures proper water flow and protection.
For more comprehensive information about proper roof installation techniques, visit our Roof Installation page.
Gear Up: Tools, Materials & Prep Checklist
Getting ready for your aluminum drip edge installation is half the battle. Having everything on hand before you start will save you multiple trips up and down the ladder (trust me, your knees will thank you later).
First, let’s gather the essential tools you’ll need:
A good measuring tape and chalk line will help you mark straight lines for precise installation. You’ll need aviation snips or tin snips to cut the aluminum cleanly – regular scissors just won’t cut it (pun intended). A roofing hammer or nail gun makes fastening much easier, with a roofing coil gun being ideal for quick, consistent nailing. Round out your toolkit with a square for marking right angles, a utility knife for underlayment work, and a flat pry bar if you’re retrofitting over existing materials.
Of course, don’t forget your ladder and safety gear – including a sturdy pair of gloves, eye protection, and non-slip footwear. Working on a roof isn’t the time to test your balance skills without protection!

For materials, you’ll need your aluminum drip edge in the appropriate profile and color, panhead roofing nails (at least 1¼” long to ensure ¾” penetration into the deck), roofing underlayment, ice and water shield membrane for eaves (especially important in our New England winters), and some roofing cement or sealant for securing joints and corners.
Choosing Aluminum for Corrosion Resistance & Color Match
When it comes to drip edge materials, aluminum stands head and shoulders above the rest for homes in our Berkshire County and Southern Vermont region.
The natural corrosion resistance of aluminum is perfect for our sometimes harsh New England weather – unlike some metals, it won’t rust or deteriorate when faced with rain, snow, and seasonal temperature swings. It’s also wonderfully lightweight, making it easier to handle while you’re perched on a ladder or roof edge.
One of the biggest advantages of aluminum is the color selection. With over 30 standard colors available, you can match practically any roof or trim color scheme. We typically use H28 grade aluminum drip edge with a hemmed kicker, which provides increased hardness and durability. This higher-grade aluminum keeps its shape better over time and resists bending during seasonal temperature changes.
For more information about coordinating your drip edge with other exterior elements, check out our Gutter and Siding page.
Site Prep & Safety
Before you climb that ladder, proper preparation will make your aluminum drip edge installation go much more smoothly.
Safety first – always secure your ladder to the house and wear appropriate safety gear. A fall from even a single-story roof can cause serious injury, so take the time to set up properly.
Next, clean the roof edge thoroughly. Remove any old drip edge, pull out protruding nails, and clear away debris from the roof edge. This is also the time to repair any damaged fascia or roof decking – it’s much easier to fix these issues before the new drip edge goes on.
Have your underlayment ready to install immediately after placing the eave drip edge. In our Berkshire climate, proper sequencing is crucial to prevent ice dam damage.
When planning your ice barriers, ice and water shield should extend at least 24 inches inside the exterior wall line. Given our heavy snowfall, we often recommend going to 36 inches for extra protection against ice dams.
Finally, measure twice, cut once. Carefully measure your roof edges and plan your cuts to minimize waste. Remember to account for thermal movement by leaving a small 1/32″ gap when nailing aluminum drip edge. This prevents buckling during hot weather when the metal naturally expands.
With proper preparation and the right materials, you’ll be ready to install a drip edge that will protect your home for years to come.
Chris Battaini Roofing and Seamless Gutters services Berkshire, Hampden, Hampshire, and Franklin Counties in Massachusetts.
Step-by-Step Aluminum Drip Edge Installation
Let’s roll up our sleeves and get into the heart of the matter—the actual aluminum drip edge installation process. I’ll walk you through this step-by-step, just as we do for our customers in Berkshire County.
Aluminum Drip Edge Installation on New Roofs
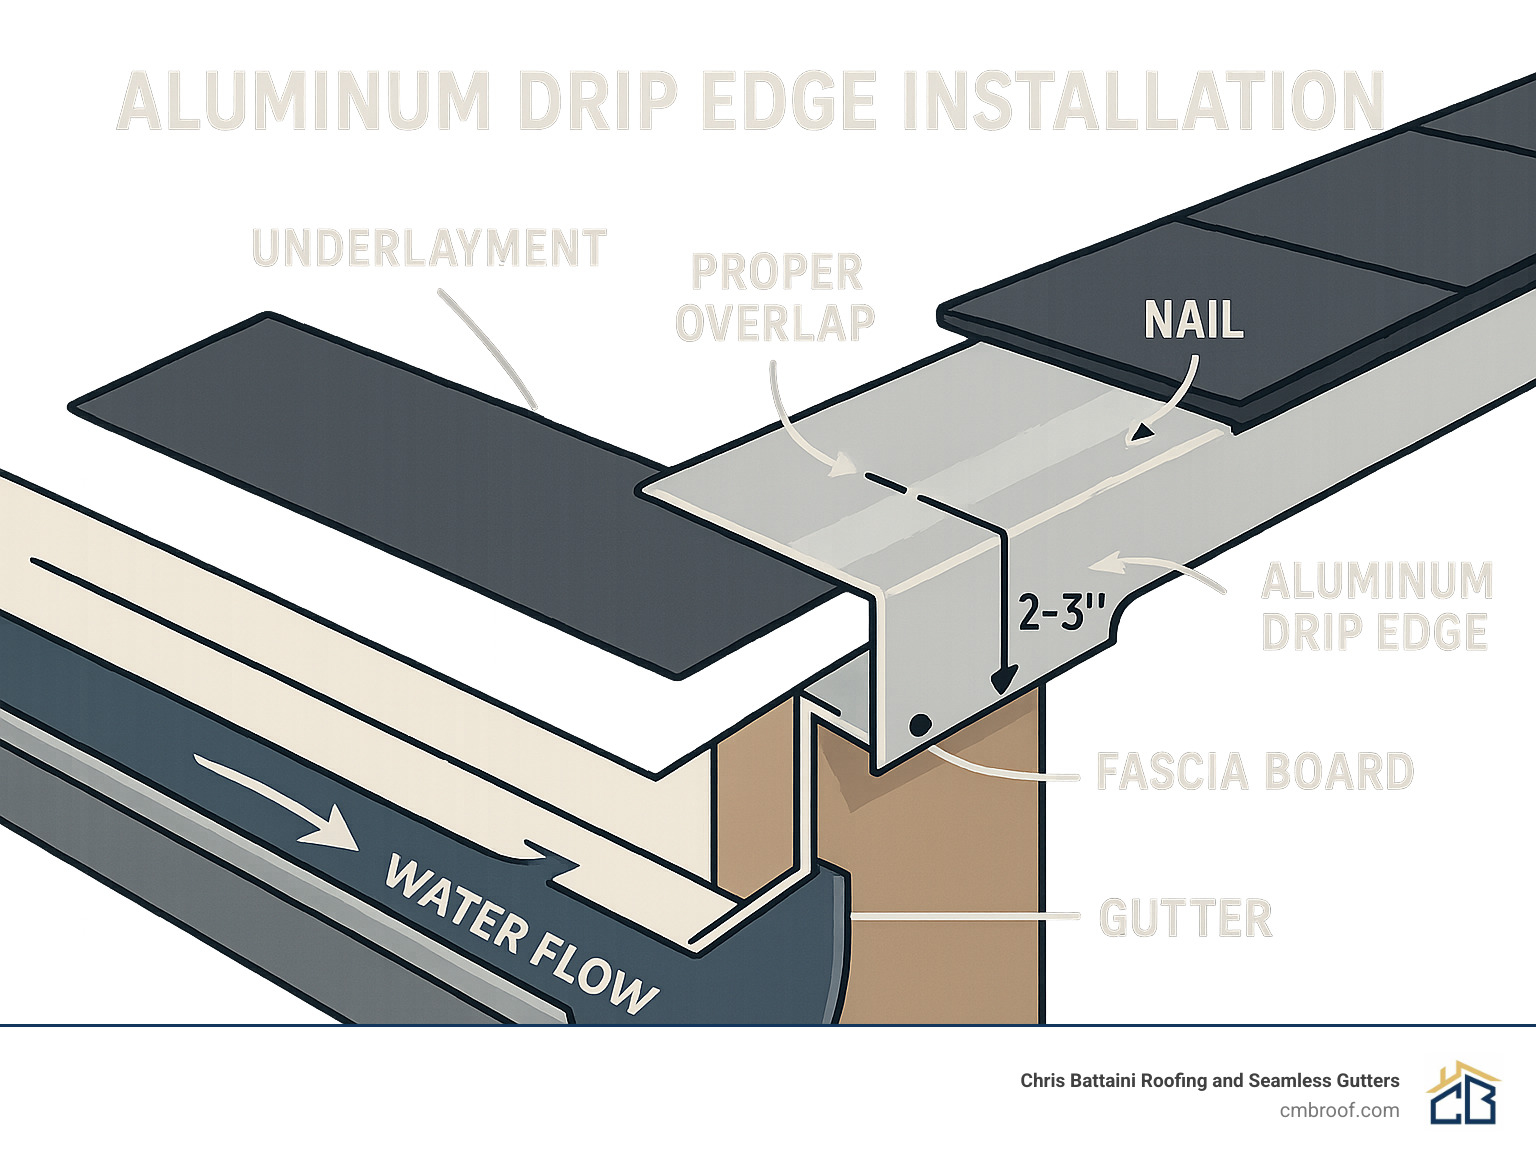
Starting with the eaves is crucial—this is where gravity does most of the work directing water away from your home. Begin by measuring your eave length carefully, trying to use full-length pieces whenever possible for a cleaner look with fewer seams.
Position your drip edge with the flange sitting nicely on the roof deck and the edge extending over your fascia. Here’s a pro tip: leave about 3/8″ to 1/2″ gap between the drip edge and the fascia. This small space actually improves water diversion and prevents capillary action from drawing moisture back toward your home.
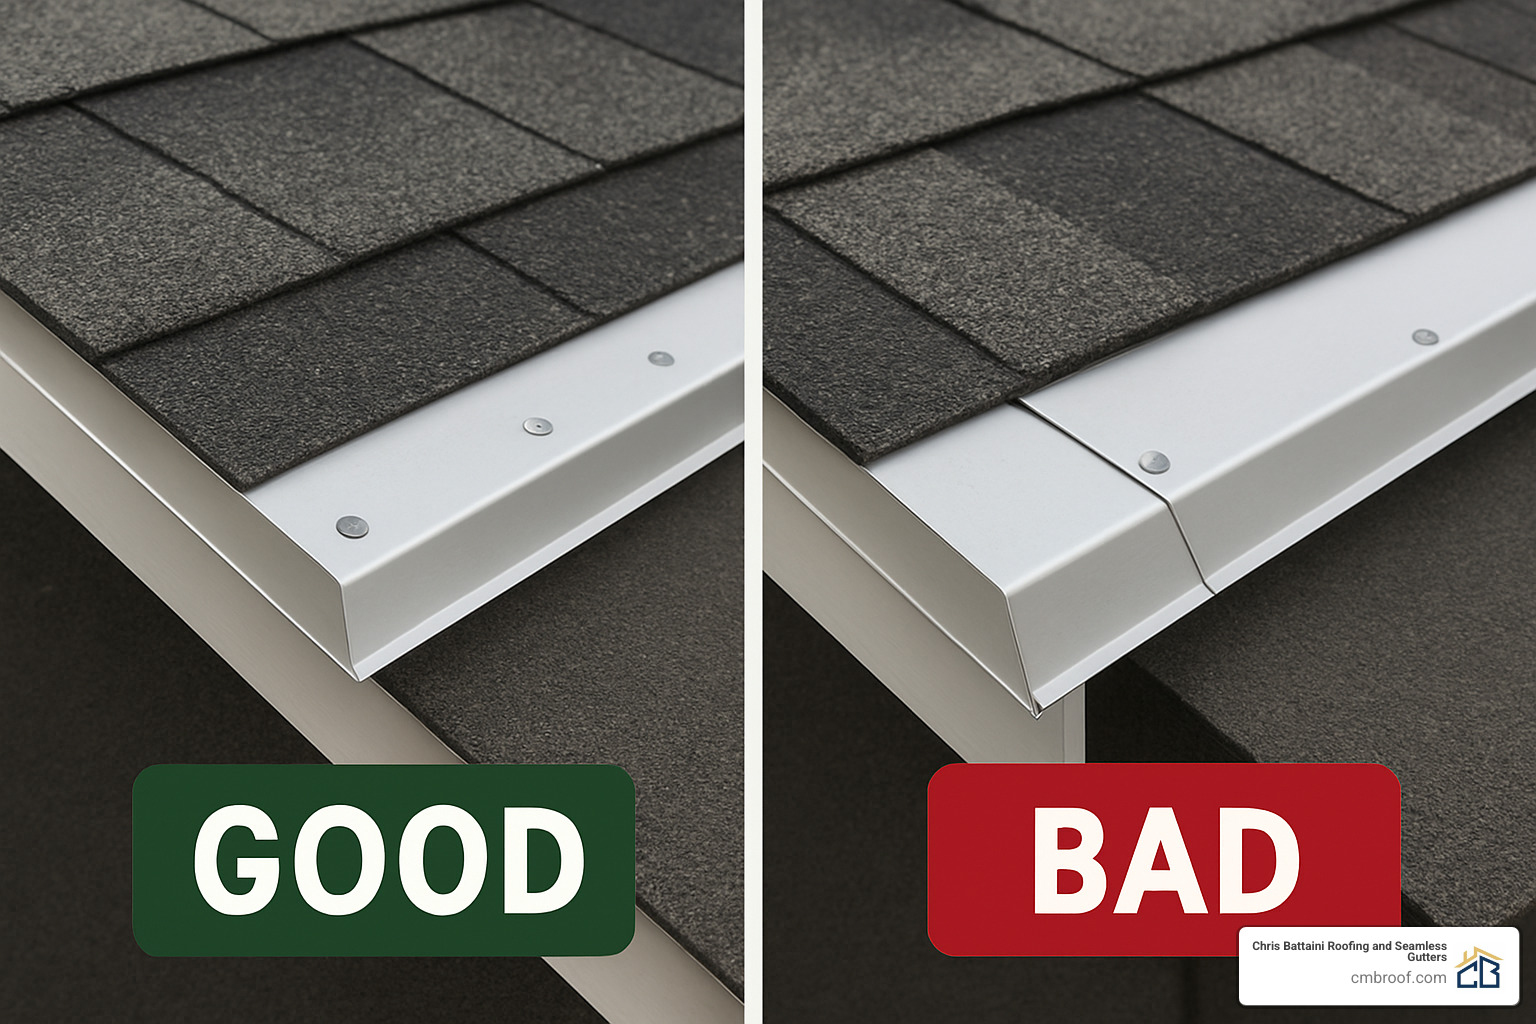
When securing the drip edge, place your first nail about 4 inches from the end, then space additional nails every 12-18 inches along the length. When you need to join two pieces, create an overlap of 2-3 inches, always positioning it so water flows over the joint rather than into it—think of it like shingles on your roof.
For corners, a clean V-shaped notch allows the drip edge to bend smoothly. Take your time with corners—they’re often where leaks begin if not done properly.
Once your eave drip edge is installed, immediately apply your ice and water shield directly over it. Here in our Berkshire County climate, we recommend extending this protection at least 24-36 inches inside the exterior wall line to guard against ice dams. For the remaining roof area, install your underlayment over the ice and water shield with proper overlaps.
Now for the rake edges—and here’s where sequencing matters. Unlike the eaves, rake drip edge goes OVER the underlayment, not under it. Secure it the same way, with nails every 12-18 inches. When you reach the peak, overlap the drip edges from both sides and seal the joint with a dab of roofing cement for extra protection.
Finally, install your starter course of shingles along the eaves, making sure they overhang the drip edge by ¼” to ¾”—not too much, not too little—before continuing with your regular shingle installation.

Retrofit Aluminum Drip Edge Installation Without Removing Shingles
Adding drip edge to an existing roof requires a gentle touch. Start by carefully lifting the first row of shingles using a flat pry bar. Be especially careful in cold weather when shingles can become brittle.
Clean the roof edge thoroughly, removing any old fasteners, roofing cement, or debris. Then, with a smooth motion, slide your new drip edge under the lifted shingles and position it properly over the fascia board. Sometimes you’ll need to make angle cuts for a perfect fit—take your time with this step.
Secure your new drip edge with nails placed where the shingles will cover them. If your existing shingles have self-sealing strips (most do), you might need to apply a small amount of roofing cement to help them reseal after being lifted.
Don’t forget to seal all joints and corners with roofing cement for that extra water-tight protection. This retrofit approach gives you the benefits of drip edge without the expense of replacing your entire roof.
Eaves vs Rakes: Sequencing & Layering
The “under-over rule” is something I emphasize with all our crew members: drip edge goes UNDER underlayment at eaves but OVER underlayment at rakes. This sequence works with gravity to ensure proper water flow and provides defense against wind uplift at the rakes.
At corners where eaves meet rakes, extend the eave drip edge 6-8 inches up the rake. When you install the rake drip edge, overlap it over the eave piece, creating a continuous water barrier that won’t let moisture sneak in at these vulnerable transitions.
Valley areas require special attention too. Install your drip edge before the valley flashing, extending it 6-8 inches up the valley. This creates a smooth pathway for water flowing from the valley to the eave.
Fastening, Overlaps & Thermal Movement
The key to lasting aluminum drip edge installation is proper fastening. Place your nails in the upper portion of the drip edge flange, about 1-2 inches from the bend. This positioning provides maximum holding power while staying far enough from the edge to prevent splitting.
I always tell our crew to use the “hang nail” technique—don’t drive the nails completely flush against the metal. Instead, leave about 1/32″ of space to allow for thermal expansion and contraction. This tiny gap prevents buckling during temperature changes, which is especially important in our New England climate where we can see 100-degree temperature swings between seasons.
When overlapping sections, maintain a 2-3 inch overlap with the upper piece overlapping the lower piece. This natural shingling effect ensures water flows over joints rather than into them. A small bead of roofing cement at these overlaps adds extra protection against wind-driven rain.
For more detailed information about securing metal roofing components properly, check out our page on Attaching Metal Roofing.
Pro Tips, Common Mistakes & Ongoing Care
Even the most experienced roofers can slip up during aluminum drip edge installation. After installing hundreds of drip edges across Berkshire County, we’ve collected some wisdom worth sharing:
Those clean, professional-looking installations don’t happen by accident. Try pre-bending your corners on solid ground before climbing up with them—you’ll get much cleaner edges than trying to bend them in place. For those long stretches of eave, a chalk line is your best friend for keeping everything straight and true. And here’s a little secret: when cutting aluminum for corners, make deep V-shaped cuts rather than shallow ones. They create cleaner bends that look better and protect better.
If you’re in one of our windier areas (like the hilltowns), consider tightening up your nail spacing to 8-10 inches apart instead of the standard 12-18. And for a more polished appearance, try to place any joints at corners or less visible areas of your home.
The most common mistake we see? Over-driving those nails. It’s tempting to hammer them flush, but this warps the drip edge and prevents it from expanding and contracting naturally with temperature changes. Aluminum moves quite a bit between our freezing winters and hot summers.
Another frequent error is improper overlapping—always overlap in the direction water flows, just like shingles. And please, don’t mix up the sequence: eaves go in first (under underlayment), rakes second (over underlayment). Those poorly cut corners might seem minor, but they create perfect entry points for water. And skipping sealant at joints and corners? That’s just asking for leaks down the road.
Ongoing Care
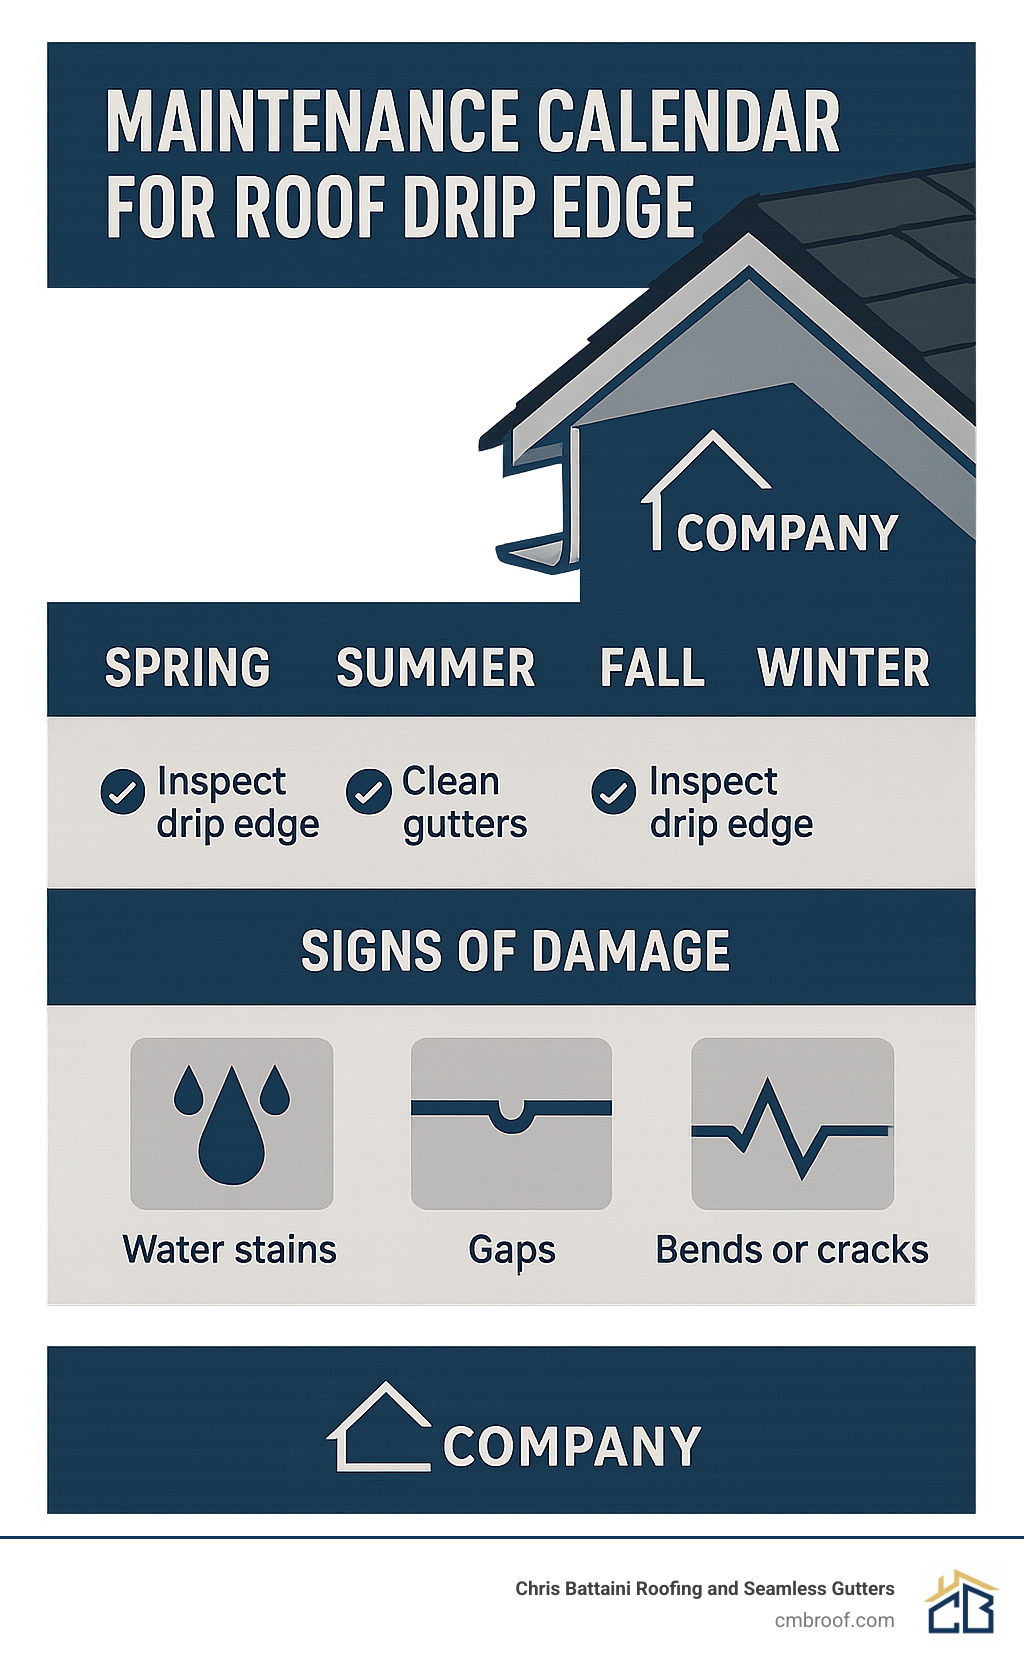
The good news about aluminum drip edge is that once it’s properly installed, it needs very little attention. That said, we recommend a quick annual inspection:
Give your drip edge a once-over each spring, checking for any sections that might have worked loose over winter. Look closely for any dents or bends—especially after big storms or if your landscaper got a little too enthusiastic with the weed trimmer. While you’re at it, clear away any leaves or debris that might be trapping moisture against the metal.
If your aluminum drip edge is painted, touch up any scratches you find to prevent corrosion from getting started. And take a close look at any sealant you applied at joints or corners—our freeze-thaw cycles can be tough on caulking.
Watch for warning signs that something’s not right: water stains creeping up your fascia board, visible gaps between the drip edge and roof deck, or sections pulling away from the roof. These are all telling you it’s time for some attention.
Aluminum vs Other Metals: Cost & Longevity
While we prefer aluminum for drip edge in our Berkshire County climate, you do have other options. Here’s how they stack up:
Aluminum hits the sweet spot for most homes in our region. It typically runs $2-$6 per linear foot installed (based on internet data) and lasts 20-30+ years. Its lightweight nature makes installation easier, and its natural corrosion resistance stands up to our wet New England weather beautifully. The wide range of available colors means we can match virtually any home’s color scheme. The only real downside? It can dent if hit hard enough.
Galvanized steel costs roughly $2-$7 per linear foot installed (based on internet data) with a lifespan of 15-25 years. It’s stronger than aluminum and offers good durability, but eventually, even with galvanization, it will begin to rust. It’s also significantly heavier to work with.
Copper is the premium choice at $8-$20 per linear foot installed (based on internet data). With a potential lifespan of 50+ years, it’s truly an investment in your home. Over time, it develops that gorgeous green-blue patina that many homeowners love. The drawbacks? It’s expensive and requires special installation techniques to accommodate its unique properties.
Vinyl is the budget option at $1-$3 per linear foot installed (based on internet data), lasting about 10-15 years. While inexpensive and easy to cut, we rarely recommend it for our climate—it becomes brittle in cold weather and can crack during our harsh winters.
Always check compatibility when selecting materials. For instance, aluminum drip edge shouldn’t directly contact certain metals due to potential galvanic corrosion that can eat away at both materials.
DIY or Hire a Pro?
While aluminum drip edge installation can be tackled by handy homeowners, it’s worth weighing the pros and cons:
The DIY route requires comfort working at heights, proper tools and safety equipment, and attention to detail. Incorrect installation can lead to water damage and might void your roof warranty.
Professional installation brings peace of mind. We ensure proper sequencing and overlap, guarantee compliance with building codes and manufacturer specifications, bring proper safety equipment and expertise, and typically include a workmanship warranty. Plus, what might take a homeowner a full weekend, our experienced teams can often complete in a day.
Complex situations like valleys, dormers, or multi-level roofs present particular challenges. In these cases, professional installation is strongly recommended—the complexity increases the risk of mistakes that could lead to water damage.
At Chris Battaini Roofing and Seamless Gutters, our owner-led teams ensure every aluminum drip edge installation is performed to the highest standards. Learn more about our Residential Roofing Service for your drip edge needs.
Frequently Asked Questions about Aluminum Drip Edge
Do I install drip edge under or over underlayment?
This is probably the most common question I hear on job sites, and it trips up even experienced DIYers. The answer depends on which part of your roof you’re working on:
- At the eaves (horizontal edges): Install drip edge FIRST, then place underlayment OVER it. This crucial sequence allows any water that sneaks beneath your underlayment to flow over the drip edge and safely into your gutter.
- At the rakes (sloped edges): Do the opposite! Install underlayment FIRST, then place drip edge OVER it. This prevents wind-driven rain from getting pushed under your drip edge and into your roof structure.
This isn’t just our preference or a “Berkshire way” of doing things—it’s specifically required by building codes and shingle manufacturers. Getting this sequence wrong is one of the fastest ways to void your roof warranty and invite water damage into your home.
Can I use steel nails with aluminum drip edge?
Yes, you can use steel nails with aluminum drip edge installation in most cases. While you might have heard concerns about galvanic corrosion (the reaction between dissimilar metals), in this specific application, the risk is minimal for several practical reasons:
First, the nails are typically covered by shingles, which keeps them protected from moisture. Second, the actual contact area between nail and drip edge is quite small. And third, our Berkshire County homes rarely experience the perfect storm of temperature and moisture conditions that would trigger significant galvanic corrosion.
For the best installation, we recommend using panhead roofing nails (steel, galvanized, or aluminum) with at least ¾” penetration into your roof deck. A roofing coil gun works much better than a framing gun, which tends to drive nails too deep and can damage your drip edge.
If you’re particularly concerned about metal compatibility or have a home near the coast where salt exposure is an issue, aluminum nails are readily available and will completely eliminate any potential for galvanic reaction.
How much should shingles or metal panels overhang the drip edge?
Getting this measurement right is crucial for proper water management. Your shingles should overhang the drip edge by ¼” to ¾” – not more, not less. This seemingly small detail serves several important functions:
It ensures water drops directly into your gutter rather than running back against the fascia board. It creates just enough distance for surface tension to break, allowing water to drop freely. And it prevents wind-driven rain from being forced up under your shingles.
For metal roofing panels, we recommend a slightly more generous overhang of approximately 1″ beyond the drip edge. Metal panels shed water differently than shingles, and this extra distance accommodates their unique water-flow characteristics.
I’ve seen the consequences of getting this wrong on many Berkshire homes: Too little overhang and water wicks back under the roof edge, eventually rotting your decking. Too much overhang and your shingles become vulnerable to cracking under winter ice loads or lifting during our occasional high winds.
Proper aluminum drip edge installation is about getting these small details right – they add up to years of protection for your home.
Chris Battaini Roofing and Seamless Gutters services Berkshire, Hampden, Hampshire, and Franklin Counties in Massachusetts.
Conclusion
Aluminum drip edge installation might seem like a small detail in your roofing system, but it’s truly one of those “ounce of prevention worth a pound of cure” situations. This humble metal strip stands as a silent guardian, directing water away from your home’s vulnerable areas and potentially saving you thousands in water damage repairs.
Throughout this guide, we’ve walked through the critical steps of proper installation: eaves first (tucked under the underlayment), rakes second (placed over the underlayment), with careful attention to overlaps and proper fastening techniques. These details matter tremendously, especially here in our Berkshire County climate where snow, ice, and freeze-thaw cycles put extra stress on our homes.
I’ve seen how homes with properly installed drip edge weather our New England seasons beautifully, while those without it often develop fascia rot and premature shingle damage. The modest investment in quality materials and correct installation typically pays for itself many times over during your roof’s lifetime.
At Chris Battaini Roofing and Seamless Gutters, we believe in doing things right the first time. Our owner-led teams take pride in those small-but-crucial details that make the difference between a roof that lasts decades and one that develops problems after just a few years. When we install drip edge, we’re thinking about how your home will handle that heavy snow melt in March or those driving autumn rainstorms.
Whether you’re planning a complete roof replacement or looking to retrofit drip edge to better protect your existing roof, we’re here to help with expert advice and meticulous craftsmanship. For more information about our comprehensive metal roofing solutions, visit our Metal Roofing page.
Chris Battaini Roofing and Seamless Gutters proudly serves Berkshire, Hampden, Hampshire, and Franklin Counties in Massachusetts, bringing peace of mind with every roof we protect.
