-
10 Wendell Ave Extension Pittsfield, MA 01201
-
210 Columbia St., Lee, MA 01238

Metal roofing installation is a smart investment for any property owner looking for durability, energy efficiency, and aesthetic appeal. For those wanting immediate guidance, here’s what you need to know:
Metal Roof Installation Basics:
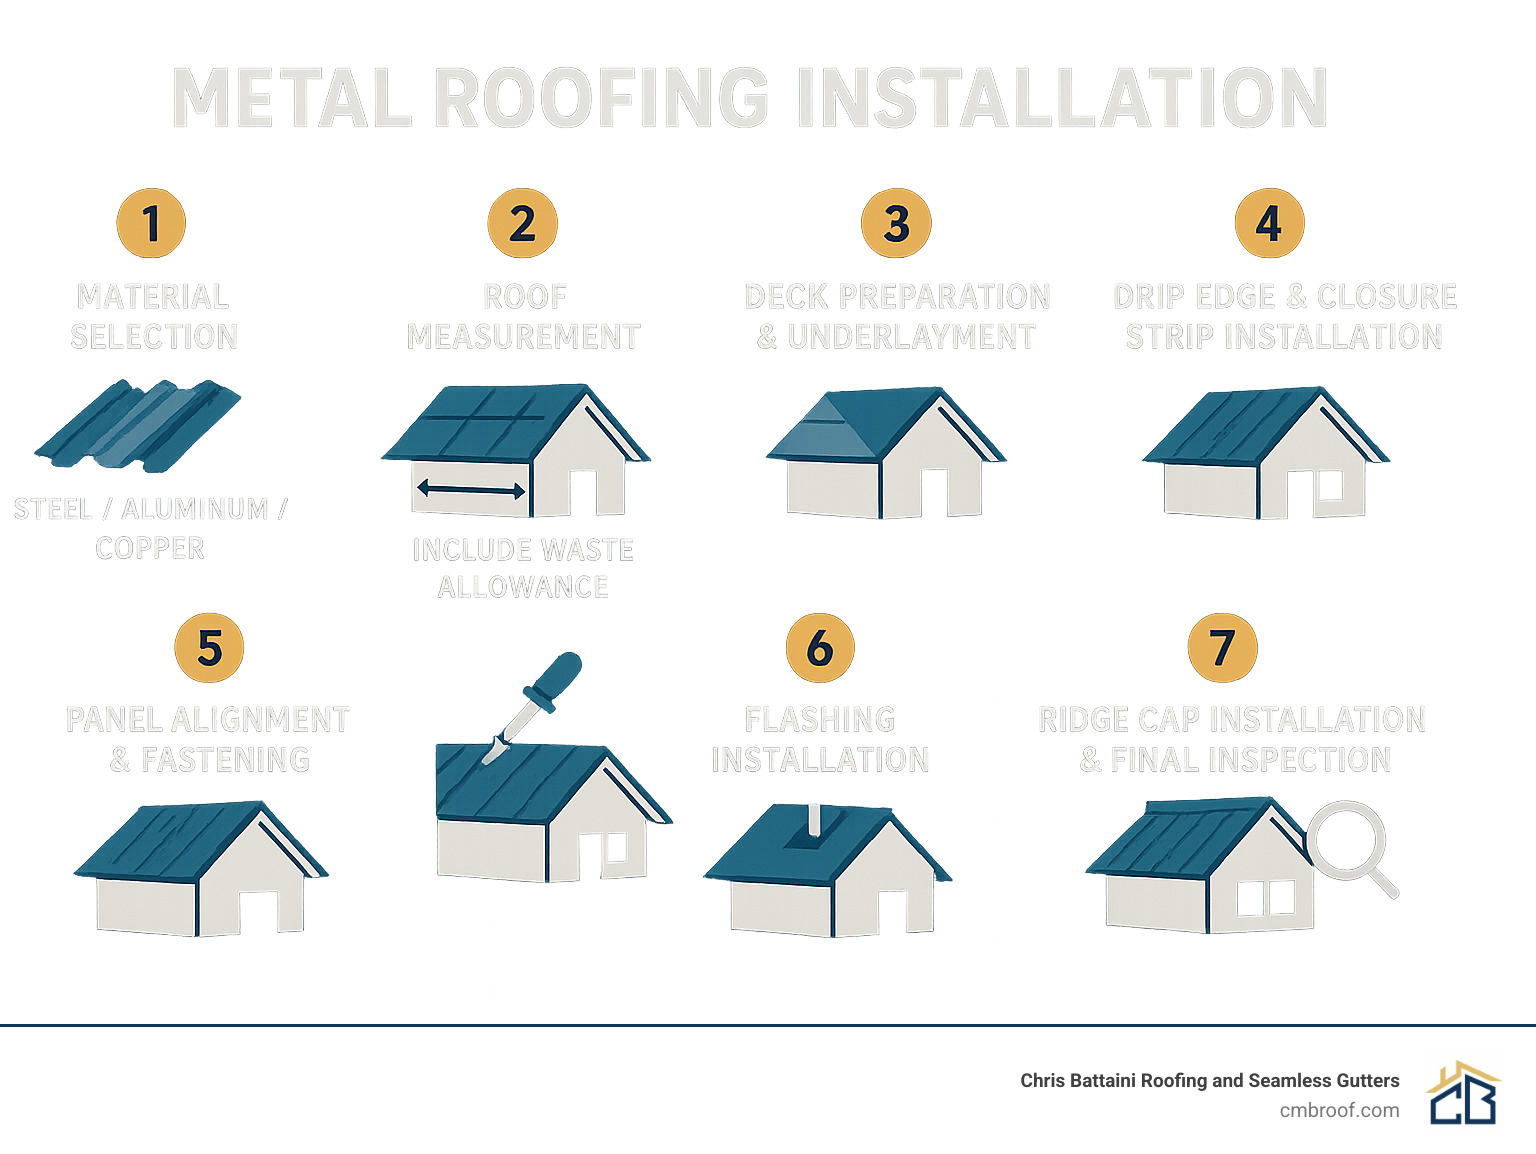
1. Select appropriate metal type (steel, aluminum, copper, zinc)
2. Measure roof and add 10% for waste
3. Install synthetic underlayment with proper overlaps
4. Apply drip edge and closure strips
5. Align first panel square to eave
6. Fasten panels with neoprene-washer screws
7. Install ridge caps and flashing
Metal roofs stand out among roofing options for good reason. With a lifespan of 40-70 years (compared to asphalt’s 12-20 years), metal roofs offer exceptional longevity. They’re also remarkably lightweight—up to 50% lighter than traditional asphalt shingles—reducing structural load and making installation easier.
Beyond durability, metal roofs deliver significant energy benefits. They reflect solar heat, potentially reducing cooling costs by 10-25%. This reflective quality makes them an excellent “cool roof” option that can help buildings qualify for LEED credits.
Safety and weather resistance are additional advantages. Properly installed metal roofs can withstand wind gusts up to 140 miles per hour, making them ideal for areas prone to severe weather.
As one installer noted, “It’s all about the layers. When it rains, a roof sheds water from one layer to the next until it runs off the roof.” This layering principle is fundamental to successful metal roof installation.
Metal roofing is highly sustainable too. Most panels contain 25-95% recycled content and are 100% recyclable at the end of their life. This recyclability, combined with their energy efficiency and longevity, makes metal roofing an environmentally responsible choice.
While the initial cost is higher than asphalt shingles, the long-term value is clear. Metal roofs require minimal maintenance, resist moss and mold, and can significantly increase your home’s resale value.
Choosing the perfect metal roofing system isn’t just about picking something that looks nice – it’s about finding the right match for your home, climate, and budget. Having installed hundreds of metal roofs across the Berkshires, I’ve seen how the right choice makes all the difference.
“Different roof types require specific installation techniques,” notes the Metal Construction Association. “Always consult the manufacturer’s instructions.”

When exploring metal roofing installation options, you’ll encounter three main panel profiles:
Standing Seam Panels create that classic, clean look with raised seams that snap together. What I love about these is their hidden fastener system – no screws penetrate the panels, dramatically reducing leak potential. These are perfect for homes throughout the Berkshires where weather protection is paramount.
Corrugated Panels offer that traditional wavy pattern many associate with metal roofing. They’re budget-friendly and straightforward to install, making them ideal for barns, sheds, or workshops. These use exposed fasteners, which require proper maintenance over time.
Modular Panels give you the best of both worlds – they mimic the appearance of slate, tile, or wood shakes while providing metal’s durability. For historic homes in Stockbridge or Great Barrington, these panels maintain traditional character with modern protection.
Your choice should consider several key factors:
Wind Uplift Resistance matters tremendously in our New England weather. Standing seam systems with mechanical seams perform exceptionally well during those blustery Berkshire winters.
Snow Load Capacity is non-negotiable for our region. When examining panels, “the closer and deeper the panel ribs are, the stronger it is,” as industry experts point out. We’ve installed systems specially designed to handle heavy snow loads in higher elevation areas like Windsor and Peru.
Coastal Considerations come into play for properties near saltwater. If you’re closer to the coast, aluminum or specially coated steel panels resist corrosion significantly better than standard steel options.
Aesthetics should complement your home’s architecture. A sleek standing seam might look stunning on a modern Williamstown home, while a traditional Lenox Victorian might call for modular panels that honor its historic charm.
Beyond the profile, the actual metal material dramatically impacts performance, longevity, and budget:
Galvalume Steel represents the sweet spot of affordability and durability. This steel coated with an aluminum-zinc alloy offers excellent corrosion resistance with standard coatings typically AZ50 or AZ55 (0.8–0.9 mil per side). With proper metal roofing installation, expect 30-50 years of protection at the most reasonable price point.
Aluminum shines in coastal environments thanks to its natural corrosion resistance. While pricier than steel, its 50+ year lifespan often justifies the investment. One installation tip we’ve learned: aluminum expands and contracts significantly more than steel, requiring specific techniques to accommodate this movement.
Copper stands as the premium choice, developing that gorgeous green-blue patina over decades. I’ve installed copper roofing on several historic Stockbridge homes, and while the upfront cost is substantial, its potential 200-year lifespan makes it surprisingly economical in the very long run.
Zinc offers an excellent middle ground with 80-100 years of protection and a beautiful matte patina. Its self-healing properties for scratches make it remarkably low-maintenance and sustainable.
When considering thickness, metal roofing is measured by gauge – and counter-intuitively, lower numbers mean thicker metal. Most homes do well with 24-29 gauge, while commercial buildings typically require 22-24 gauge for added strength.
The finish quality matters tremendously. As the Metal Construction Association reminds us, “No field-applied paint or touch-up will ever match the durability of factory-applied coatings.” For optimal color retention and protection, look for high-quality finishes like Kynar 500® (PVDF) with 70% resin content.
For environmentally conscious homeowners (and there are many in Western Massachusetts!), metal roofing delivers impressive sustainability credentials. Most panels contain at least 25% recycled material and remain 100% recyclable at end-of-life – something that can’t be said for asphalt shingles sitting in landfills for centuries.
Chris Battaini Roofing and Seamless Gutters proudly serves Berkshire, Hampden, Hampshire, and Franklin Counties in Massachusetts, as well as Southern Vermont.
Accurate planning and measurement make or break your metal roofing installation. As the old contractor’s wisdom goes, “Measure twice, cut once” – nowhere is this more important than with custom-ordered metal panels that can’t be easily adjusted on-site.
Start by taking a good look at your roof’s shape and complexity. A simple gable roof is straightforward, but add dormers, valleys, or multiple roof planes, and your planning needs increase significantly. For each section of your roof, you’ll need to:
First, measure the rake (the distance from ridge to eave) with a long tape measure. Next, determine the width, making sure to include any overhang you want for your finished roof. Then calculate your slope factor – this accounts for the actual surface area being larger than the flat footprint. The formula is √(rise² + run²) ÷ run. For instance, if you have a fairly steep 12/12 pitch (45-degree angle), your slope factor is 1.414, meaning a 10’×10′ section actually requires about 141 square feet of material.
“Always start metal panels square with the eave,” says roofing expert David Bitan. “That first panel is your template – if it’s off even slightly, the error multiplies across the entire roof.”
When ordering materials, be generous with your calculations. Add at least 10% extra for waste, overlaps, and the occasional mistake. That 2,000 square foot roof? Order about 2,200 square feet of materials. This small buffer prevents the frustration and delays of running short mid-project – something we’ve learned from experience serving homeowners throughout Berkshire County.
Create a detailed roof map showing panel direction, overlap points, all penetrations like vents and chimneys, and where different flashings will be needed. Use chalk lines on the roof deck to transfer these measurements during installation.
Don’t forget the paperwork! Building codes and permit requirements vary widely across Western Massachusetts and Southern Vermont. Some towns have specific wind resistance standards, while others focus on snow load capacity. Here at Chris Battaini Roofing, we handle all permitting requirements for our customers, ensuring everything is properly filed and approved before we begin work.
More info about Residential Roofing
Having the right tools ready makes your metal roofing installation smoother, safer, and more professional. Here’s what you’ll need:
Safety comes first in any roofing project. A proper fall protection harness and anchor points are non-negotiable, along with non-slip footwear that gives you confident footing on metal surfaces. Add heavy-duty gloves (the rubber-coated ones provide the best grip on metal panels), safety glasses to protect from metal shavings, and a hard hat for complete protection.
Power tools make the job possible. A drill with a clutch mechanism is essential – this prevents over-tightening fasteners, a common mistake that damages panels. “Set your drill clutch correctly,” advises Mike Berner, a veteran installer. “You want to compress the neoprene washer just to the edge without deforming it.” You’ll also need an impact driver, a circular saw with metal-cutting blades, and cordless metal shears for clean cuts.
Hand tools handle the precision work. Aviation snips in straight, left, and right-cutting varieties let you make detailed cuts. A hand seamer bends metal precisely for flashing. Add a rubber mallet, chalk line, tape measure, framing square, and utility knife to your toolkit.
Specialty items solve roofing challenges. A magnetic sweep tool collects dangerous metal shavings that could otherwise cause rust stains or injuries. Butyl tape creates watertight seals, while closure strips fill the gaps in corrugated panels. Panel hemming tools create professional bends, and ladder brackets provide stable access.
Fasteners and accessories complete your materials list. You’ll need neoprene-washer head screws (color-matched to your panels), galvanized or stainless steel roofing nails, underlayment, drip edge, ridge caps, valley flashing, and pipe boots for any penetrations.
At Chris Battaini Roofing and Seamless Gutters, we bring professional-grade equipment to every job throughout Berkshire, Hampden, Hampshire, and Franklin Counties. Chris personally oversees each project, ensuring the right tools are on hand for the specific challenges of your roof. This attention to detail is why our installations stand the test of time – and New England weather.
Proper deck preparation and underlayment installation form the critical foundation of any successful metal roofing installation. As Mike Berner wisely notes, “It’s all about the layers. When it rains, a roof sheds water from one layer to the next until it runs off the roof.”
Begin by thoroughly inspecting the roof deck. If you’re installing over an existing roof, you have two options:
For new construction or after tear-off, inspect the deck for:
– Damaged or rotted sheathing (replace as needed)
– Protruding nails or screws (remove or drive flush)
– Proper ventilation (ensure adequate intake and exhaust)
– Level surface (shim low spots to prevent ponding)
“A proper substrate is crucial for metal roofing performance,” explains roofing expert Mark Spelman. “The layout never lines up properly without a solid, even foundation.”
Underlayment is your roof’s second line of defense against moisture. For metal roofing, synthetic underlayments have largely replaced traditional felt paper due to their superior performance and longevity.
Follow these steps for proper underlayment installation:
“Synthetic underlayment can outlast the metal roof itself, up to 30+ years,” notes an industry expert. “Using tar or felt paper underlayment is an outdated practice that should be avoided.”
After underlayment installation, install drip edge along all eaves and rakes. Properly overlapping these components ensures water flows away from the roof deck and into gutters.
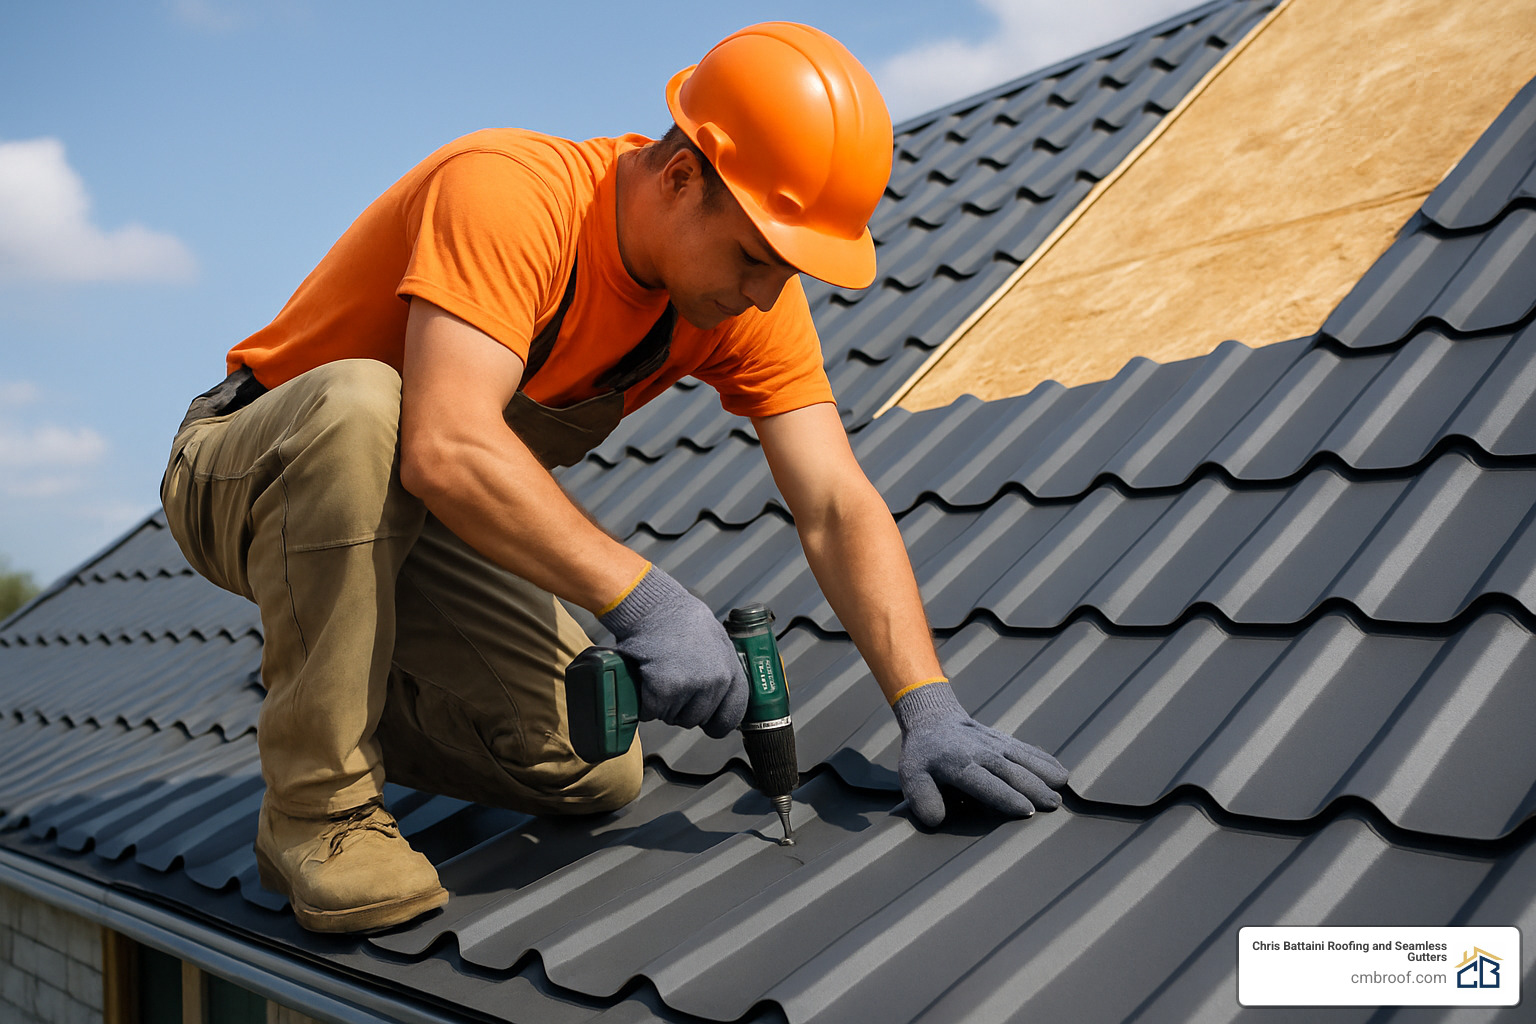
To maximize the effectiveness of your underlayment during metal roofing installation, follow these industry best practices:
In high-wind regions like the hilltowns of Western Massachusetts, consider using adhesive or mechanically attached underlayment systems specifically designed for these conditions.
“Follow underlayment manufacturer guidelines strictly,” advises the Metal Construction Association. “The performance of the entire roof system depends on proper installation of each component.”
At Chris Battaini Roofing and Seamless Gutters, we use only premium synthetic underlayments throughout our service area, ensuring maximum protection and longevity for homes in Berkshire, Hampden, Hampshire, and Franklin Counties.
Time-saving tips from Sherwin Williams
The panel installation phase is where your metal roofing installation truly comes to life. This is the moment when all your careful planning and preparation pays off as the roof takes visible form. Getting the alignment, fastening, and flashing right isn’t just about creating a beautiful roof—it’s essential for ensuring decades of weather protection.
In our years of installing metal roofs throughout Western Massachusetts and Southern Vermont, we’ve learned that proper panel alignment starts with understanding your local weather patterns.
Begin your installation at the gable end opposite to the prevailing wind. This simple but crucial step prevents wind-driven rain from being forced under the panel laps. For most homes in the Berkshires region, this typically means starting on the east side of the roof.
“Begin at the gable end opposite to the prevailing wind to keep rain from being driven under the panel laps,” as industry experts consistently advise.
For perfect panel alignment, follow these proven steps:
First, establish a square reference line using the reliable 3-4-5 method to snap a perfectly square chalk line along the eave. This initial line is critical—if your first panel isn’t perfectly square, every subsequent panel will compound the error.
When positioning that crucial first panel, align it carefully with your chalk line, ensuring it’s square to both the eave and rake. This first panel creates the template for your entire roof.
For proper water runoff, panels should overhang the eave by 1 to 1½ inches when gutters are present, or up to 3 inches without gutters. Before laying panels, don’t forget to install foam closure strips along the eave to seal those corrugation gaps in the metal panels.
Proper fastening makes the difference between a roof that lasts for decades and one that develops problems within years. The details matter here:
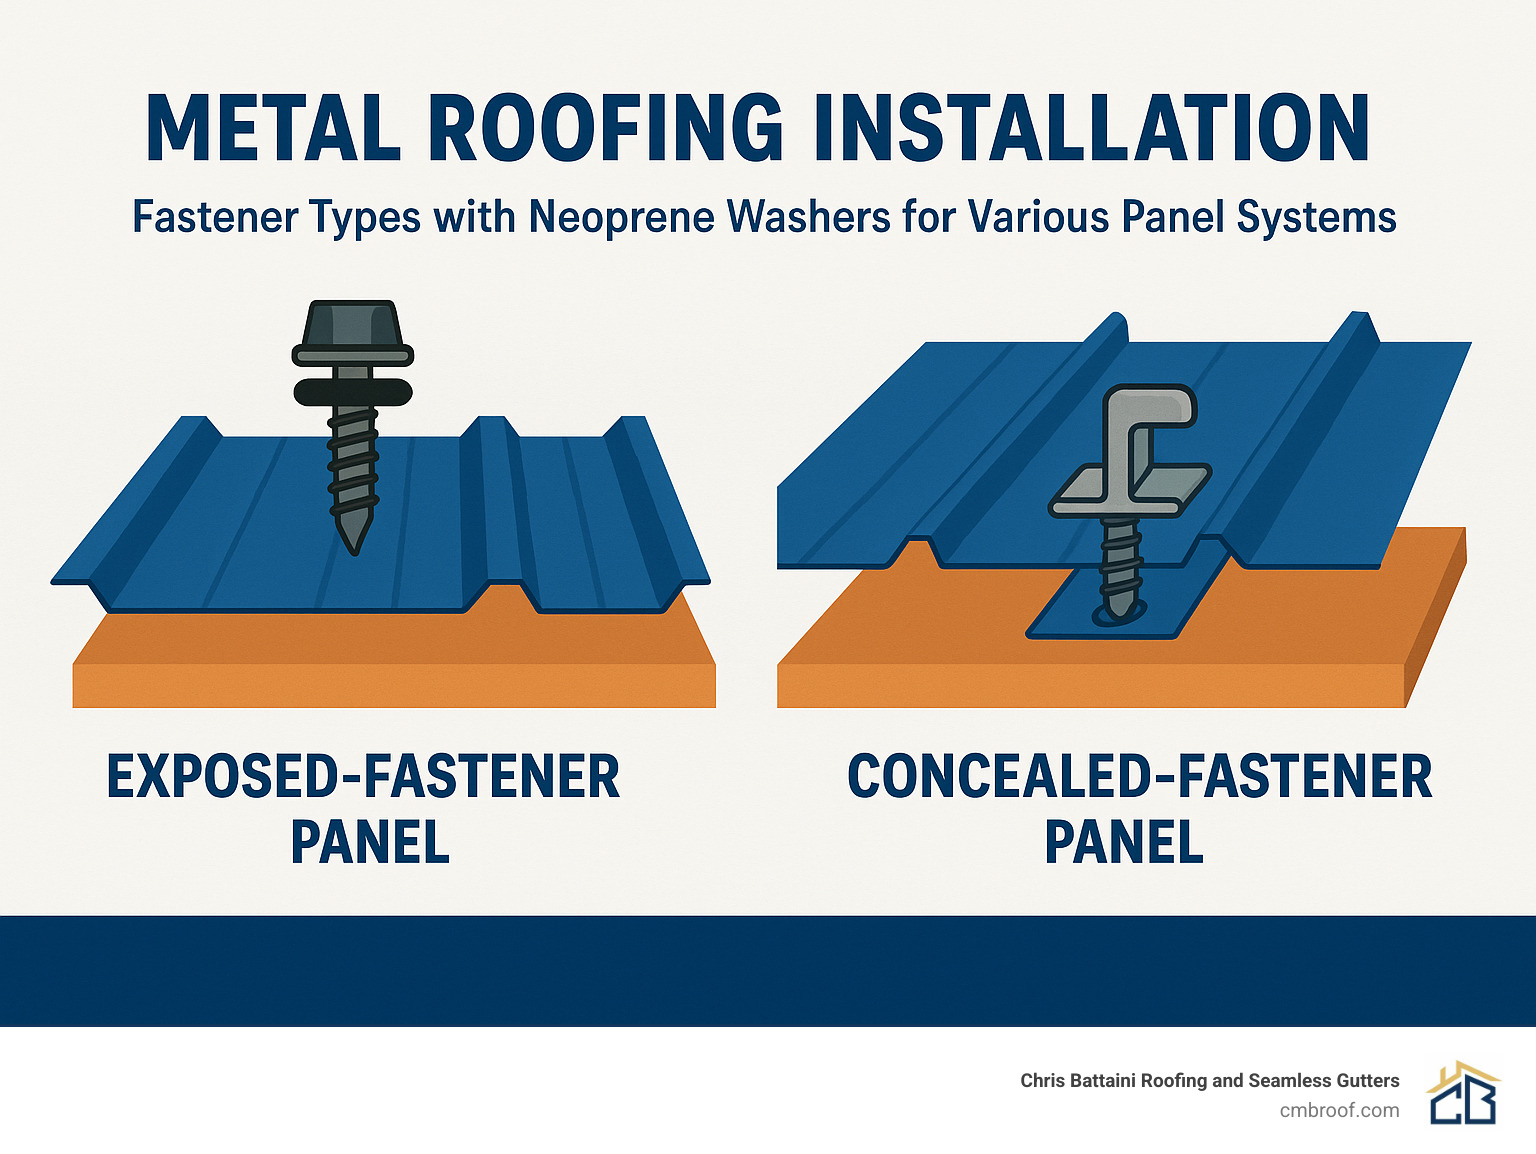
For exposed fastener systems like corrugated panels, use screws with neoprene or EPDM washers that match your panel color. For concealed fastener systems like standing seam, use only the manufacturer-specified clips and fasteners—substitutions can void warranties and compromise performance.
Fastener spacing typically ranges from 12-24 inches apart, depending on wind uplift requirements. In high-wind areas like the Berkshire mountains, we often recommend closer spacing for added security during our notorious winter storms.
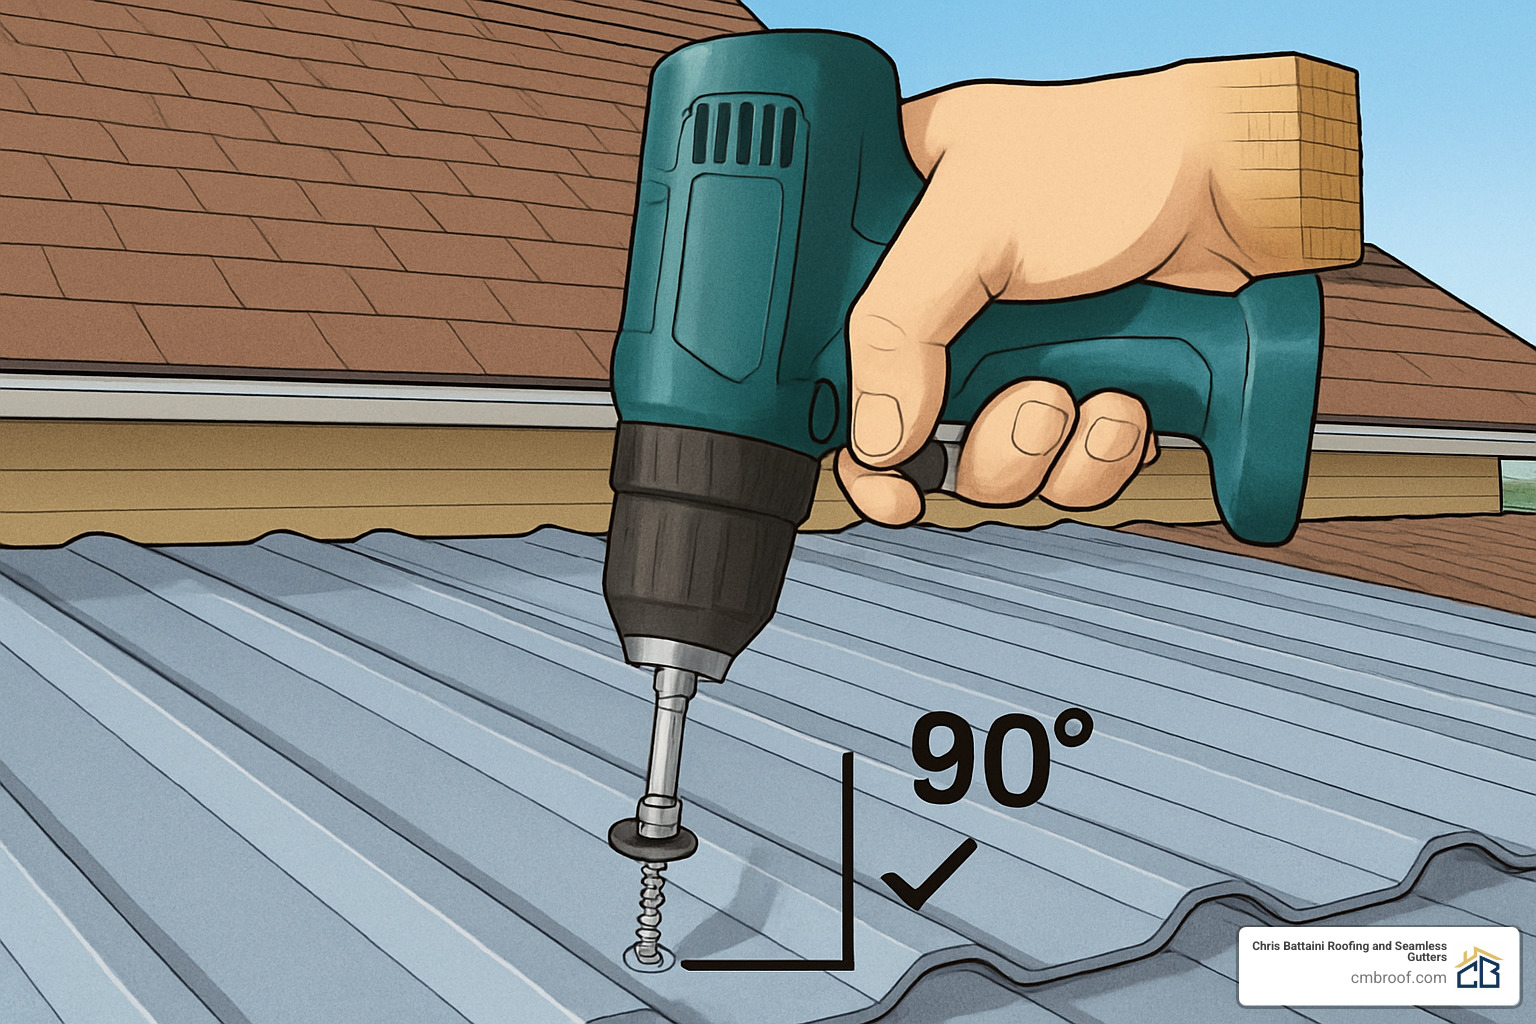
Achieving proper tension is perhaps the most technical aspect of fastening. Drive screws until the neoprene washer is compressed but not deformed. As one of our veteran installers puts it, “Seat screws flat—compress the gasket to the edge of the head without over-tightening.” When done correctly, the washer creates a perfect watertight seal without distortion.
Always place fasteners in the flat areas of panels, never at the top of ribs where water could pool and eventually cause leaks.
Think of flashing as your roof’s defensive armor against water intrusion. Each type serves a specific purpose:
Eave Flashing gets installed along the eave before panels to direct water into gutters. Gable/Rake Flashing protects the panel edges at gable ends from wind-driven rain. The Ridge Cap covers the peak where panels meet, often incorporating ventilation options for proper attic airflow.
Valley Flashing plays a critical role in directing heavy water flow where roof planes intersect. These areas receive concentrated runoff and require extra attention to detail. Sidewall/Endwall Flashing creates weathertight transitions where the roof meets vertical walls.
For roof penetrations like vents, skylights, and chimneys, specialized Penetration Flashing or “boots” create watertight seals. We always apply sealant tape or butyl caulk as specified by the manufacturer to ensure these potential weak points remain completely weathertight.
“Treat the roof system holistically to ensure compatibility of panels, sealants, and fasteners,” recommends the Metal Construction Association—advice we follow on every installation.
Even experienced installers can fall victim to these common pitfalls. Here’s how we avoid them:
Overtightened Screws are perhaps the most frequent mistake we see on DIY installations. When screws are driven too tight, they crush the neoprene washer, compromising its seal and creating a future leak point. The proper technique requires a gentle touch—drive screws until the washer just begins to compress.
Panel Creep occurs when panels gradually shift out of square during installation. We prevent this by measuring periodically to ensure panels remain parallel to the rake edge throughout the installation process.
Storage Stain happens before installation even begins. Improper storage can damage panels through moisture trapped between them. We always store panels lifted with free air circulation to prevent condensation damage.
Dissimilar Metals in contact with each other can cause galvanic corrosion—for example, copper runoff onto aluminum can cause rapid deterioration. We’re careful to use compatible materials throughout every roof system we install.
Walking Damage is all too common when installers aren’t careful about roof traffic. Our crews are trained to walk on panel flat areas, near supports, and always wear soft-soled shoes to prevent denting or scratching the metal surface.
Debris Neglect can lead to unsightly rust stains. Metal shavings left on the roof will rust and permanently stain the finish. We use a magnetic sweep to collect all metal debris daily during installation.
“Panels left outdoors with protective film can bake plastic into the metal, making removal difficult,” warns an industry expert. “Store panels under a breathable canvas and out of direct sun.”
Another valuable tip we follow: “Cut panels upside down to direct shavings to the underside, reducing top-surface cleanup.”
Throughout Berkshire County and Southern Vermont, we’ve seen how these proper installation techniques prevent common issues, ensuring decades of trouble-free performance for our customers.
Latest research on MCA Installation Manual
Safety during installation and long-term maintenance are essential aspects of metal roofing installation that ensure both installer wellbeing and roof longevity.
Metal roofing installation presents significant safety hazards. Always prioritize these safety measures:
“Always wear a safety harness and work from secure ladders or scaffolding,” emphasizes safety expert David Bitan. At Chris Battaini Roofing and Seamless Gutters, safety is our top priority on every job site throughout Western Massachusetts and Southern Vermont.
Once installation is complete, conduct a thorough inspection:
Metal roofs require minimal maintenance, but regular care extends their already impressive lifespan:
“Regular small inspections (including debris removal) are critical to prevent minor issues from becoming costly repairs,” notes maintenance specialists.
In the Berkshires and Southern Vermont, these additional considerations apply:
At Chris Battaini Roofing and Seamless Gutters, we provide comprehensive maintenance services throughout our service area, ensuring your metal roof delivers its full potential lifespan.
Can I install a metal roof over existing shingles?
Yes, in many cases metal roofing can be installed over one layer of existing asphalt shingles, provided the roof deck is in good condition and local building codes permit it. However, a complete tear-off is generally recommended to allow inspection and repair of the deck and proper underlayment installation. Throughout Berkshire County, we evaluate each situation individually to determine the best approach.
What is the average lifespan of a metal roof?
Metal roof lifespans vary by material: steel typically lasts 40-70 years, aluminum 50+ years, zinc 80-100 years, and copper up to 200 years with proper installation and maintenance. This significantly exceeds asphalt shingles’ typical 15-20 year lifespan. In the varied climate of Western Massachusetts and Southern Vermont, we’ve seen properly installed metal roofs perform exceptionally well for decades.
Which fasteners are best for metal roofing?
The best fasteners depend on your panel system. For exposed-fastener systems, use screws with neoprene or EPDM washers that match your panel color. For concealed-fastener systems like standing seam, use manufacturer-specified clips and fasteners. In all cases, fasteners should be corrosion-resistant and compatible with your metal panels to prevent galvanic reaction. At Chris Battaini Roofing, we use only premium fasteners designed specifically for each roofing system we install.
A successful metal roofing installation combines thoughtful planning, premium materials, precise techniques, and meticulous attention to detail. By following the five methods we’ve explored in this guide, you’re well-equipped to achieve a stunning, long-lasting metal roof that will shelter your home for generations.
Here at Chris Battaini Roofing and Seamless Gutters, we bring these best practices to life with every project we undertake across Western Massachusetts and Southern Vermont. What sets us apart? Our owner-led approach ensures that Chris personally oversees each installation, delivering the craftsmanship and attention to detail that has built our reputation throughout the region.
“The quality of your roof is only as good as the installation behind it,” Chris often reminds homeowners. “That’s why we never cut corners, even when no one’s looking.”
The rewards of a properly installed metal roof are substantial and far-reaching. Exceptional durability means you’ll enjoy protection for 40-70+ years—often outlasting the mortgage on your home! The energy efficiency benefits are immediate, with reflective surfaces reducing summer cooling costs by 10-25% for many Berkshire County homeowners we’ve served.
When those notorious New England nor’easters blow through, you’ll appreciate the superior weather resistance of your metal roof, engineered to withstand wind gusts up to 140 mph. And unlike traditional roofing that demands regular maintenance, your metal roof will require minimal upkeep, saving you time and money throughout its impressive lifetime.
For environmentally conscious homeowners (and we meet more of you every day in places like Great Barrington and Williamstown), the sustainability of metal roofing offers peace of mind. With high recycled content and 100% recyclability at end-of-life, metal roofing represents a responsible choice for our planet’s future.
While installing metal roofing demands specialized knowledge and skills, the long-term benefits make it a worthwhile investment. Whether you’re considering a DIY approach for a simple structure or seeking professional installation for your family home, the methods we’ve shared provide a roadmap to success.
Proper installation is absolutely crucial to realizing the full benefits of your metal roof. As the Metal Construction Association emphasizes, “Always consult the manufacturer’s instructions” for your specific panel system—advice we follow religiously on every job.
For homeowners throughout Berkshire, Hampden, Hampshire, and Franklin Counties in Massachusetts, as well as our neighbors in Southern Vermont, we’re here to help. Chris Battaini Roofing and Seamless Gutters offers expert service backed by years of experience and an unwavering commitment to quality that’s evident in every seam, every flashing, and every finished project.
More info about metal roofing services
Chris Battaini Roofing and Seamless Gutters proudly serves Berkshire, Hampden, Hampshire, and Franklin Counties in Massachusetts, as well as Southern Vermont.
Need a reliable roofer? CMB Roofing provides licensed, insured, and professional roofing services for homeowners and businesses.
We stand by a simple promise: Clear estimates. Quality workmanship. Clean job sites.
From roof repairs and full replacements to storm damage restoration, our team delivers dependable results with durable materials, expert installation, and complete site cleanup.