-
10 Wendell Ave Extension Pittsfield, MA 01201
-
210 Columbia St., Lee, MA 01238

Shingle installation is the process of layering overlapping roofing materials across a prepared roof deck to shed water, protect your home, and extend the life of your roof.
Here’s a quick overview of how it works:
Done right, a properly installed asphalt shingle roof can last 15 to 20 years or more — and done wrong, even a small misstep in nailing or layering can lead to leaks, wind damage, or a voided warranty.
The core principle behind shingle installation is simple: gravity plus overlap equals water shedding. Every layer — from the deck up to the ridge — is designed to move water down and off the roof without letting it sneak underneath.
I’m Christopher Battaini, owner of Chris Battaini Roofing and Seamless Gutters, with over two decades of hands-on experience in professional shingle installation across the North Shore and Greater Boston area. In this guide, I’ll walk you through everything a homeowner needs to know about how a quality shingle installation is done — and what to watch for.
Simple shingle installation glossary:

Before the first shingle is ever nailed down, the foundation must be perfect. At Chris Battaini Roofing and Seamless Gutters, we know that a roof is only as good as the deck it sits on.
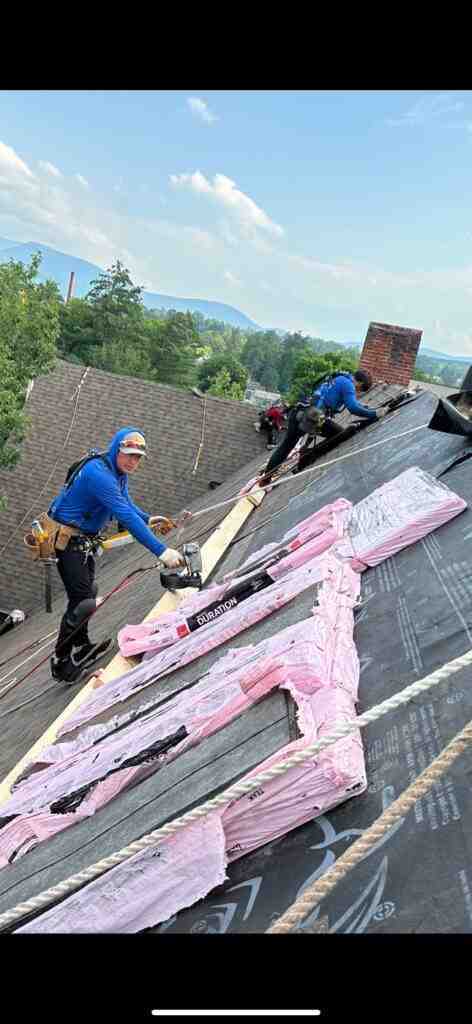
Safety isn’t just a checklist; it’s a necessity. Professional crews use sturdy ladders, non-slip footwear, and OSHA-approved safety harnesses. Working in wet or excessively windy conditions is avoided to prevent accidents. For homeowners in Berkshire County, seeing a crew utilize roof jacks on steep slopes is a sign of a professional operation that values both worker safety and property protection.
The “deck” is the structural wood (usually plywood or OSB) that supports the shingles. Once the old materials are removed—often using a specialized pitchfork to pry up shingles without gouging the wood—we perform a thorough inspection. We look for:
A smooth, dry surface is mandatory. If the deck is uneven or damp, the new shingle installation could suffer from “telegraphing,” where imperfections show through the shingles, or worse, trapped moisture can lead to mold. If you’ve noticed issues before a full replacement, you might find our guide on asphalt shingle roof repair helpful for understanding smaller fixes.
Not all shingles are created equal. While 3-tab shingles were the standard for decades, architectural (laminated) shingles are now the preferred choice for most Berkshire County homes due to their durability and aesthetic depth.
| Feature | 3-Tab Shingles | Architectural Shingles |
|---|---|---|
| Appearance | Flat, uniform, three distinct tabs | Dimensional, textured, wood-shake look |
| Wind Rating | Typically up to 60-70 MPH | Typically up to 110-130 MPH |
| Lifespan | 15–20 years | 25–50 years (varies by brand) |
| Weight | Lighter | Heavier/More durable |
| Installation | Requires precise tab alignment | Easier to stagger naturally |
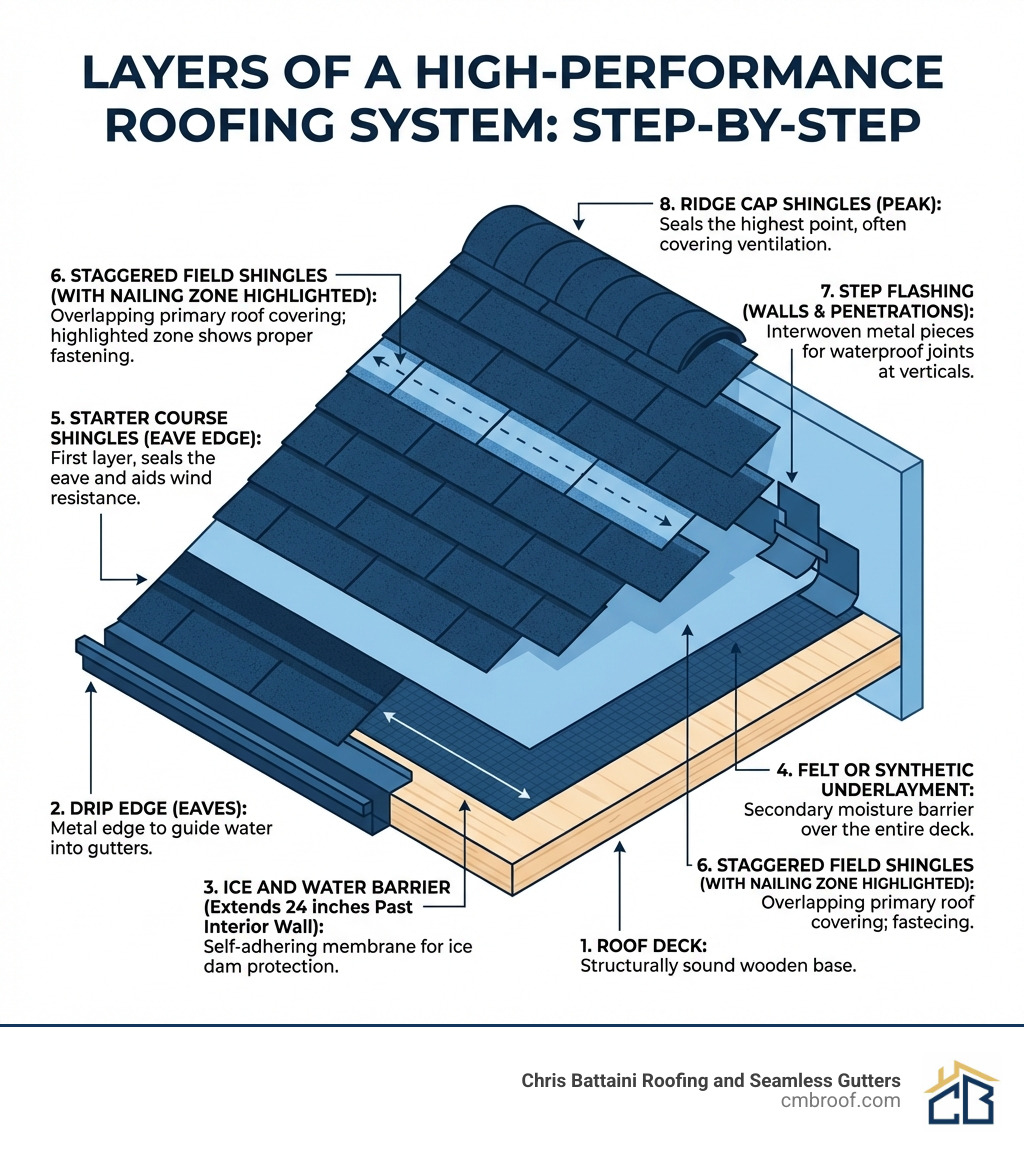
A roof is a system, not just a cover. Each layer serves a specific purpose in the shingle installation process.
We install galvanized drip edge along the eaves first. This metal flashing guides water away from the fascia and into the gutters. Interestingly, while the drip edge goes under the ice and water shield at the eaves, it goes over the underlayment at the rakes (the slanted edges of the roof) to provide better wind resistance.
In our climate, ice dams are a real threat. We apply a self-adhering leak barrier—often called ice and water shield—along the eaves. Per industry standards, this membrane should overhang the eave by 1/4″ to 3/4″ and extend at least 24″ inside the vertical line of the interior wall. This seals around every nail that passes through it, preventing water from backing up under the shingles.
The rest of the roof deck is covered with underlayment, typically 30-pound felt or a high-performance synthetic like Summit® or Gorilla Guard®. Synthetic underlayments are popular because they can be exposed to the elements for months if necessary and don’t wrinkle like organic felt. We overlap the eave ice and water protector by at least 4″ and overlap valley membranes by 6″ to ensure a continuous water-shedding surface.
To see these components in action, you can watch a how-to video on YouTube that explains why these layers are non-negotiable for a long-lasting roof. For a deeper dive into materials, check out our asphalt shingle roofing complete guide.
Once the “dry-in” phase is complete, the shingles themselves can be applied. This is where the visual transformation of your home happens.
We don’t just “eyeball” it. We snap horizontal chalk lines every 5 inches (to match the shingle reveal) and vertical lines every 6 inches. This ensures that the courses remain perfectly straight from the gutter to the peak.
The most critical rule of shingle installation is staggering. If the vertical seams between shingles line up, water will find its way to the deck. We use an offset pattern—usually 5 or 6 inches—to ensure that the joints are never stacked. For example, we might trim 6 inches off the first shingle of the second row, 12 inches off the third, and so on. This creates a “stair-step” pattern that forces water to run over the solid face of the shingle below it.
Every project requires a specific kit of materials to be successful:
Nailing is where many amateur installations fail. A nail that is “over-driven” (too deep) can cut through the shingle, while an “under-driven” nail (head sticking up) will eventually wear a hole through the shingle above it.
Special care is taken to flash around plumbing stacks and attic vents. These penetrations are the most common source of leaks. We use metal step flashing—pieces about 10″ long—interleaved with the shingles wherever the roof meets a vertical wall or chimney.
The environment in Massachusetts dictates many of our installation choices.
The slope of your roof changes the rules.
Can you install shingles in a Berkshire County winter? Yes, but with modifications. Asphalt shingles become brittle below 40°F (4°C) and can crack if handled roughly.
A roof that can’t “breathe” will fail prematurely. According to Energy.gov on attic condensation, proper ventilation prevents moisture from condensing on the underside of the roof deck. We aim for a balanced system of intake (soffit vents) and exhaust (ridge vents). FHA standards generally require 1 square foot of vent area for every 150 to 300 square feet of attic floor space.
With professional shingle installation and regular maintenance, a standard 3-tab roof lasts 15–20 years. High-quality architectural shingles can last 25–30 years or more, depending on environmental factors.
Staggering ensures that the vertical joints between shingles are offset. If these joints were lined up, water would have a direct vertical path to the roof deck, leading to immediate leaks during heavy rain.
While 4 nails is the standard for many applications, high-wind zones or steep slopes require 6 nails per shingle. This significantly increases the wind-uplift resistance and ensures the shingles stay bonded to the deck.
Choosing the right team for your shingle installation is the most important decision you’ll make for your home’s exterior. At Chris Battaini Roofing and Seamless Gutters, we pride ourselves on being an Owens Corning Platinum Preferred Contractor. This is an earned, elite designation limited to the top tier of roofing professionals nationwide.
When we step onto your property in Berkshire County, you aren’t just getting a crew; you’re getting owner-led, on-site service backed by exceptional workmanship warranties.
If you are researching the financial side of a project, it’s helpful to know that average costs for a roof replacement are based on publicly available internet data and are not the client’s actual pricing. Typical costs for a full replacement can range from $5,000 to $30,000 or more, depending on the size of the home, the pitch of the roof, and the materials selected. For more details on budgeting, see our guide on asphalt-shingle-roof-price-per-square-foot.
Whether you need a full asphalt shingle roofing replacement or a minor repair, we are here to ensure your home stays dry and protected for decades to come.
Chris Battaini Roofing and Seamless Gutters services Berkshire County, Massachusetts, including Adams, Pittsfield, Dalton, and Williamstown.
Follow us on Facebook — https://www.facebook.com/chrisbattainiroofing
Need a reliable roofer? CMB Roofing provides licensed, insured, and professional roofing services for homeowners and businesses.
We stand by a simple promise: Clear estimates. Quality workmanship. Clean job sites.
From roof repairs and full replacements to storm damage restoration, our team delivers dependable results with durable materials, expert installation, and complete site cleanup.