

Why Metal Roof Eave Trim Installation is Essential for Your Home
Metal roof eave trim installation is a critical step in protecting your roof’s perimeter and ensuring decades of leak-free performance. This component, also called drip edge, directs water away from your fascia and foundation while creating a clean, finished look.
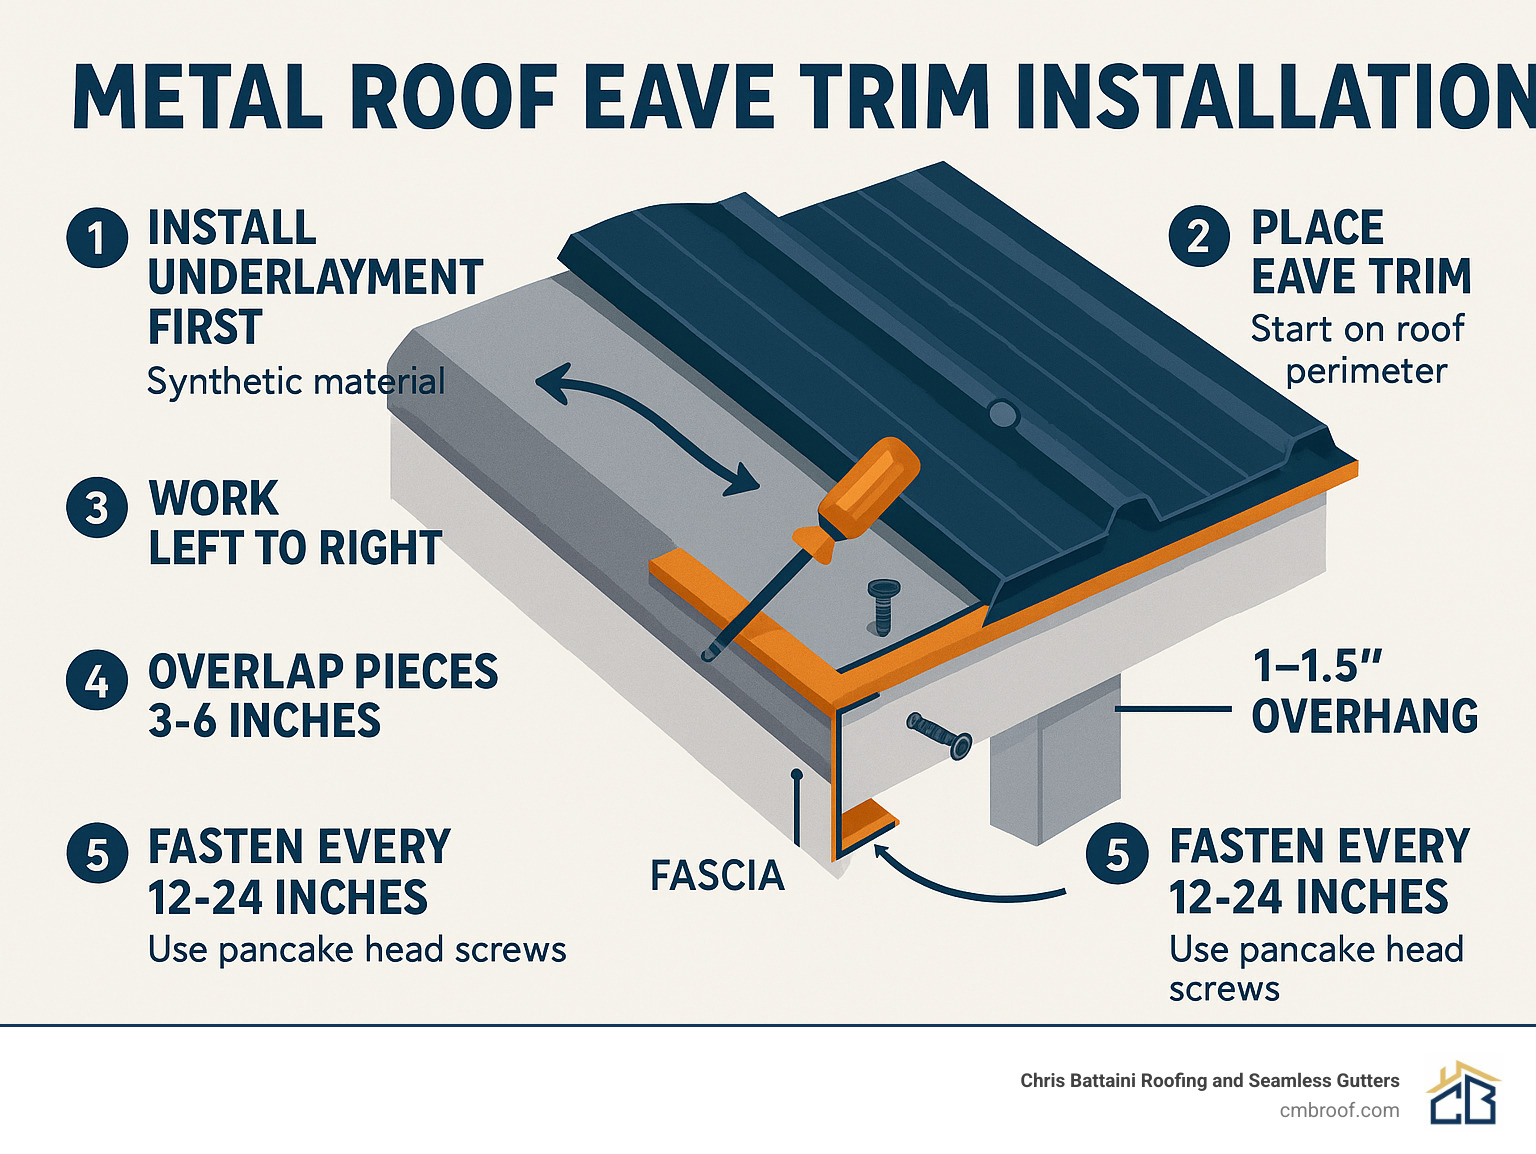
Quick Installation Overview:
- Install underlayment first – Synthetic material goes down before trim.
- Start with eave trim – It’s the first piece installed on the roof perimeter.
- Work left to right – This maintains a consistent overlap direction.
- Overlap pieces 3-6 inches – Seal overlaps with high-quality sealant.
- Fasten every 12-24 inches – Use pancake head screws to prevent dimpling.
- Overhang fascia 1-1.5 inches – This ensures proper water drainage.
Metal roofs can last 50 to 70 years, but only with proper trim installation. As one roofing expert notes: “Perimeter flashings on a standing seam metal roof take the brunt of wind uplift forces, so it’s important to get them right.”
Poor eave trim installation leads to water damage, fascia rot, and costly repairs. When done correctly, it protects your investment and improves curb appeal. This guide walks you through the professional techniques for a watertight, long-lasting installation, whether you’re a DIYer or hiring a contractor.
Terms related to metal roof eave trim installation:
The Critical Role of Eave Trim on a Metal Roof
Eave trim is the unsung hero of your metal roofing system. While the panels get the attention, the eave trim does the heavy lifting to protect your home.
Eave trim (also called drip edge or eave flashing) is the metal component installed along the lowest edge of your roof. Its primary job is water diversion, ensuring rainwater flows where it should.
Beyond managing water, eave trim serves several key functions:
- Fascia Protection: It shields your fascia board from water, preventing stains, rot, and costly replacement.
- Pest Deterrence: It seals the vulnerable gap between the roof deck and fascia, keeping insects and rodents out of your attic.
- Wind Uplift Resistance: Especially critical for standing seam roofs, properly installed eave trim helps lock down the roof perimeter against strong winds.
- Aesthetic Finish: It provides a clean, crisp look that signals a professional installation.
These benefits contribute to an increased roof lifespan. A metal roof can last 50 to 70 years, but only when every component, including the eave trim, is installed correctly. For a roof that stands the test of time, consider our comprehensive Professional Roof Installation services.
What is Eave Trim vs. Drip Edge?
Essentially, eave trim, drip edge, and eave flashing are different names for the same component. Their function is to create a “kick-out” feature that directs water off the roof and away from the fascia and walls. Water flows down the roof, hits the trim, and is kicked out into your Seamless Gutters or safely away from the foundation.
Why Proper Installation is Non-Negotiable
Poor metal roof eave trim installation is a recipe for disaster. It’s the first line of defense in preventing leaks that can lead to attic damage and interior repairs. It is also essential for protecting the fascia board from rot caused by constant moisture exposure.
Over time, water intrusion can lead to structural damage, including problems with the roof deck and supporting rafters, as well as creating conditions for mold growth. Proper installation not only prevents these issues but also improves curb appeal, making it a key part of a complete Metal Roofing Installation.
Types of Metal Roof Eave Trim
Choosing the right eave trim depends on your project’s needs.
- Mini eave trim (2.5″ x 2.5″) is ideal for residential applications with smaller fascia boards, like on homes and sheds.
- Full-size eave trim (5.25″ x 5.25″) is used for commercial projects or homes with larger fascia, such as barns and workshops.
- Bullnose drip edge has a rounded profile that can be easier to install on some standing seam systems, but it requires a roof pitch of 6:12 or less.
- Custom profiles can be created for unique architectural designs or specialized project requirements.
The choice is typically based on fascia size and whether the project is for residential vs. commercial use.
Pre-Installation Checklist: Tools and Materials
Proper preparation is key to a successful metal roof eave trim installation. Gathering your tools and materials beforehand saves time and ensures a smooth workflow. Most importantly, safety comes first. Always use proper safety equipment when working at heights.
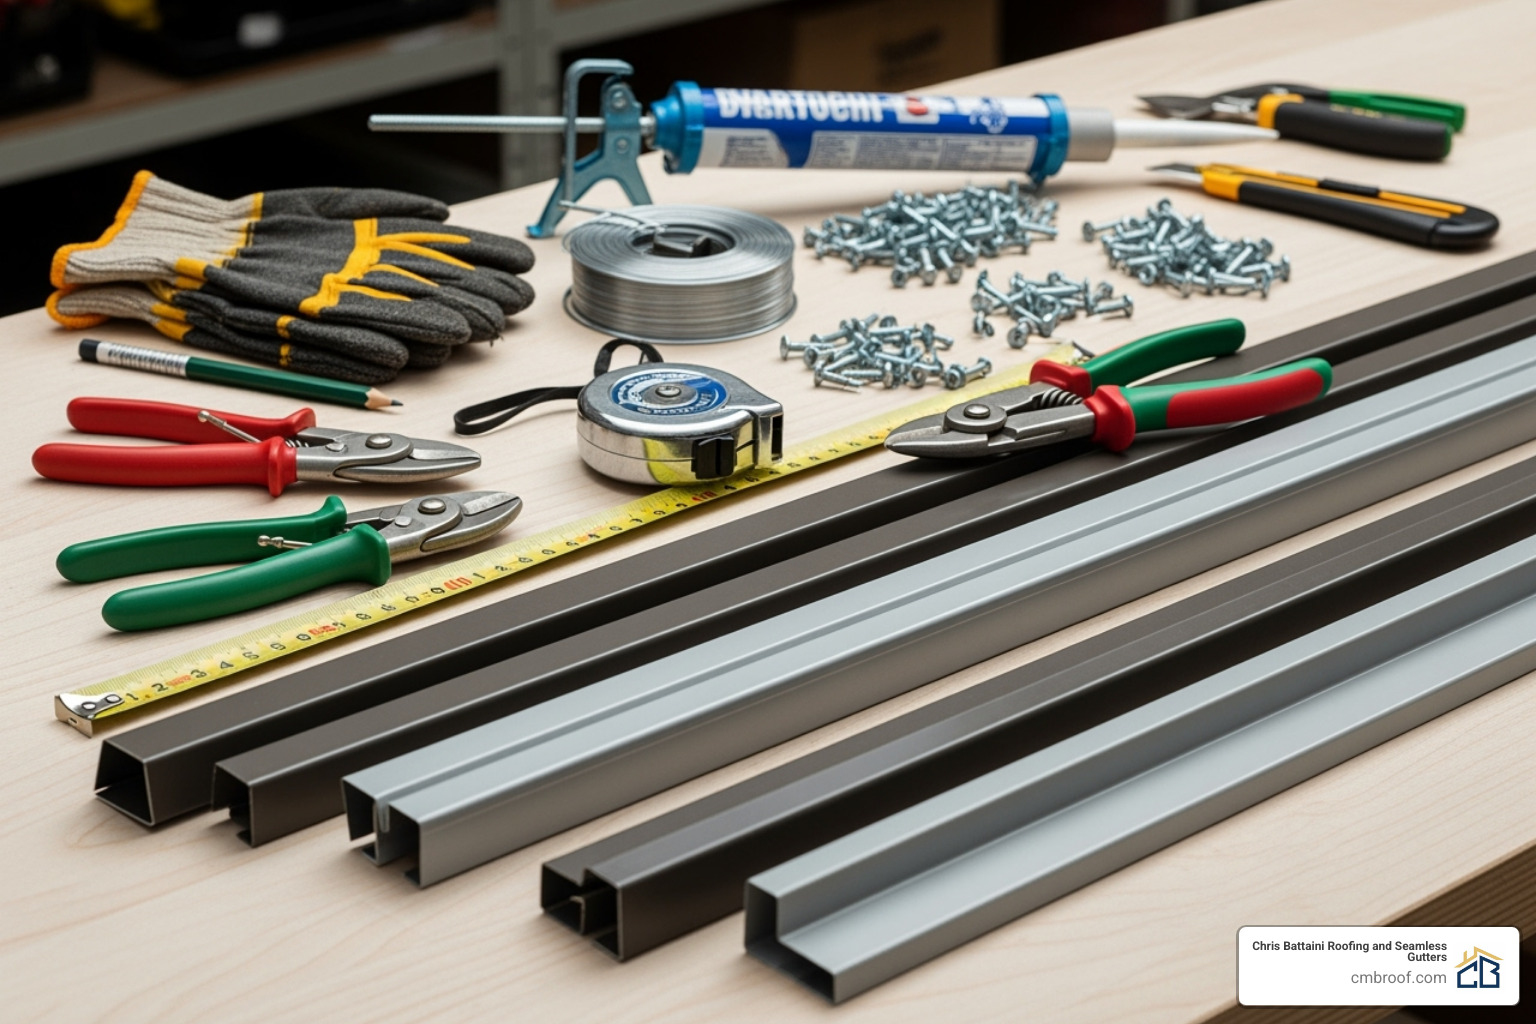
Essential Tools for Metal Roof Eave Trim Installation
Having the right tools makes the job easier and the results more professional.
- Tin snips: A set of left, right, and straight-cutting snips is essential for clean cuts.
- Hand seamer: A 3-inch hand seamer is used to create crisp, clean bends and folds.
- Power drill with magnetic bit: Speeds up fastening and holds screws in place.
- Measuring tape: For accurate measurements, which are critical.
- Chalk line: Ensures your trim lines are perfectly straight.
- Carpenter’s pencil: Its flat design keeps it from rolling off the roof.
- Caulking gun: For applying sealant to create watertight seals.
- Safety gear: Non-negotiable items include cut-resistant roofing gloves, eye protection, and proper fall protection.
Materials You’ll Need
Using quality materials is the foundation of a long-lasting roof.
- Eave trim pieces: Typically sold in 10 to 12-foot lengths. Calculate your roof’s perimeter and buy extra.
- 1-inch pancake head screws: The low-profile head prevents dimpling of metal panels.
- High-quality silicone sealant: Crucial for creating durable, watertight seals at overlaps.
- Synthetic roofing underlayment: An essential layer of protection against water infiltration that is installed before the trim.
- Butyl tape: A self-sealing tape used to create watertight seals under trim and closures.
The Ultimate Guide to Metal Roof Eave Trim Installation
This section details the process for a successful metal roof eave trim installation. The core principles apply to both exposed fastener and standing seam systems. A key tip is to work from left to right to ensure consistent, professional-looking overlaps. Before starting, plan your layout by measuring sections and thinking through the corners. Always prioritize safety with proper fall protection. For more details, see our guide on Drip Edge Installation for Metal Roofs.
Step 1: Underlayment and Eave Preparation
Getting the foundation right is critical. A properly prepared eave ensures a successful installation.

First, prepare the roof deck by ensuring it is clean, dry, and free of debris. Next, install the synthetic underlayment, extending it slightly over the eave edge. This underlayment goes down before the eave trim. For climates with ice and snow, a self-healing ice-and-water membrane is highly recommended to protect against ice dams.
Position the eave trim directly on top of the underlayment. This layering ensures any water that gets past the metal panels is shed away from the roof deck. For extra protection, especially with exposed fastener systems, you can install an additional 8-inch strip of underlayment over the eave trim to create a double seal against wind-driven rain.
Step 2: How to Handle Corners
A well-executed corner is a sign of true craftsmanship. This technique will help you create a clean, professional finish.
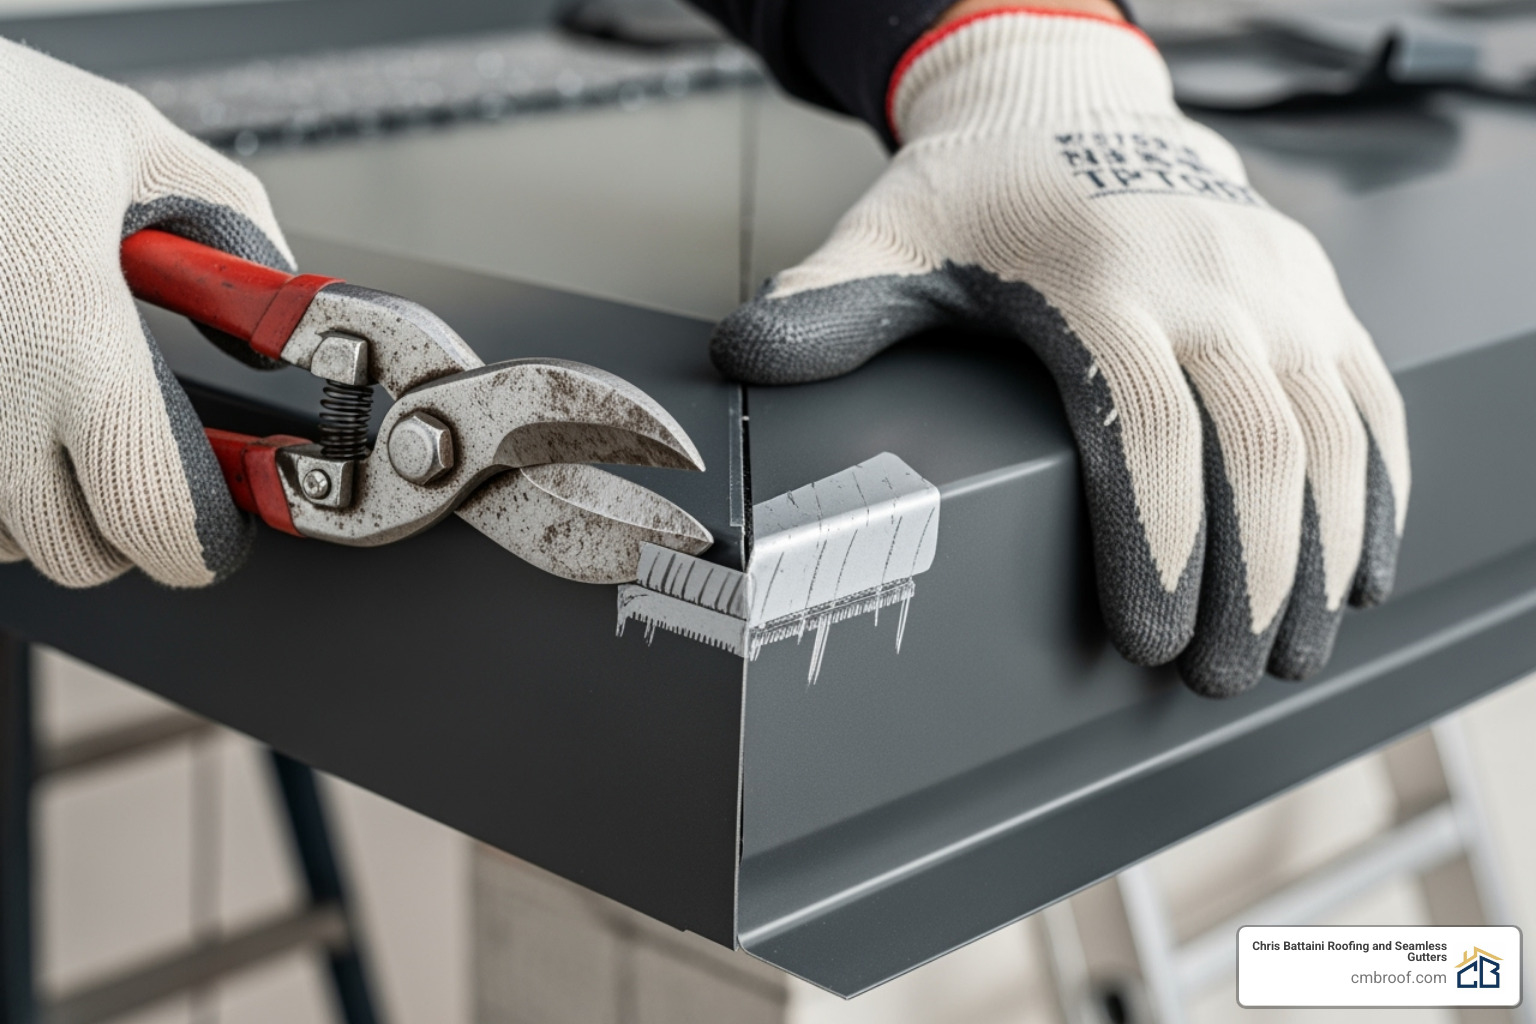
Start your run at one end of the eave. When you reach a corner, let the trim extend about one inch past the edge. Mark your bend line by tracing the fascia and gable board on the trim’s underside. Using tin snips, cut the center of the trim up to the bend line, then cut away the top one-inch portion.
To create a professional mitered corner, remove the hem by making a 45-degree angled cut to your bend line. This allows the corner to fold cleanly. Use your hand seamer to bend the remaining tab around the corner (upward for an outside corner, downward for an inside corner). This creates a crisp finish that directs water smoothly. Mastering the mitered corner is a valuable skill.
Step 3: Overlapping and Splicing Trim Pieces
Since trim comes in standard lengths, you will need to join pieces. The goal is a watertight and visually seamless overlap.
Always overlap pieces in the direction of water flow (typically left to right), so the upper piece sheds water over the lower one. The overlap length should be 3 inches for exposed fastener systems and at least 6 inches for standing seam bullnose drip edge.
A crucial step is notching the hem of the underlapping piece. Remove about 3 inches of the drip edge hem to allow the next piece to slide over it without creating a bulge. Before joining the pieces, apply two beads of high-quality silicone sealant near the edge of the underlapping piece. Finally, slide the next piece over the first, ensuring a snug, interlocked fit.
Step 4: Fastening Eave Trim Correctly
Proper fastening secures your eave trim against the weather for decades.
Use 1-inch metal-to-wood pancake head screws. Their low-profile design prevents them from dimpling the metal roofing panels. Fastener spacing should be about 8 inches from each end of the flashing, with additional screws spaced 12 to 24 inches on center. Some systems may require closer spacing, so always check manufacturer specifications.
Place screws in the center of the eave trim’s flat section, never on panel ridges. Drive them straight and avoid over-tightening, which can dimple the trim, or under-tightening, which can create a weak point. Ensure all overlaps are securely fastened and sealed. These techniques are part of the broader principles in our guide on Tips for Attaching Metal Roofing.
Avoiding Pitfalls: Common Mistakes and Pro Tips
Precision and attention to detail are what separate a professional metal roof eave trim installation from one that will cause problems later. A small gap or a rushed corner can lead to preventable water damage. Knowing the common pitfalls is the first step to avoiding them.
Common Metal Roof Eave Trim Installation Blunders
Here are the most frequent missteps to avoid:
- Incorrect layering with underlayment: The most serious mistake is placing eave trim under the underlayment. This directs water onto the roof deck. The correct order is underlayment first, then eave trim on top.
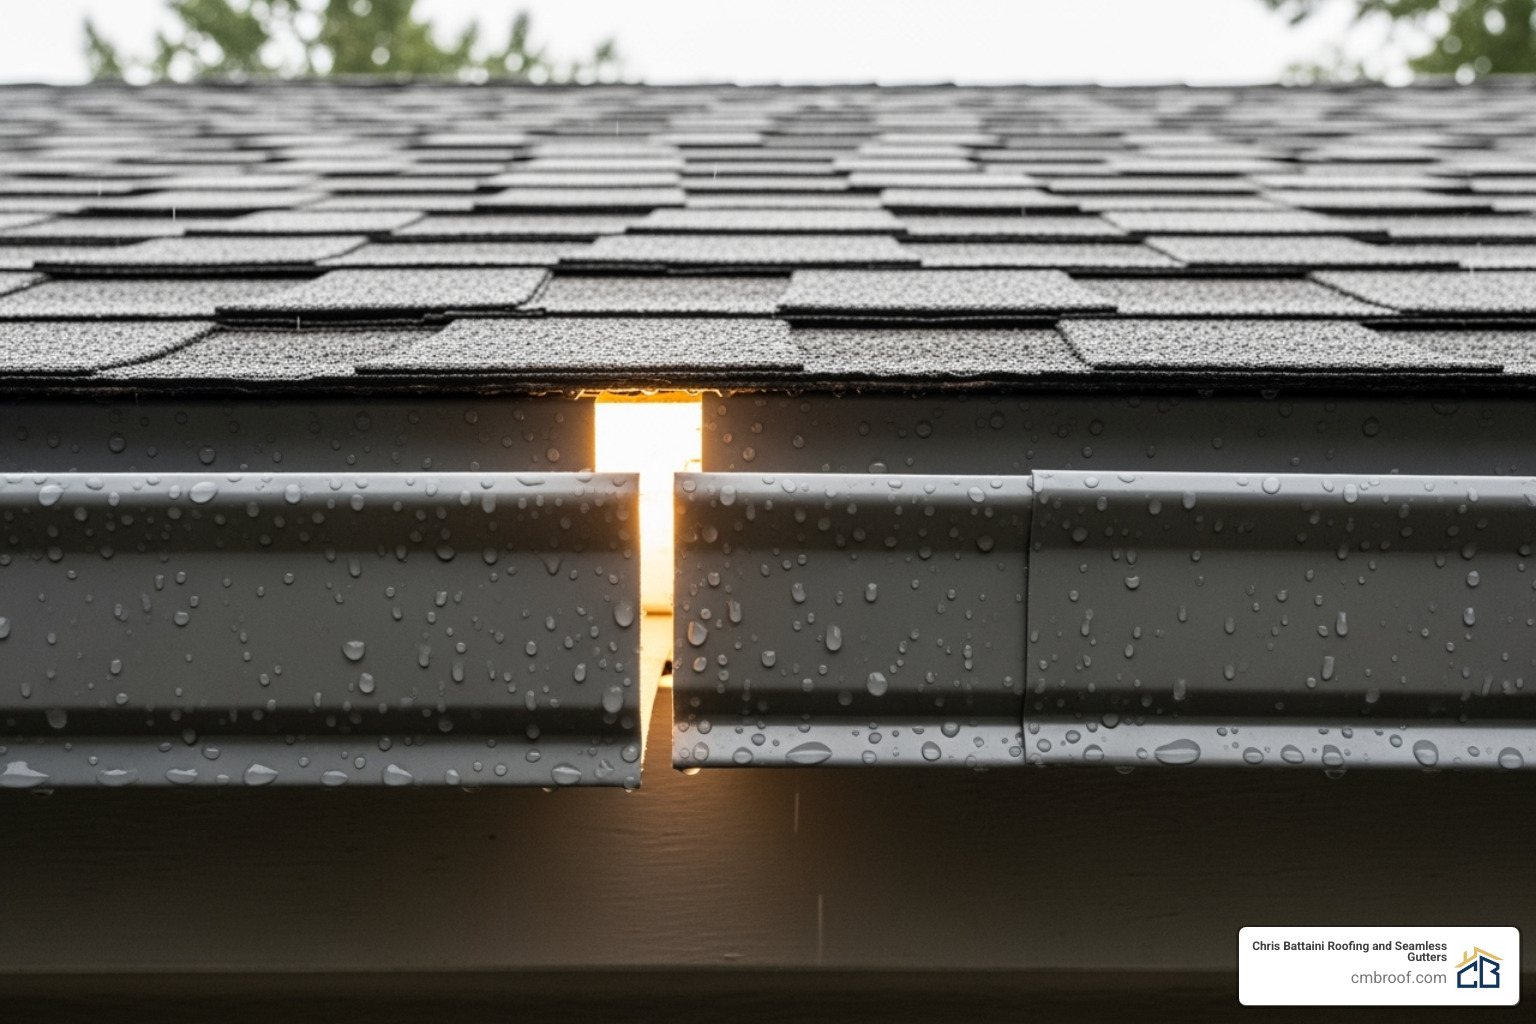
- Gaps at overlaps or corners: Even tiny gaps invite water, pests, and wind. Every overlap must be tight and sealed. Corners must be carefully cut and bent to form a seamless transition.
- Improperly tightened screws: Over-tightening can dimple the metal and compromise the seal. Under-tightening leaves the trim loose and vulnerable to water intrusion. Fasteners should be snug, with the rubber gasket slightly compressed.
- Not cleaning metal shavings (swarf): If left on the roof, these tiny metal particles will rust and cause unsightly stains. Always sweep or blow them away after cutting and drilling.
- Inaccurate measurements: “Measure twice, cut once” is essential advice. Poor measurements lead to ill-fitting pieces, gaps, and wasted material.
- Mixing incompatible metals: This can cause galvanic corrosion, where one metal rapidly deteriorates. Ensure your fasteners and trim are made of compatible materials.
Maintenance for Longevity
A little ongoing care will keep your installation performing for decades.
- Regular inspections: Check your eave trim annually and after severe storms. Look for loose fasteners, damage, or failing sealant.
- Cleaning gutters and trim: Keep gutters clear of debris to prevent water from backing up onto the eave trim. Clean the trim itself to remove dirt that can trap moisture.
- Checking sealant integrity: UV exposure and temperature changes can degrade sealant over time. Check all sealed joints and re-apply sealant as needed.
- Checking for pest infestations: A quick visual check ensures no pests have found a way in. Keep nearby vegetation trimmed.
For worry-free maintenance, consider our Professional Roofing and Guttering Services.
Planning Your Project: Costs, Colors, and Customization
Beyond the technical steps, planning your metal roof eave trim installation involves budgeting and aesthetic choices. Quality eave trim not only protects your home but can also significantly boost its curb appeal and value.
Cost Considerations for Eave Trim
Eave trim costs vary based on several factors. The material gauge (thickness), the type of paint finish, and the profile’s complexity all impact the price. Heavier gauge metal and premium finishes like Kynar 500 cost more but offer superior durability.
Based on average internet data, eave trim can cost anywhere from $1.25 to $7.50 per lineal foot. The lower end covers basic profiles and standard finishes, while the higher end includes premium materials and custom designs.
Important Pricing Disclaimer: These figures are general averages based on internet data and are not a quote from Chris Battaini Roofing and Seamless Gutters. Actual project costs depend on current material prices, labor, and specific requirements.
While metal roofing has a higher initial cost than asphalt, the long-term savings from reduced maintenance and a 50 to 70-year lifespan are substantial. Quality eave trim is a crucial part of achieving that longevity.
Color and Customization Options
Metal eave trim offers excellent opportunities to improve your home’s appearance.
- Standard colors are the most budget-friendly and include popular choices like black, white, brown, and various grays. These are readily available and often match standard panel colors.
- Custom color matching allows you to create a unique shade that complements your home’s existing color scheme or achieves a specific design vision.
- Textured finishes, such as matte, gloss, or metallic options, can add character and change how the trim interacts with light.
For a polished, professional look, matching your trim to your panels and siding creates a cohesive design that boosts curb appeal.
Frequently Asked Questions about Eave Trim Installation
Here are answers to the most common questions we receive about metal roof eave trim installation.
Which piece of metal roof trim gets installed first?
Eave trim (or drip edge) is always the first piece of trim installed on a metal roof’s perimeter. It must be installed before the gable/rake trim and the ridge cap. This specific order is essential for proper water shedding and creating a layered, watertight protection system.
How much should eave trim overhang the fascia?
The ideal overhang is 1 to 1.5 inches. This measurement ensures water drips completely clear of the fascia board and flows directly into the gutter. Too little overhang allows water to run down the fascia, causing rot, while too much can look awkward and interfere with gutter function.
Can I install eave trim on an existing metal roof?
While technically possible, this is a complex task that carries significant risks. It requires carefully lifting the bottom edge of existing roof panels to slide the new trim underneath. This process can easily damage the panels, create new leak points, or even void the roof’s warranty.
Retrofitting eave trim requires specialized knowledge and tools. This is a job best left to professionals who understand the nuances of working with installed roofing systems. If you are considering this, we recommend a professional assessment. For more information, see our guide on Installing Drip Edge on Existing Metal Roof.
Conclusion: Secure Your Roof with a Flawless Finish
We’ve covered the critical role of eave trim and the detailed steps for a proper metal roof eave trim installation. The key takeaway is that correct installation is not just for aesthetics; it’s a crucial defense against water damage, pests, and wind.
Properly installed eave trim extends the life of your metal roof, protecting an investment that can last 50 to 70 years. This means decades of worry-free protection for your home.
However, getting it right requires precision. A small mistake can lead to costly future repairs. While DIY enthusiasm is admirable, the expertise of a professional is invaluable for a job this important.
At Chris Battaini Roofing and Seamless Gutters, we provide owner-led, on-site service for every project. This means you get our personal commitment to excellence. We stand behind our work with exceptional workmanship warranties because we do the job right the first time.
Your home deserves protection that lasts. To learn how a professionally installed metal roof can secure your investment, explore our Metal Roofing services.
Chris Battaini Roofing and Seamless Gutters proudly services Berkshire, Hampden, Hampshire, and Franklin Counties in Massachusetts.
