

Why Retrofit Drip Edge Installation Matters for Metal Roofs
Installing drip edge on existing metal roof systems is one of the smartest upgrades you can make to protect your home from water damage and extend your roof’s lifespan. Many older metal roofs were installed without proper drip edge flashing, leaving vulnerable edges exposed to wind-driven rain, ice dams, and pest infiltration.
Quick Answer for Installing Drip Edge on Existing Metal Roof:
- Assess your roof edges – Check for loose panels, rust spots, and gutter alignment
- Choose compatible materials – Match aluminum with aluminum, steel with steel to prevent corrosion
- Use the wedge method – Lift existing panels slightly without full removal
- Maintain proper overhang – Install with ½ to ¾ inch overhang into gutters
- Overlap sections – Ensure 2-inch overlap between pieces for continuous protection
- Seal all connections – Use weatherproof sealant at joints and fastener points
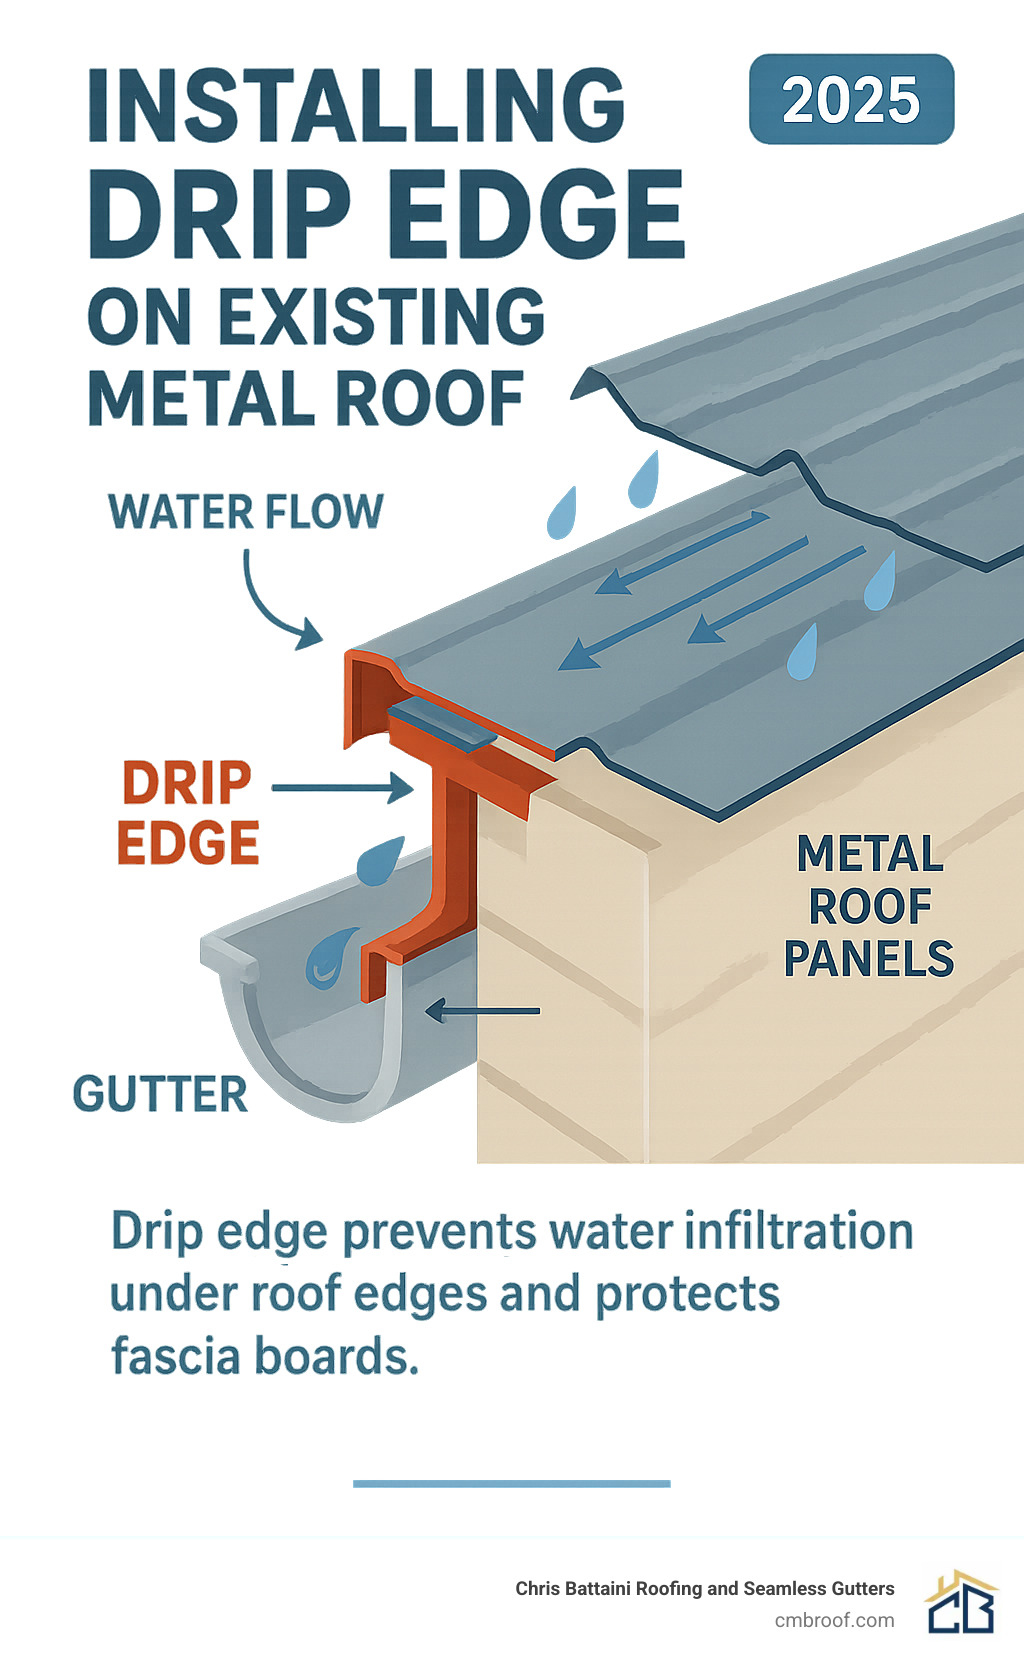
As one roofing professional noted: “Missing drip edge lets water into soffits” – a common problem that leads to costly fascia rot and structural damage.
You don’t need to tear off your entire metal roof to add this critical protection. Modern retrofit techniques let you slide drip edge under existing panels or mount it strategically above them.
Why act now? Most building codes now require drip edge installation on new roofs. Properly installed drip edges can reduce water damage risk to roof decks and fascia – among the most expensive roof repairs you’ll face.
Installing drip edge on existing metal roof terms made easy:
– aluminum drip edge installation
– attaching metal roofing
– metal roofing installation
Why Add a Drip Edge to an Existing Metal Roof?
Metal roofs without proper drip edges silently invite trouble into your home. We’ve worked on countless homes where homeowners thought their metal roof was bulletproof, only to find water damage creeping into fascia boards, soffits, and even basement walls.
The problem isn’t the metal panels – it’s what happens at the edges. Without a drip edge, water follows the underside of your roof through “capillary action.” Instead of dripping cleanly away, water sneaks back toward the fascia board, creating a perfect recipe for fascia rot and structural damage.
Ice dams become especially problematic on metal roofs without proper edge protection. When snow melts and refreezes at the roof edge, ice can force water back under panels, causing thousands of dollars in damage during harsh winters.

Wind-driven rain presents another challenge. Even slight breezes can push rainwater up and under metal panels at vulnerable edges, especially during nor’easters common in New England.
Missing drip edges also create perfect entry points for pest deterrent issues. Carpenter bees, wasps, and other insects love gaps between roof decking and fascia boards. Properly installed drip edges seal these gaps.
Gutter performance improves dramatically when you add drip edges to existing metal roofs. Without them, water can overshoot gutters during heavy downpours or create splash-back that defeats your drainage system.
Modern code requirements increasingly mandate drip edge installation. The IRC 2021 standards recognize that proper edge flashing is essential for roof longevity. Even where not required for existing roofs, adding drip edges demonstrates proactive maintenance that protects your investment.
Energy efficiency benefits occur when drip edges prevent moisture infiltration that can compromise attic insulation and create mold growth conditions, forcing heating and cooling systems to work harder.
For detailed information about protecting your roof investment, this latest research on roof inspections provides valuable insights.
How a Drip Edge Works on Metal Roof Profiles
The magic happens through a capillary break – forcing water to drip away from your home instead of sneaking back under the roof. Different metal roof profiles require slightly different approaches.
Standing seam roofs present unique challenges because raised vertical seams can interfere with traditional drip edge placement. The solution often involves specialized profiles that accommodate these vertical elements.
Corrugated metal panels work well with standard drip edges, but require closure strips – foam pieces that fill gaps between corrugated waves and the drip edge.
Many homeowners assume hemmed edge panels eliminate the need for separate drip edges. Unfortunately, hemmed edges alone rarely provide adequate protection against capillary action during severe weather.
Building-Code Snapshot & Warranty Implications
IRC 2021 requirements now mandate drip edge installation on most new roof installations, and Massachusetts has adopted these standards with local amendments for our climate challenges.
Many metal roofing manufacturers require proper drip edge installation to maintain warranty coverage. We’ve seen warranty claims denied when water damage occurred at unprotected roof edges, even when metal panels performed flawlessly.
The resale value impact becomes significant when buyers or inspectors evaluate your property. Installing drip edge on existing metal roof systems demonstrates proactive maintenance that can justify higher asking prices.
Selecting the Right Drip Edge & Preparing for Retrofit
Choosing the wrong drip edge material can turn your upgrade into a costly mistake. The golden rule: match your metals. Pairing aluminum drip edge with steel roofing creates galvanic corrosion – turning your roof edge into a slow-motion battery that eats itself.
Aluminum drip edges make sense for most homeowners. They’re lightweight, cut cleanly with basic tools, and typically last 20-30 years. At roughly $1.50-$9.00 per linear foot for materials (these are average costs based on internet data and not actual costs for Chris Battaini Roofing and Seamless Gutters), they won’t break the budget.
Galvanized steel options offer 30-50+ year durability when properly maintained. The catch? Any nick exposing bare steel will rust immediately in New England weather.
Galvalume steel represents the sweet spot for many installations. The aluminum-zinc coating handles freeze-thaw cycles and humidity better than traditional galvanized steel.
Copper drip edges are premium choices lasting 50+ years, but come with premium pricing that makes sense mainly for historic homes or long-term ownership.
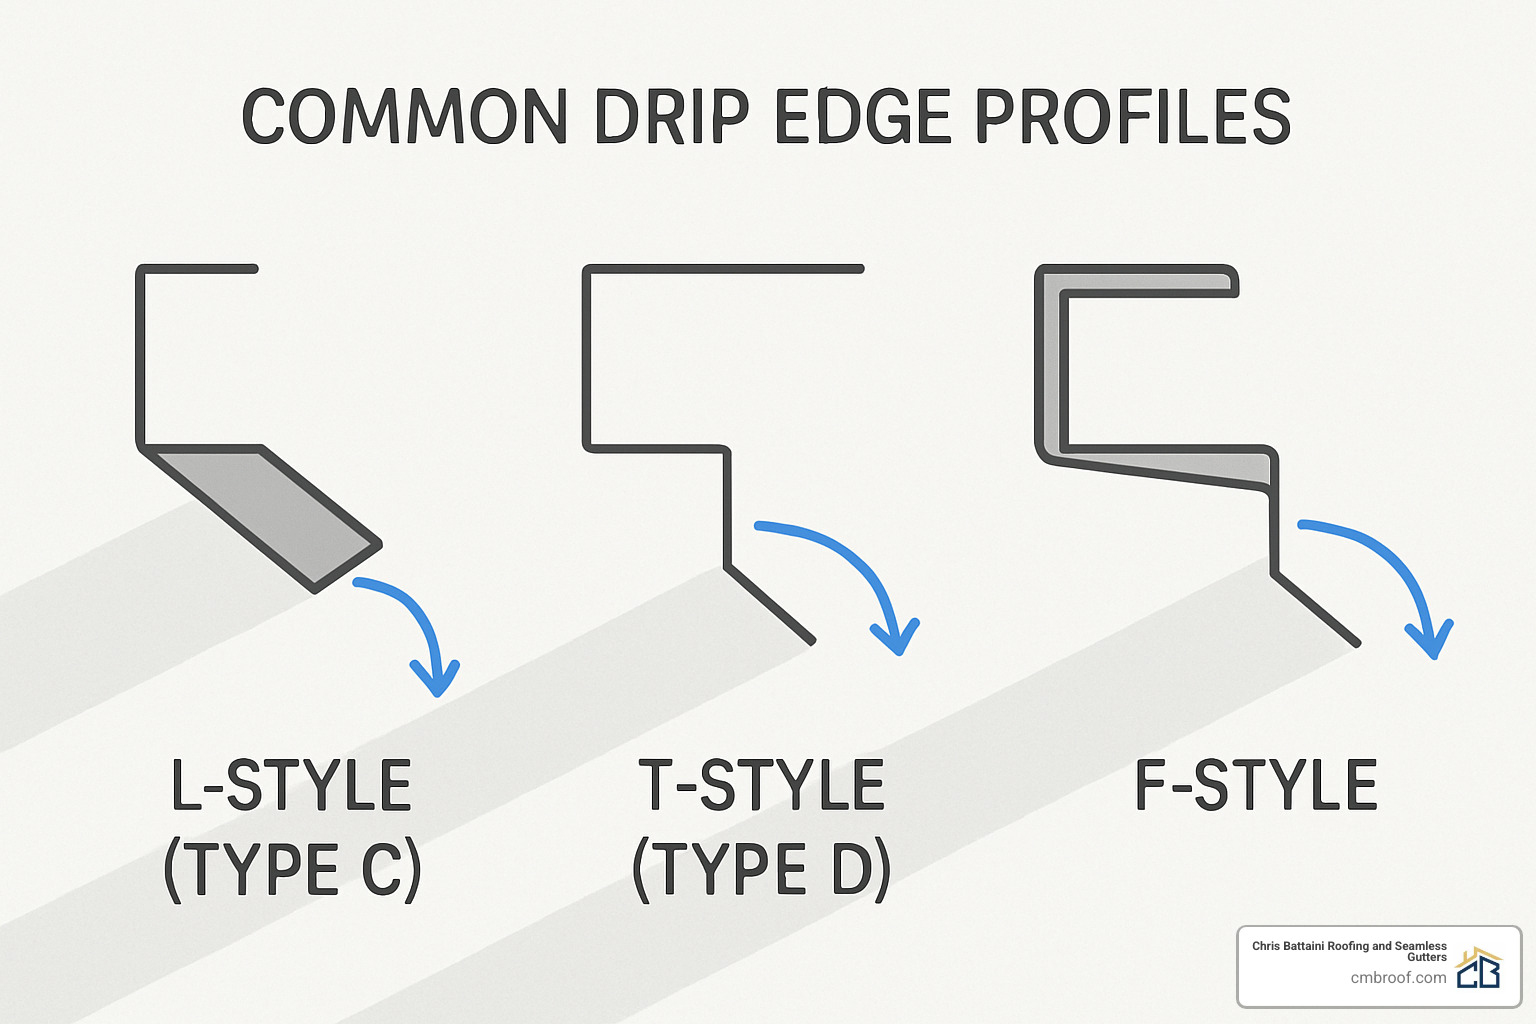
Profile selection affects function. L-style drip edges handle most standard applications. T-style versions keep water further from fascia boards. F-style profiles work best for complex roof-to-wall transitions.
Understanding your roof configuration before buying is key. Standing seam roofs often need T-style or F-style edges, while corrugated panels usually work with L-style edges plus closure strips.
For detailed guidance on materials for your specific roof type, check our comprehensive roofing materials guide.

Tools & Supplies Checklist
Installing drip edge on existing metal roof requires proper tools. You’ll need aviation snips or tin snips for cuts, plus left and right-cutting versions for curves. Heavy-gauge materials might need metal shears or hacksaws.
Your drill/driver with magnetic bit holder prevents dropping screws. Stainless steel screws (#8 x 1¼”) cost more but won’t leave rust stains.
Safety gear isn’t optional. OSHA-approved safety harness, non-slip roof boots, safety glasses, cut-resistant gloves, and hard hat are essential.
Retrofit-specific tools include flat pry bars for lifting panels without damage, wooden wedges (6″ with notched edges), measuring tape, chalk line, and caulk gun with weatherproof sealant.
Scientific research on snip ergonomics shows properly designed cutting tools reduce hand fatigue and improve cut quality.
Inspecting Roof Edges Before You Start
Walk your roof’s perimeter before starting. Check panel security – press on edges to see if anything moves. Loose fasteners need tightening before adding drip edge.
Rust spots tell your roof’s health story. Surface rust around fasteners isn’t necessarily problematic, but active corrosion needs rust converter treatment first.
Gutter alignment matters more than most realize. Measure from roof edge to gutter center. Your drip edge needs ½ to ¾ inch overhang into gutters, so misaligned gutters might need repositioning.
Examine soffit and fascia boards for water stains, soft spots, or pest damage. Installing drip edge over damaged wood traps moisture – fix underlying issues first.
Finally, check underlayment condition wherever visible at roof edges. Repair torn or missing underlayment to prevent water from sneaking behind your new drip edge.
Step-by-Step Guide: Installing Drip Edge on Existing Metal Roof
Installing drip edge on existing metal roof doesn’t have to feel overwhelming when you break it down into manageable chunks. Think of it like following a recipe – each step builds on the last one, and before you know it, you’re protecting your home from water damage like a pro.
Start with a measurement and planning phase that’ll save you headaches later. Walk around your house with a measuring tape, jotting down each roof edge section separately. Don’t assume your house is perfectly square – we’ve yet to meet one that is! Standard drip edge comes in 10-foot lengths, so sketch out where each piece will go to minimize waste. Add about 10% extra to your shopping list for those inevitable “oops” moments.
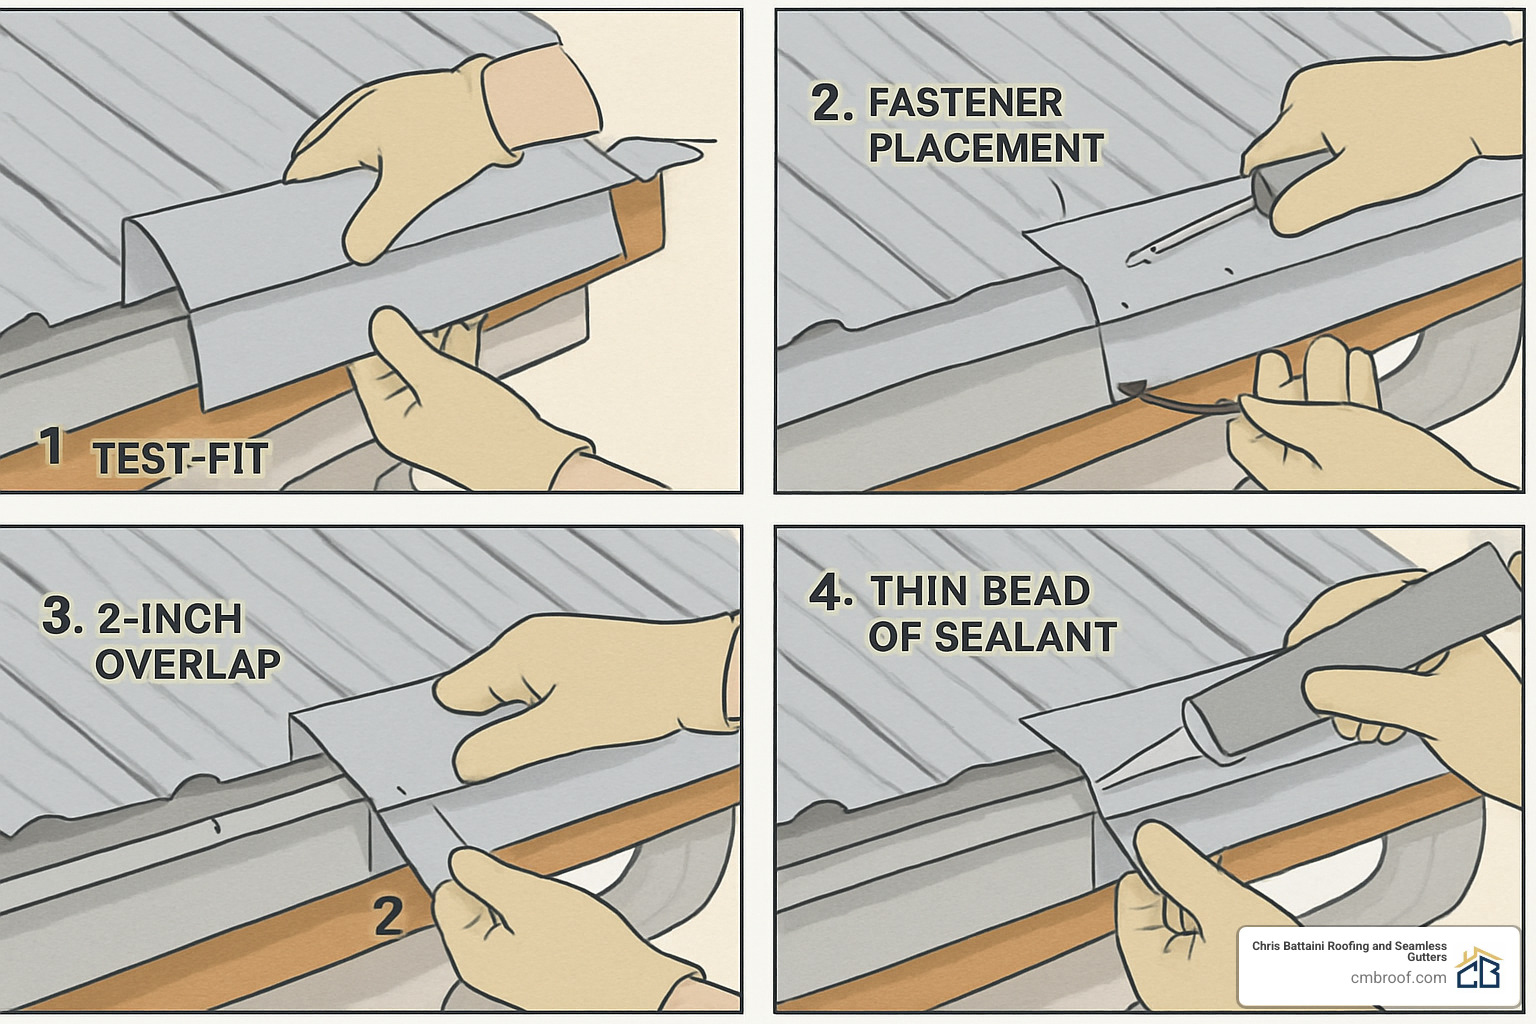
The test fitting step might feel tedious, but it’s your insurance policy against mistakes. Hold that first piece in place before making any permanent holes. The drip edge should stick out ½ to ¾ inch beyond your fascia board, landing nicely in the gutter. If it doesn’t look right now, it won’t magically fix itself after you’ve drilled holes everywhere.
Fastener spacing follows a simple rule: every 10 to 16 inches along the drip edge keeps everything secure without turning your roof into Swiss cheese. Here’s a pro tip from years of installations – use the “high point” nailing pattern. Place your screws or nails at the raised portions of the drip edge so water flows freely underneath instead of pooling around fasteners.
The overlap technique prevents those annoying gaps where water sneaks through. Each piece should overlap the next by 2 inches, with the upper piece always covering the lower one. Picture how roof shingles work – same principle applies here for proper water shedding.
Sealing all joints wraps up each section before moving to the next. A thin bead of weatherproof sealant at overlaps and fastener holes does the trick. Resist the urge to glob it on thick – excess sealant just collects leaves and debris, making your roof look messy.
For more detailed installation guidance, check out our drip edge installation metal roof resource.
Installing Drip Edge on Existing Metal Roof Without Removing Panels
The wedge method changed everything for retrofit installations. Instead of tearing off perfectly good metal panels, this clever technique lets you slip drip edge underneath existing panels. One contractor working on an old estate figured this out, and it can speed up your installation by about 12 times compared to the old panel-removal method.
Preparing your wedges starts in the workshop, not on the roof. Cut wooden wedges about 6 inches long with a notch carved into the bottom edge. That notch cradles the drip edge flange while lifting the metal panel just enough to slide everything into place. Think of them as temporary helpers that hold things steady while you work.
Lifting panels safely requires patience and timing. Slide your wedges between the metal panels and underlayment every couple of feet, creating a uniform gap. Work during cooler morning hours when panels haven’t expanded from heat – they’re less likely to bind up on you. Lift panels only ¾ to 1 inch maximum; any more puts unnecessary stress on the metal.
The insertion process flows smoothly once you get the rhythm down. Slip the drip edge flange into the space your wedges created, making sure the vertical leg covers the fascia board properly. Remove wedges one by one as you nail the drip edge in place – the panel’s own weight helps hold everything flat against the roof deck.
Sometimes panels won’t lift enough for this method, especially on older installations. The friction-fit approach mounts the drip edge above the panel edge, securing it directly to the fascia. While not the ideal solution, it still provides solid protection when combined with quality sealant.
For broader context on retrofit techniques, these retrofitting tips offer helpful background information.
Cutting & Fitting Corners and Overlaps
Outside corners demand precision to avoid those frustrating gaps where water finds its way in. Make a deep V-shaped cut into the drip edge tip, then bend it to form a clean outside corner. Cut almost to the horizontal leg but not completely through – you need that connection to maintain strength.
Inside corners use a different approach that’s actually easier once you get the hang of it. Cut only the vertical leg of the drip edge and fold it inward, creating a neat inside corner that still sheds water properly. These joints need extra attention with sealant since wind-driven rain loves to find weak spots.
45-degree miters work beautifully for complex roof shapes but require careful measuring and cutting. Use a speed square to mark your cuts, and always test-fit before making final cuts. There’s no “undo” button when working with metal.
Deep V-cuts for multi-bend profiles need a gradual approach. Score the metal progressively rather than trying to cut through in one aggressive pass. This prevents ugly tears and ensures your bend lines stay clean and professional-looking.
The side-over-bottom overlap rule keeps water flowing where it should. Side drip edges always overlap bottom (eave) drip edges, directing water toward gutters instead of letting it sneak behind your gutter system. Get this backward, and you’re creating problems instead of solving them.
Ensuring Corrosion-Safe Connections
Preventing galvanic corrosion protects your investment for decades to come. When different metals touch in the presence of moisture, they create a battery effect that eats away at the weaker metal. Use butyl tape or specialized isolation washers when mixing metal types becomes unavoidable.
Stainless steel fasteners cost more upfront but save money long-term, especially here in New England where our coastal-influenced weather can be tough on metals. These fasteners eliminate the most common failure point in drip edge installations – rusty screws that fail after a few years.
Paint touch-up becomes necessary wherever you cut or drill through factory finishes. Use manufacturer-matched paint or high-quality metal primer to seal exposed edges. Skip this step, and those fresh cuts become rust magnets within a season or two.
Maintaining ventilation gaps prevents moisture buildup behind your drip edge. A tiny 1/16″ to 1/8″ gap allows air circulation, preventing the trapped moisture that leads to corrosion and wood rot. It’s a small detail that makes a big difference over time.
Post-Installation Care, Costs & Common Pitfalls
Once you’ve completed installing drip edge on existing metal roof, proper maintenance and care become essential. Think of your new drip edge like gutters – it works best with regular attention.
Budget planning helps you understand the financial commitment. For a typical DIY project covering 150 feet of roofline, expect to spend $250-$1,500 in materials (these are average costs based on internet data and not actual costs for Chris Battaini Roofing and Seamless Gutters). Standard aluminum drip edge runs $1.50-$9.00 per linear foot, while premium copper can reach $8-$36 per foot.
Supporting materials add up: quality fasteners cost $5-$45 per pack, weatherproof sealant runs $5-$60 per tube, and tool rental can add $50-$300 per day.
Professional installation costs vary significantly. Standard installations typically range from $3-$21 per linear foot, but complex projects with premium materials can reach $15-$75 per foot (these are average costs based on internet data and not actual costs for Chris Battaini Roofing and Seamless Gutters).
Maintenance becomes essential for long-term performance. Monthly visual checks during fall and spring when weather changes stress roofing systems most. Look for loose sections, damaged sealant, or debris accumulation.
Annual detailed inspections should check every overlap joint and fastener point. Pay attention to sealant condition – it typically needs refreshing every 3-5 years depending on climate. After significant storms, walk around your home to spot damage or displacement.
Debris removal becomes easier with proper drip edge installation but remains essential. Leaves and twigs along roof edges can create dams forcing water back under your protection.
Common mistakes can turn good installations into problems. Flush nailing against fascia boards prevents proper drainage. Insufficient overlap between sections creates vulnerable gaps for wind-driven rain.
Skipping sealant at joints ranks among the most expensive shortcuts. That $5 tube prevents hundreds in water damage repairs. Wrong material selection leads to galvanic corrosion – we’ve seen aluminum drip edges completely deteriorate with steel fasteners in coastal areas.
Inadequate fastener spacing allows wind uplift during storms. Space fasteners every 10-16 inches maximum, using recommended fastener types.
For comprehensive guidance on avoiding these pitfalls, check our metal roofing installation resource.

Frequently Asked Questions about Retrofitting Metal Roof Drip Edges
Do I really need a drip edge if my metal panels already overhang?
Installing drip edge on existing metal roof makes sense even when your panels already stick out past the fascia board. Here’s why that overhang alone isn’t enough protection for your home.
Metal panels can actually work against you during storms. Capillary action – that sneaky force that makes water climb up narrow spaces – can draw moisture right back toward your fascia board, especially when wind pushes rain sideways. We’ve seen this happen countless times during nor’easters here in the Berkshires.
A proper drip edge creates what we call a definitive break point. Water hitting that edge has nowhere to go but down into your gutters. It’s like having a tiny cliff that forces water to jump away from your house instead of sneaking back toward the wood.
Plus, that panel overhang might look substantial now, but thermal expansion and contraction can create gaps over time. A dedicated drip edge maintains consistent protection regardless of temperature swings.
Can I mix aluminum drip edge with a copper roof?
Absolutely not – and here’s a story that’ll stick with you. We once saw a beautiful historic home where someone installed aluminum drip edge on a copper roof. Within two years, the aluminum looked like Swiss cheese. The homeowner ended up paying twice – once for the failed installation, then again for proper copper drip edge.
Galvanic corrosion sounds fancy, but it’s basically what happens when two different metals get together in the presence of moisture and decide they don’t like each other. The aluminum becomes the sacrificial metal and corrodes rapidly while the copper stays pristine.
If you absolutely must mix materials – maybe you’re trying to save money on a tight budget – use isolation barriers like butyl tape between the metals and stainless steel fasteners. But honestly, expect to replace that aluminum drip edge in 5-10 years instead of the 20-30 years you’d normally get.
Copper drip edge costs more upfront, but it’ll outlast your roof and probably your mortgage. Sometimes the expensive option is actually the bargain in the long run.
How often should I inspect and reseal the overlaps?
Annual inspections should become as routine as checking your smoke detector batteries. We recommend timing these checks with your fall gutter cleaning – you’re already up there, so take a few extra minutes to examine the drip edge.
Resealing typically happens every 3-5 years, depending on your sealant quality and weather exposure. Those cheap tubes of caulk from the hardware store might need attention every 2-3 years, while high-quality polyurethane sealants can go 5-7 years before showing wear.
Warning signs that tell you it’s time to reseal include cracked sealant that looks like dried mud, missing chunks where sealant has fallen out, or hardened material that feels brittle when you press it with your finger. Fresh sealant should feel slightly flexible, even in cold weather.
Post-storm checks become critical after significant wind or hail events. High winds can work sealant loose at overlap points, creating entry points for future storms. A quick visual inspection after severe weather can save you from water damage later.
The key is catching problems early. A $5 tube of sealant applied at the right time can prevent hundreds of dollars in fascia board replacement down the road.
Conclusion
Installing drip edge on existing metal roof systems truly transforms your home’s protection against water damage, pest infiltration, and costly repairs down the road. We’ve walked through everything from selecting the right materials to mastering the wedge technique that makes retrofit installation so much easier than traditional methods.
The beauty of this upgrade lies in its simplicity and effectiveness. For a relatively modest investment – typically $250-$500 in materials for most homes – you’re adding a critical layer of protection that can prevent thousands of dollars in fascia rot, foundation damage, and structural issues.
You don’t need to be a roofing expert to tackle this project successfully. The retrofit techniques we’ve covered, especially the innovative wedge method for lifting existing panels, make drip edge installation accessible to confident DIYers while remaining cost-effective for professional installation.
Building codes are catching up to what experienced roofers have known for decades – proper edge protection isn’t optional, it’s essential. Many metal roofing warranties now require drip edge installation, and home inspectors increasingly flag missing drip edges as maintenance issues that can affect resale value.
The peace of mind factor can’t be overstated. Once you’ve properly installed drip edge around your metal roof, you’ll notice the difference during the next heavy rainstorm. Water flows cleanly into gutters instead of finding its way behind fascia boards or under roof edges.
Remember the key principles we’ve emphasized throughout: match your materials to prevent corrosion, maintain proper overlaps and sealant application, and don’t skip the annual inspections that keep everything working properly.
Whether you tackle this as a weekend project or call in professionals, the investment in proper drip edge protection pays dividends in reduced maintenance, improved home value, and protection against our unpredictable New England weather.
For expert guidance custom to your specific roof configuration and local conditions, explore our comprehensive roofing and guttering services. We bring decades of experience to every drip edge retrofit project, ensuring your installation meets both current building codes and manufacturer warranty requirements.
Chris Battaini Roofing and Seamless Gutters serves Berkshire, Hampden, Hampshire, and Franklin Counties in Massachusetts, providing owner-led expertise and exceptional warranties on every project we complete.
