

Why Flat Roofing Installation is More Popular Than Ever
Flat roofing installation is becoming the go-to choice for homeowners and businesses across Massachusetts who want cost-effective, versatile roofing solutions. Here’s what you need to know:
Quick Installation Overview:
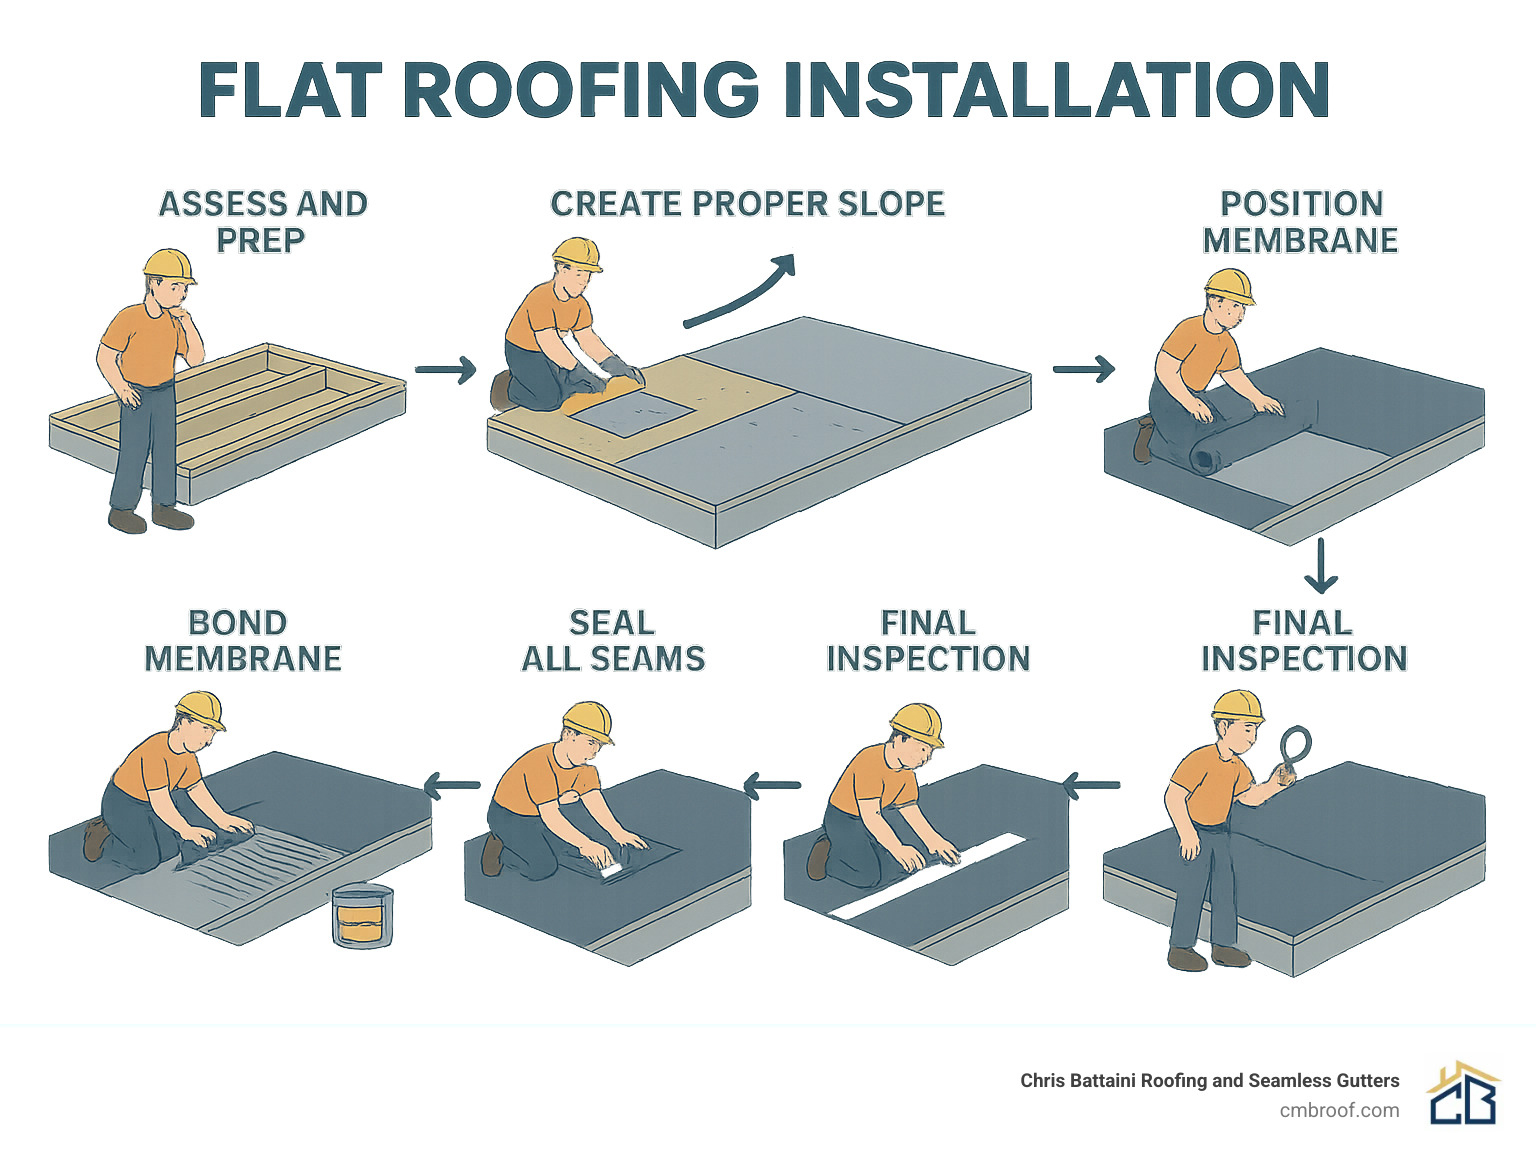
1. Assess and prep the roof deck structure
2. Create proper slope (minimum 1/8″ per foot) and install insulation
3. Apply vapor barrier and underlayment (iso board)
4. Position membrane and let it relax for 30 minutes
5. Bond membrane using water-based adhesive in field, contact adhesive at perimeter
6. Seal all seams with 6-inch tape, flash penetrations and edges
7. Final inspection including drain test and walkthrough
Unlike pitched roofs that shed water quickly, flat roofs work differently. They’re never truly flat – they need a slight slope toward drains or scuppers to prevent water pooling.
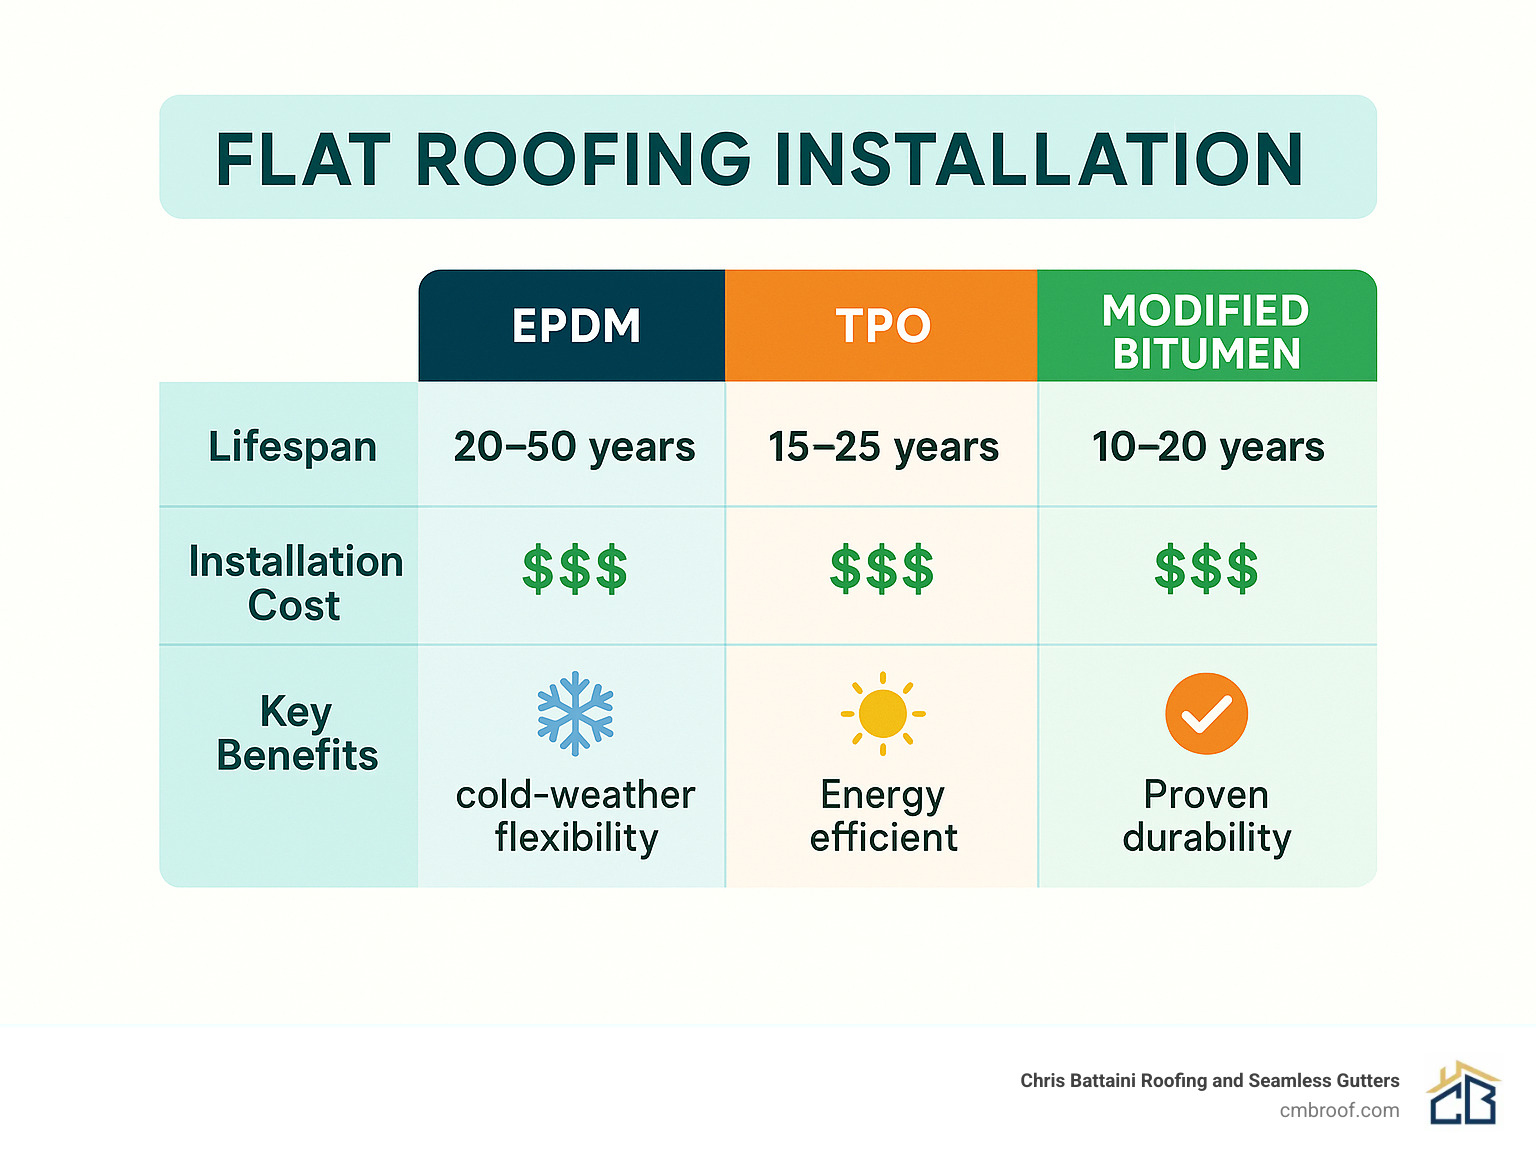
Modern flat roofs can last 10-30 years when installed correctly. EPDM rubber membranes are popular for their durability, while TPO and PVC offer energy-saving reflective surfaces. Modified bitumen provides excellent weather resistance for our New England climate.
The key to success? Proper preparation and attention to detail. Many flat roof failures happen because of poor drainage design or rushed installation. That’s why understanding each step matters – whether you’re planning a DIY project or want to know what your contractor should be doing.
As one roofing expert notes: “Flat roofs are difficult to install properly, and as a result, many don’t last for anything close to the life span they’re capable of achieving.”
Flat roofing installation word roundup:
– flat roofing materials
– high quality flat roofing
– types of flat roofs
Why Flat Roofs? Pros, Cons & Popular Materials
Flat roofs aren’t just for big box stores anymore. We’re seeing more homeowners in Berkshire County find what commercial builders have known for decades – flat roofing installation offers some pretty compelling advantages.
The biggest draw? Cost and versatility. You’ll use less material than a pitched roof, and the installation goes faster too. But here’s where it gets interesting – that “roof” becomes usable space. We’ve helped customers install everything from rooftop gardens to solar panel arrays.
Energy savings are real too. Reflective membranes can slash your cooling costs significantly during those hot Massachusetts summers. The clean, modern lines also complement today’s architectural styles beautifully.
Now, let’s be honest about the challenges. Flat roofs need more attention than their sloped cousins. Water pooling is your biggest enemy – if drainage isn’t designed properly, you’ll have problems. That’s why we recommend twice-yearly inspections. Our New England winters are tough on any roof, but especially one that holds snow longer.
The material you choose makes all the difference. EPDM synthetic rubber dominates about 40% of commercial installations for good reason. This black membrane stays flexible down to -60°F (perfect for those brutal February nights) and can last up to 50 years when installed correctly.
TPO thermoplastic offers a different approach – it’s white and reflective, heat-welded at the seams for superior strength. Expect over 20 years of life with excellent summer energy savings. PVC works similarly but handles chemical exposure better, making it ideal if you’ve got HVAC equipment that might drip oils.
Modified bitumen brings asphalt-based reliability to the table. It can reduce heat transfer by up to 50% and adapts to different installation methods – torch-applied or self-adhering depending on your situation.
Built-up roofing (BUR) is the old-school “tar and gravel” approach using multiple layers of bitumen and reinforcement. Don’t let its age fool you – properly maintained BUR systems regularly hit 30+ years. Metal panels in aluminum, steel, or copper cost more upfront but resist hail damage and reflect solar energy beautifully.
Scientific research on cold-roof condensation helps us design systems that prevent moisture problems before they start. For detailed comparisons of these materials, check out our comprehensive guide on flat roofing materials.
Essential Tools & Materials Checklist
Getting your flat roofing installation off to the right start means having everything you need before you climb up on that roof. Trust me – there’s nothing worse than realizing you’re missing a crucial tool when you’re halfway through applying adhesive on a time-sensitive membrane.
Safety comes first, always. You’ll need non-slip footwear with excellent grip, safety harnesses and rope systems, and don’t forget your hard hat and safety glasses. Good work gloves rated for roofing will save your hands, and keep a first aid kit on-site. I’ve seen too many accidents happen when people skip the safety gear.
For prep work, grab some soft-bristled brooms for cleaning the deck, utility knives with fresh blades (buy extra – you’ll go through them), and a 100-foot measuring tape. A chalk line helps with marking, and if you’re removing old materials, a toothed spade makes the job much easier.
The actual installation requires specific tools that make all the difference. You’ll need a 9-inch hand roller for adhesive application and a 3-inch neoprene seam roller for those critical seams. An adhesive applicator or brush keeps things neat, while a caulking gun handles sealants. Don’t forget a masonry drill for anchor installation.
Material selection depends on your chosen membrane system. For EPDM installations, you’ll need the EPDM membrane itself (45-90 mil thickness works best), high-density gypsum board at 3/8-inch thickness, and iso board insulation. The adhesives are crucial – water-based deck adhesive for the field and contact adhesive for perimeter work.
Sealing components include 6-inch EPDM seam tape, seam primer, termination bars, and drip edge or gravel stop flashing. Stock up on roofing screws and plate washers – you’ll use more than you think.
Proper drainage requires roof drains in 8-1/2″, 12″, or 15″ diameters, sump pans sized for your joist spacing, scuppers for edge drainage, and downspouts with gutters to complete the water management system.
The key is matching your material choice to your specific situation. For our Massachusetts climate, we often recommend EPDM for its cold-weather flexibility or modified bitumen for its proven track record in freeze-thaw cycles. Having quality materials makes the difference between a roof that lasts 10 years and one that protects your building for 30 years or more.
For comprehensive information about all roofing materials, visit our roofing materials guide.
Step-by-Step Flat Roofing Installation (Primary Keyword)
Now let’s dive into the actual flat roofing installation process. Each step builds on the previous one, so taking your time and doing it right the first time is essential.
Step 1: Assess & Prep the Deck – Flat Roofing Installation Starts Here
Structural Review:
Before any flat roofing installation begins, we thoroughly inspect the existing roof deck. We look for:
– Sagging or damaged joists
– Rotted or delaminated plywood
– Proper load-bearing capacity
– Adequate ventilation pathways
Deck Preparation:
1. Remove all existing materials down to the structural deck using a toothed spade
2. Clean the surface with a soft-bristled brush, removing all dust, debris, and loose materials
3. Fill any cracks larger than 1/4 inch with wood strips or appropriate filler
4. Replace damaged plywood sections – we typically use 5/8-inch plywood with 1/8-inch gaps at joints for thermal expansion
5. Check for proper slope – even “flat” roofs need at least 1/8 inch per foot toward drainage points
Step 2: Create Proper Slope & Install Insulation
Creating the Right Slope:
Flat roofs are never truly flat. We build in a minimum slope of 1/8 inch per foot (some manufacturers require 1/4 inch per foot) to ensure water flows toward drains or scuppers.
Insulation Installation:
– Warm Roof Assembly: Insulation goes above the deck, preventing condensation issues in cold climates like ours in Massachusetts
– Cold Roof Assembly: Insulation below the deck with proper ventilation – less common in flat roof applications
– Tapered Insulation Panels: Pre-cut panels that create slope while providing R-value
We typically install 1/2-inch high-density gypsum board (1000 psi) over the insulation. This creates a stable, non-compressing substrate that won’t deflect under foot traffic or equipment loads.
Step 3: Apply Vapor Barrier & Underlayment
Moisture Control:
In our New England climate, controlling moisture is critical. We install a vapor barrier on the warm side of the insulation to prevent interior humidity from reaching the cold roof deck where it could condense.
Iso Board Installation:
– Fit pieces tightly with no gaps – this is the only layer that doesn’t allow for expansion and contraction
– Stagger joints to prevent thermal bridging
– Secure with appropriate fasteners – typically screws with plate washers every 12 inches
The iso board provides a smooth, stable surface for membrane adhesion and adds additional R-value to the system.
Step 4: Position & Relax Membrane
This step is often overlooked, but it’s crucial for a successful installation.
Membrane Positioning:
1. Unfold the EPDM membrane carefully to avoid punctures
2. Position with 9-inch overhang around all perimeters
3. Align seams properly if multiple sheets are needed
4. Check for wrinkles or folds
The 30-Minute Rest:
Here’s where patience pays off. Let the membrane rest for 30 minutes before bonding. This allows the material to expand and relax, eliminating wrinkles that could cause problems later.
Step 5: Bond Membrane & Roll Out Air
Adhesive Application:
We use a two-part adhesive system for optimal results:
Field Area (Water-Based Adhesive):
1. Fold back half the membrane to expose the substrate
2. Apply water-based adhesive with a 9-inch roller to both the substrate and membrane
3. Wait for solvents to flash off – the adhesive should be tacky but not wet
4. Carefully roll the membrane back into position
5. Use a soft broom to work out air bubbles, working from center outward
Perimeter (Contact Adhesive):
1. Apply contact adhesive to the 150mm (6-inch) perimeter zone
2. Apply to both surfaces – substrate and back of membrane
3. Wait until touch-dry but still tacky
4. Press membrane firmly into place – you only get one chance with contact adhesive!
Step 6: Seal Seams, Penetrations & Edges – Flat Roofing Installation Critical Zone
This is where many flat roofing installations succeed or fail. Proper sealing is everything.
Seam Sealing:
1. Clean both surfaces where seams will overlap
2. Apply seam primer to both layers – this improves tape adhesion significantly
3. Install 6-inch seam tape with the release paper aligned 1/8 to 1/4 inch over the overlap
4. Roll with a 3-inch neoprene roller – every inch must be rolled to activate the adhesive
5. Trim excess tape with a sharp utility knife
Penetration Sealing:
– Pipe boots: Use preformed EPDM boots, seal the base with mastic, and secure with hose clamps
– Vents and equipment: Custom-flash each penetration with membrane material and appropriate sealants
– Chimneys and walls: Install termination bars every 8 inches with appropriate anchors
Edge Details:
– Drip edges: Turn membrane over the edge, then install drip edge or gravel stop over the membrane
– Parapet walls: Extend membrane up the wall, secure with termination bar, and install counterflashing
– Scuppers: Critical drainage points that need careful detailing to prevent leaks
Step 7: Final Inspection & Clean-Up
Comprehensive Inspection:
1. Walk the entire roof looking for any defects, wrinkles, or unsealed areas
2. Test all drains by flooding them with water – they should drain completely within 48 hours
3. Check all penetrations for proper sealing
4. Verify edge details are properly secured and sealed
5. Document with photos for warranty purposes
Drainage Test:
We pour water on the roof and verify it flows toward drains without pooling. Any standing water after 48 hours indicates a slope problem that needs correction.
Clean-Up:
– Remove all debris and old materials
– Clean gutters and downspouts
– Dispose of materials properly
– Leave the site cleaner than we found it
Drainage & Waterproofing Best Practices
Here’s the truth about flat roofs: they live or die by their drainage. We’ve seen perfectly installed membranes fail within a few years simply because water had nowhere to go. Get the drainage right, and your flat roofing installation will serve you well for decades.
Water always wins. That’s our motto when designing drainage systems. If you give water a chance to pool and sit, it will eventually find its way through even the best membrane.
Internal drains are the workhorses of flat roof drainage. We typically use bottom-outlet drains when there’s at least 13 inches of vertical clearance below the roof deck. These connect directly to the building’s internal drainage system and handle large volumes of water efficiently. When space is tight, side-outlet drains work well with just 8-9 inches of clearance.
Here’s where many installations go wrong: sump pans. These create a small depression around each drain, ensuring water flows directly into the drain opening rather than potentially bypassing it.
Scuppers serve as your backup plan and sometimes your primary drainage. Wall scuppers cut through parapet walls to let water escape, while edge scuppers work at roof perimeters. We always install overflow scuppers positioned 2 inches above primary drains. During heavy storms, these act as relief valves, preventing water from backing up.
Tapered insulation systems have revolutionized how we handle drainage on existing flat roofs. Instead of tearing off everything to rebuild slope into the structure, we can install pre-engineered tapered panels that create the proper pitch while adding R-value.
Ponding prevention starts with that critical minimum 1/8 inch per foot slope toward all drainage points. We test this by actually flooding sections of the roof during installation. If there’s standing water after 48 hours, we know there’s a problem that needs fixing before we call the job complete.
Regular maintenance keeps everything flowing smoothly. Clogged drains are the enemy of flat roofs, turning minor rainstorms into potential disasters. We recommend cleaning drains twice yearly and after any major storms when debris might accumulate.
Scientific research on roof-drain placement helps us position drainage points for maximum efficiency. When problems do arise, our roof inspection services can identify drainage issues before they become costly repairs.
The bottom line? Great drainage isn’t expensive – it’s priceless. Spending a little extra on proper slope and quality drains saves thousands in potential water damage repairs down the road.
Costs, Lifespan & Maintenance
Here’s the reality about flat roofing installation costs – they’re all over the map, and for good reason. Your neighbor’s simple ranch house replacement will cost a lot less than a complex commercial building with multiple penetrations and equipment.
What You Can Expect to Invest:
The basic EPDM systems typically run $4-8 per square foot, making them the budget-friendly choice for many homeowners. TPO and PVC installations usually fall between $6-12 per square foot, with their energy-saving benefits often justifying the extra cost. Modified bitumen systems land somewhere in the middle at $5-10 per square foot, while traditional built-up roofing ranges from $8-15 per square foot.
For high-end systems with premium materials and complex details, you might see costs reaching $15-30+ per square foot. These typically involve specialized membranes, extensive insulation upgrades, or challenging architectural features.
These are average costs based on internet data and not actual costs for Chris Battaini Roofing and Seamless Gutters. Every roof is different, so contact us for accurate pricing specific to your project.
How Long Will Your Investment Last?
This is where flat roofs really shine when installed properly. EPDM membranes are the marathon runners of the roofing world, lasting anywhere from 20-50 years with good care. We’ve seen well-maintained EPDM roofs in Massachusetts that are still going strong after 30 years.
TPO systems typically give you 15-25 years of reliable service, while PVC membranes can last 20-30 years. Modified bitumen usually provides 10-20 years of protection, and built-up roofing systems can go 15-30 years when properly maintained.
The key word here is “maintained.” A neglected roof rarely reaches its potential lifespan, regardless of the material.
Keeping Your Roof Healthy:
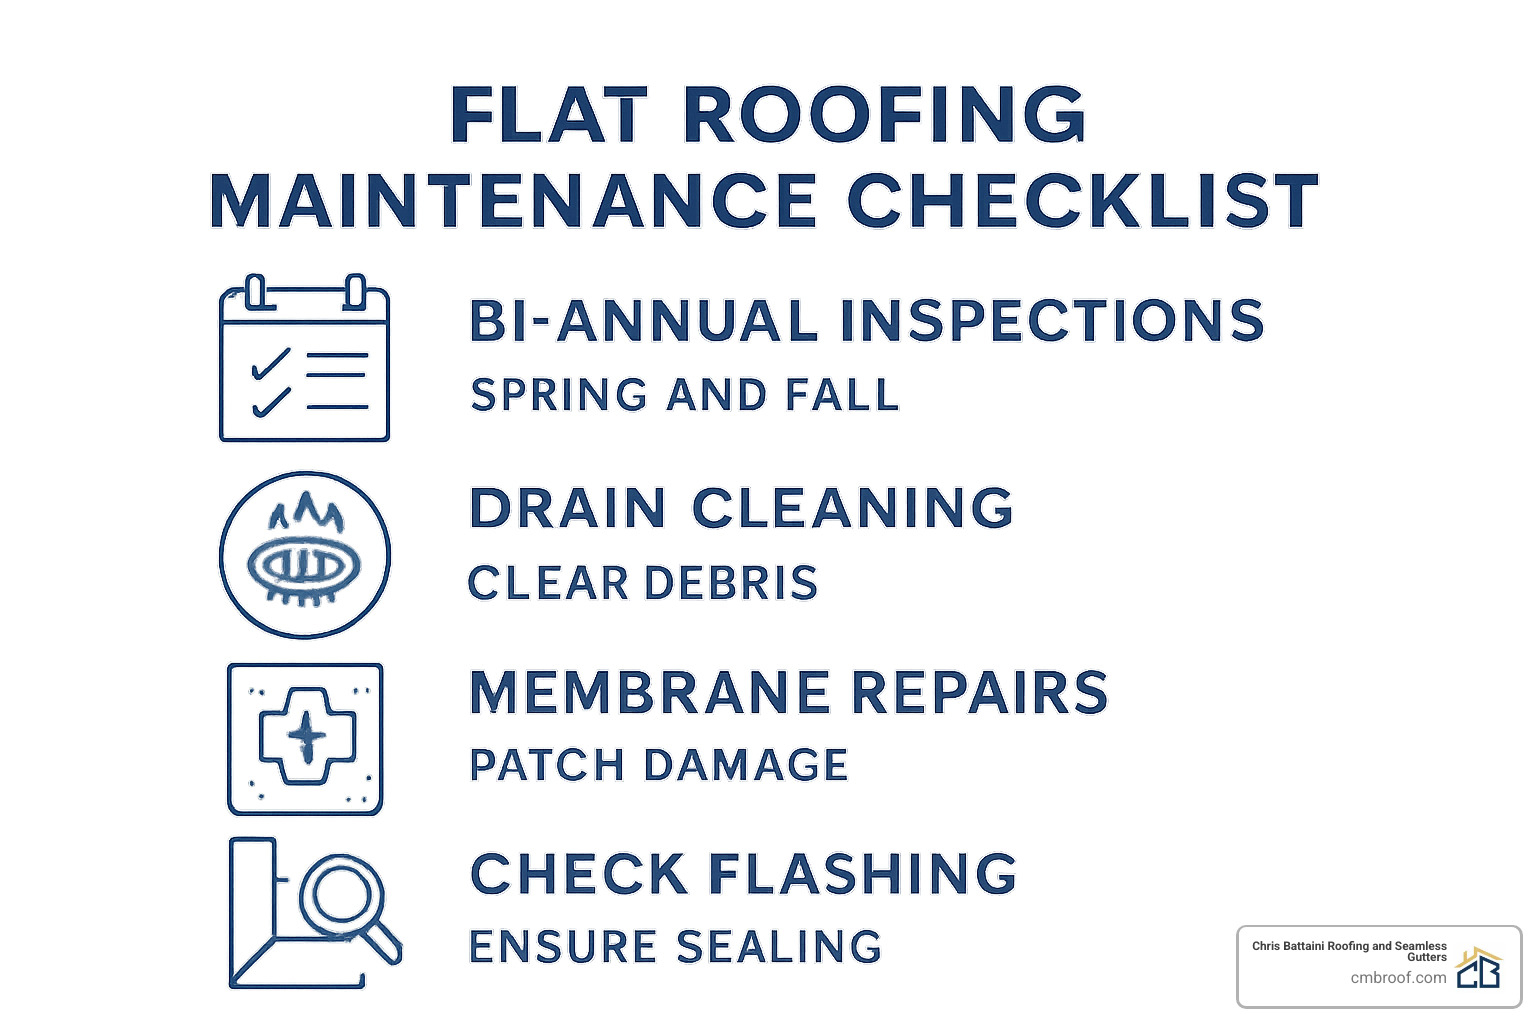
Think of flat roof maintenance like changing your car’s oil – skip it, and you’ll pay dearly later. Bi-annual inspections in spring and fall catch small problems before they become big headaches. We also recommend post-storm inspections after any major weather event.
Drain cleaning is absolutely critical. A clogged drain can destroy a roof faster than almost anything else. Immediate repairs of any punctures or tears prevent water from getting where it shouldn’t be. Some systems benefit from recoating every 10-15 years to refresh their protective properties.
What Maintenance Actually Costs:
An annual professional inspection typically runs $200-500 – a small price for peace of mind. Minor repairs like sealing a small puncture or replacing a pipe boot usually cost $150-800. Major repairs involving significant membrane replacement can range from $1,000-5,000, while recoating runs about $2-4 per square foot.
Here’s the thing – that $300 inspection that catches a small problem early can save you thousands in emergency repairs later. We’ve seen too many situations where a $200 repair turned into a $10,000 replacement because it was ignored.
The bottom line? Flat roofing installation is an investment that pays dividends when done right and maintained properly. A quality system with regular care will protect your building for decades.
For professional maintenance and repairs, explore our commercial roof repair solutions.
Frequently Asked Questions about Flat Roofing Installation
Do flat roofs leak more than pitched roofs?
Not when they’re installed correctly. Water does remain on a low-slope roof longer, so sloppy work shows up faster, but with proper slope, tight seams and routine maintenance a flat roof is just as watertight as a steep one.
How long does a typical flat roof take to install?
- Under 1,000 sq ft: 1–3 days
- 1,000–5,000 sq ft: 3–10 days, depending on insulation and penetrations
- 5,000 sq ft and up: 1–4 weeks; longer if weather or complex detailing slows the crew
Weather delays and roof complexity are the biggest schedule wildcards.
Can I DIY a flat roofing installation or should I hire a pro?
A handy owner might tackle a small, single-story EPDM roof. Anything larger, multi-level, or requiring heat-welded seams should be left to a certified installer. Professional work keeps material warranties intact, meets code, and usually costs less than fixing a failed DIY job later.
Conclusion
Flat roofing installation doesn’t have to be overwhelming when you understand the process and work with the right team. We’ve walked through everything from material selection to final inspection, and one thing becomes clear: success comes down to doing things right the first time.
The beauty of a well-installed flat roof is that it quietly does its job for decades. No dramatic slopes or complex angles – just reliable protection that gives you usable space and energy savings. But that simplicity is deceiving. Behind every successful flat roof is careful attention to proper slope creation, quality membrane bonding, and meticulous sealing of every seam and penetration.
At Chris Battaini Roofing and Seamless Gutters, we’ve seen what happens when flat roofs are rushed or installed by inexperienced crews. That’s why our owner-led approach means you get personal oversight on every project. No subcontractors learning on your dime, no shortcuts to meet unrealistic deadlines.
Whether you’re planning a flat roofing installation for your Pittsfield home or replacing a commercial roof in Northampton, the fundamentals remain the same. Start with a solid structural assessment, create proper drainage, use quality materials, and never compromise on the details that matter.
The investment makes sense when you consider the long-term benefits. A properly installed EPDM roof can last 30+ years with minimal maintenance. That’s decades of protection, energy savings, and peace of mind. Compare that to the headaches and costs of dealing with a poorly installed roof that fails after just a few years.
We’re proud to serve homeowners and businesses throughout our region with the kind of craftsmanship that stands the test of time. Our comprehensive warranties back up our work because we’re confident in what we deliver.
Ready to move forward? Every great flat roof starts with an honest assessment of your current situation. We’ll evaluate your roof structure, discuss your goals and budget, and provide straightforward recommendations without any pressure tactics.
The roofing industry keeps evolving with new materials and techniques, but our commitment stays the same: exceptional workmanship that protects your investment for years to come. When you choose us, you’re choosing a team that takes pride in every detail.
Schedule your free roof assessment today and find why so many property owners in our area trust us with their most important investment. For more information about our comprehensive roofing services, visit our roof installation page.
Chris Battaini Roofing and Seamless Gutters proudly services Berkshire, Hampden, Hampshire, and Franklin Counties in Massachusetts.
