

The Complete Guide to Attaching Metal Roofing Panels
Attaching metal roofing properly is crucial for ensuring your roof lasts 40-70 years instead of failing prematurely. Here’s what you need to know at a glance:
| Fastening Method | Panel Type | Where to Place Fasteners | Spacing |
|---|---|---|---|
| Exposed Fasteners | Corrugated/Ribbed | On the rib peaks (corrugated) or in valleys (ribbed) | Every rib at eaves/ridge, 24″ apart in field |
| Concealed Clips | Standing Seam | Hidden clips attach to deck | Per manufacturer specs, typically 24″ apart |
| Direct Deck | R-panels | In the flat beside ribs | 24″ apart in rows |
Metal roofing has gained tremendous popularity for good reason. With its sleek appearance, incredible durability, and energy-saving reflective properties, a properly installed metal roof is an investment that pays dividends for decades.
But let’s be honest – the success of your metal roof depends almost entirely on how well it’s attached to your roof deck.
When done right, attaching metal roofing creates a weather-tight shield that can withstand hurricane-force winds and shed heavy snow loads with ease. When done poorly, those same panels can become dangerous projectiles or develop persistent leaks that damage your home.
The good news? By understanding the fundamentals of metal panel attachment, you can ensure your installation goes smoothly whether you’re a DIYer tackling a small shed or hiring professionals for your home.
This guide will walk you through everything you need to know about securing metal roofing panels properly – from panel selection to fastener placement, tools, and techniques that professionals use to create lasting, leak-free installations.
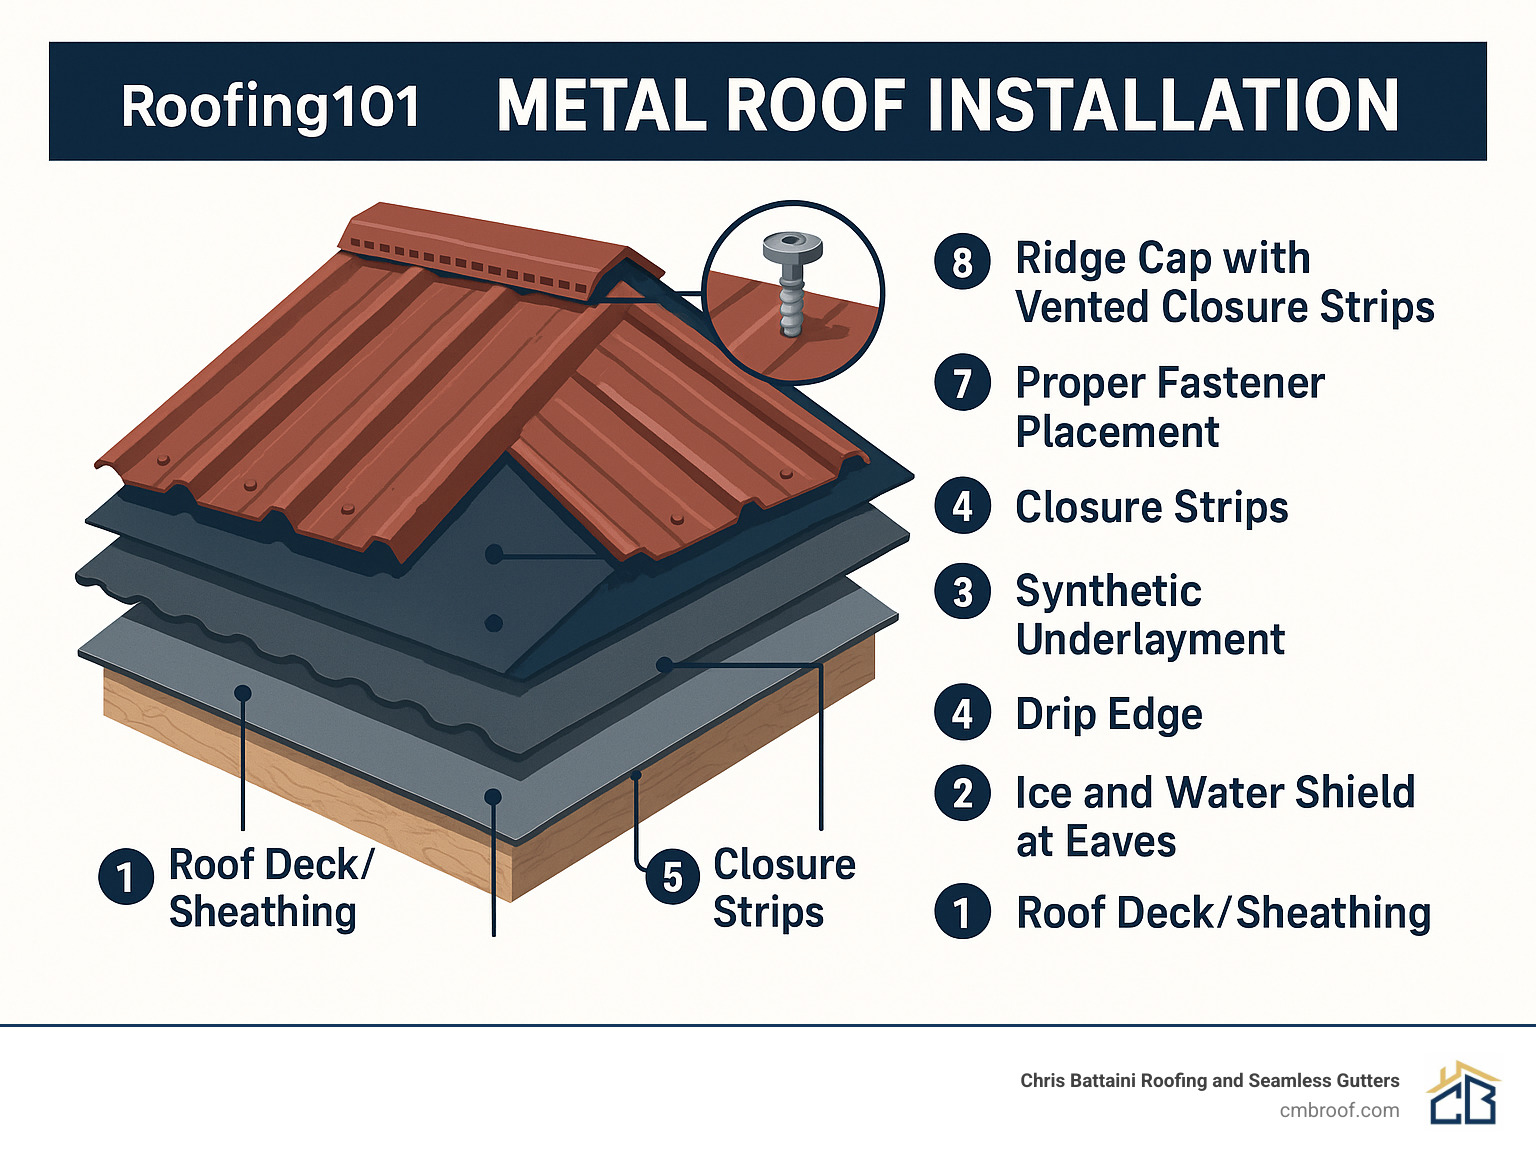
As one experienced installer noted in our research: “Build roof layers from underlayment up so water sheds from one layer to the next” – this layering concept is the foundation of successful metal roof installation.
Meet the Metal: Choosing the Right Panel Profile
Selecting the perfect metal panel for your roof isn’t just about looks—it’s the foundation that determines everything from installation methods to the lifespan of your roof. Let’s explore your options to ensure you make an informed choice before the first panel goes up.
Common Metal Roofing Panel Types
When you’re standing in front of samples trying to decide, each profile has distinct advantages and installation requirements.
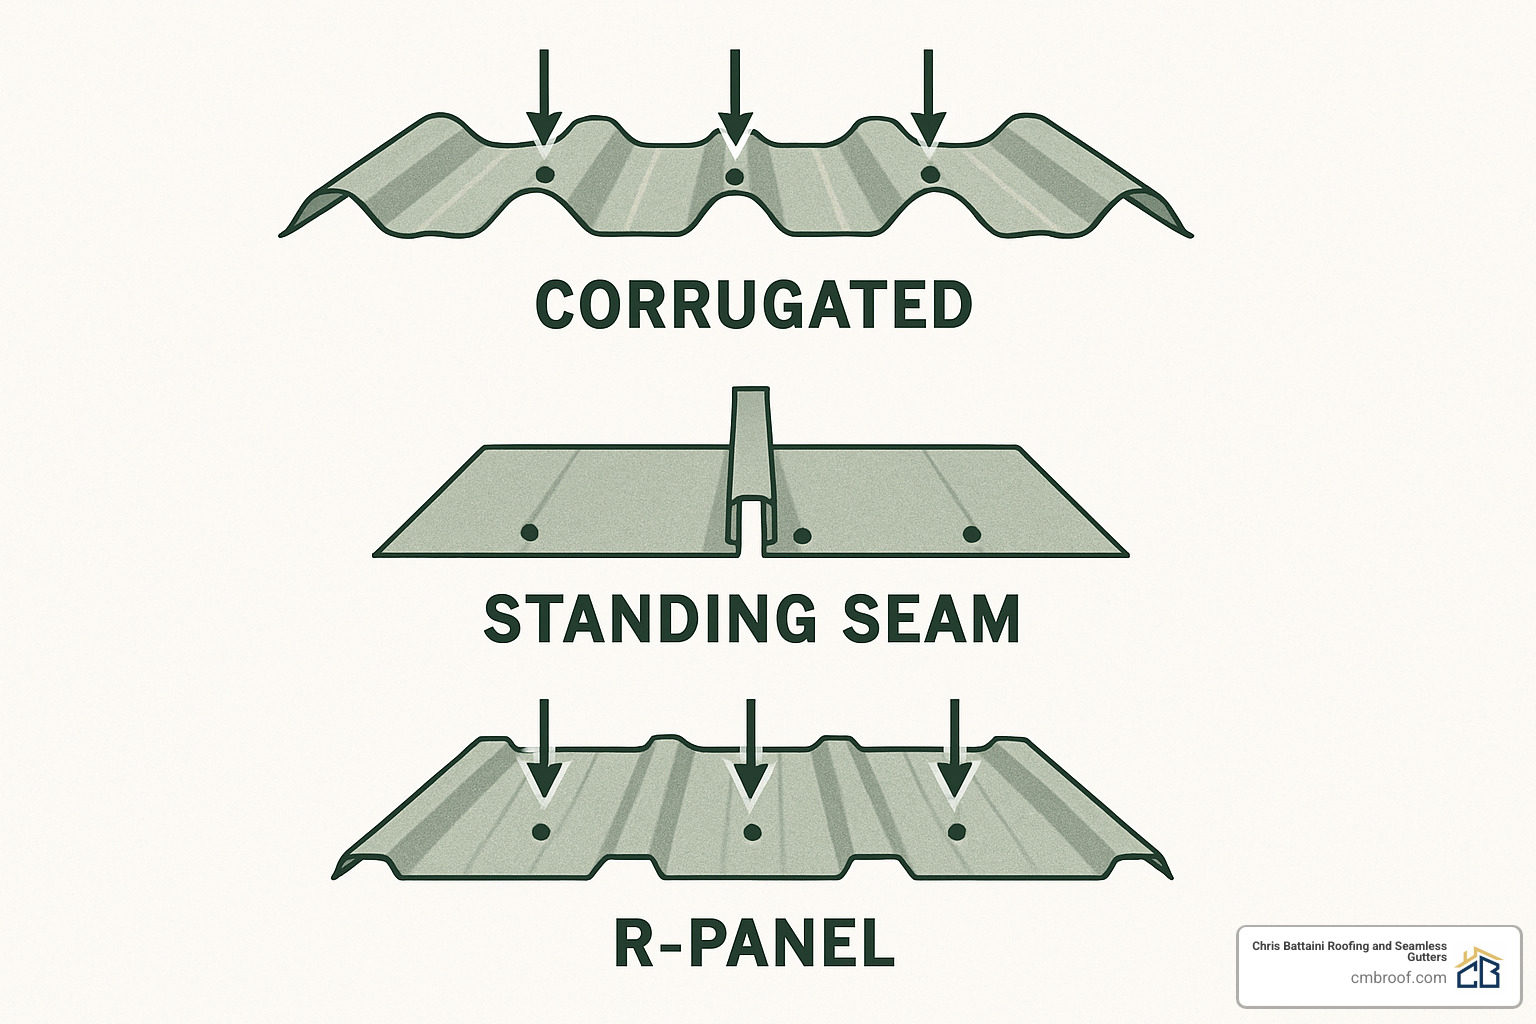
Corrugated panels offer that classic wavy pattern that many associate with metal roofing. They’re budget-friendly and surprisingly versatile. When attaching metal roofing of this type, fasteners go through the peaks of those waves—never in the valleys where water collects.
Ribbed or R-panels feature a more modern, trapezoidal design with flat areas between raised ribs. These workhorses of the metal roofing world require fasteners in the flat sections adjacent to the ribs, creating a secure attachment that still allows water to flow freely.
Standing seam panels represent the premium end of metal roofing. With their clean, vertical legs that snap or seam together, they hide fasteners completely. No holes through the panel surface means exceptional weather protection, though at a higher price point and installation complexity.
Modular metal shingles give you the look of traditional roofing materials with metal’s durability. These interlocking pieces typically have hidden fastening systems at their top edges, concealed by the next course—offering a best-of-both-worlds solution.
Your choice should consider more than just appearance:
A steeper roof pitch (3:12 minimum for most profiles) ensures proper water shedding. If you live in a high-wind area, you’ll need panels and fastening systems rated accordingly. Heavy snow regions call for heavier gauge metal and potentially closer fastener spacing. And be honest about your skill level—standing seam systems generally require specialized tools and experience.
Why Profile Choice Dictates Attaching Metal Roofing Methods
Each profile has its own “rules of engagement” when it comes to installation:
With corrugated panels, attaching metal roofing means driving rubber-gasketed screws through the tops of the ribs. This keeps water moving across the surface rather than pooling around fasteners. The key is proper torque—enough to compress the washer slightly without crushing it.
Standing seam panels use an entirely different approach. Clips attach to your roof deck, and panels snap or mechanically seam over them—no penetrations through the visible surface. This not only prevents leaks but allows the metal to expand and contract with temperature changes.
R-panels strike a middle ground, with fasteners placed in the flat area beside each major rib. As one veteran installer told us, “The fastening pattern is everything with R-panels—too sparse and wind can get underneath; too dense and you’re just adding more potential leak points.”
Ordering Panels & Trim Like a Pro
Once you’ve chosen your profile, ordering correctly saves headaches later:
Panel length matters—always try to run panels uninterrupted from eave to ridge. While manufacturers can produce panels up to 40 feet long, transportation realities sometimes limit this. Plan accordingly.
Always order 10% extra for waste, cuts, and the inevitable “oops” moments. That small additional cost upfront beats coming up short mid-installation.
Color matching is crucial—order all components (panels, trim, fasteners) simultaneously to ensure everything matches perfectly. Even the same color produced months apart can show subtle variations.
Plan for lead times, especially with custom colors or profiles. Metal roofing isn’t typically an off-the-shelf product, so factor manufacturing time into your project schedule.
Don’t forget the supporting cast—closure strips, butyl tape, and proper fasteners designed specifically for your chosen panel. These seemingly minor accessories play major roles in creating a weathertight installation.
By understanding these profile options and their specific requirements, you’ll be well-positioned to make informed decisions that affect both the installation process and the long-term performance of your metal roof.
Chris Battaini Roofing and Seamless Gutters proudly services Berkshire, Hampden, Hampshire, and Franklin Counties in Massachusetts.
Gear Up: Tools, Materials & Safety Essentials
Getting ready to install your metal roof? Having the right tools and materials on hand before you start climbing that ladder will make attaching metal roofing so much easier. Trust me, there’s nothing worse than being halfway through a panel installation and realizing you’re missing that one crucial tool!
Essential Tools for Metal Roof Installation
Think of your tool belt as your best friend during this project. A cordless drill with a clutch setting is absolutely essential – that clutch will prevent you from over-driving fasteners and crushing those neoprene washers. While some folks swear by impact drivers, I’ve found a good drill with a properly set clutch gives you more control.
You’ll also need a quality set of aviation snips for cutting panels. Pro tip: color-coded snips (red for left cuts, green for right cuts, and yellow for straight) will make your life so much easier when trimming around obstacles.
Don’t forget your hand seamer for those precise bends in flashing and trim. A rubber mallet helps seat panels without denting them, and a good magnetic sweeper is worth its weight in gold for collecting those tiny metal shavings that can cause rust spots down the road.
Your basic measuring tools round out the collection – tape measure, chalk line, and a good square to ensure those first panels start perfectly aligned.
Materials Checklist
Beyond the panels themselves, you’ll need self-tapping screws with neoprene washers that match your roof color. Buy more than you think you’ll need – running short mid-installation is a headache you don’t want.
Butyl tape is your secret weapon for waterproofing panel overlaps and trim connections. It’s sticky, messy, and absolutely essential for a leak-free roof. Pair it with closure strips – those foam pieces shaped to match your panel profile – to seal off the open ends at eaves and ridges.
Your underlayment system is your roof’s last line of defense against moisture. Use ice-and-water shield at eaves and valleys (at least 36″ wide) and a quality synthetic underlayment for the main roof field.
Don’t skimp on trim pieces either. You’ll need drip edge, eave trim, gable trim, ridge caps, and valley metal that’s compatible with your panel system. And grab some panel sealant for those spots where extra weatherproofing is needed.
Safety First When Attaching Metal Roofing
Let’s talk about keeping you in one piece. Metal roofing installation comes with serious hazards, and I’ve seen too many DIYers take unnecessary risks.
Fall protection isn’t optional – it’s essential. OSHA requires protection for heights above 6 feet, but honestly, any fall can be dangerous. Invest in a proper fall-arrest harness, roof anchors, and lifelines. Secure your ladder with tie-offs and have someone spot you when possible.
Those panels have edges like paper cutters, so cut-resistant gloves and long sleeves aren’t just comfortable – they’re your skin’s best defense. Add safety glasses to protect from flying metal shavings and debris.
Be extremely cautious of electrical hazards – metal conducts electricity beautifully (not a good thing when you’re holding it). Check for overhead power lines before raising panels, and never, ever work during lightning storms or high winds.
The weather matters more than you might think. Metal becomes dangerously slippery when wet, panels turn into sails in high winds, and on hot days, that metal heats up fast enough to cause burns. Morning hours tend to offer the best conditions for safe installation.
Master Checklist: Load-Out & Staging
Smart material handling saves time and prevents damage. When your panels arrive, store them properly – off the ground on a slight angle to prevent water pooling. Skip the plastic tarps that trap moisture and cause condensation; use breathable covers instead.
When loading the roof, distribute panel bundles evenly across the structure to avoid overloading any one area. Keep fasteners organized in clearly labeled containers – mixing up screw types mid-installation is frustrating and potentially dangerous.
Establish clean drop zones and use debris nets to catch the inevitable scraps and shavings. Make it a habit to do regular magnetic sweeps of your work area – those tiny metal bits can rust and damage your beautiful new panels if left behind.
Finally, always have a weather contingency plan. Know how you’ll quickly secure materials if unexpected weather moves in. Nothing ruins a roof installation faster than a surprise thunderstorm with panels only partially attached!
We at Chris Battaini Roofing and Seamless Gutters have seen how proper preparation makes all the difference between a smooth installation and a stressful one. Taking the time to gather the right tools and materials now will pay dividends in the quality and longevity of your metal roof.
Deck Prep & Flashing Fundamentals
Before you even think about attaching metal roofing panels, you need to create a solid foundation. Think of your roof as a layered system—like a well-crafted sandwich where each ingredient plays a crucial role in keeping water where it belongs: outside your home.
Deck Inspection and Preparation
Let’s start with the basics—your roof deck needs to be in tip-top shape. While some folks might tell you it’s fine to install over existing shingles, we’ve seen enough problems down the road to recommend starting fresh whenever possible.
First, strip away old roofing materials down to the deck. This gives you the chance to spot any hidden issues that might cause headaches later. Look for soft spots, rotted wood, or areas where previous leaks may have damaged the structure. Replace any compromised decking—this isn’t the place to cut corners!
Once your deck is exposed, give it a thorough cleaning. Those old roofing nails, debris, and even small pebbles can create pressure points under your new metal panels, potentially causing premature wear or noisy pops during temperature changes.
Underlayment Installation
Now comes your secondary defense against Mother Nature—proper underlayment. Here in the Northeast, where winter throws everything from ice dams to freeze-thaw cycles at your roof, this layer is absolutely critical.
Start with ice-and-water shield along all eaves, extending at least 6 feet up from the edge (measure from the interior wall, not just the drip edge). This self-adhering membrane is your insurance policy against ice dams. For valleys, penetrations, and roof transitions, apply this same shield, extending at least 12 inches on each side of valleys.
For folks in Berkshire County and Southern Vermont where winter can be particularly harsh, we often recommend ice-and-water shield across the entire roof surface. It costs a bit more upfront but can save thousands in potential water damage.
Over any remaining areas, apply synthetic underlayment with 6-8 inch overlaps. Keep it taught and wrinkle-free—those wrinkles can telegraph through to your metal panels over time. Secure it according to the manufacturer’s specs, typically with cap nails or staples that won’t tear through during windy conditions while you’re working.

Flashing Sequence That Keeps Water Out
The secret to a leak-free metal roof isn’t just in the panels—it’s in how water flows from one component to the next. Always remember this golden rule: work from the bottom up, so each new piece overlaps the previous one.
Your flashing sequence matters tremendously:
Start with drip edge at the eaves, installed directly over your underlayment. This creates that clean edge while directing water into your gutters instead of behind them. Next, address your valleys with proper valley flashing, extending at least 12 inches on each side to handle heavy water flow.
Where your roof meets walls or chimneys, step flashing is your best friend. Then install drip edge along the gable ends (rakes) over the underlayment. Finally, add proper boots and flashing around all penetrations like vents, pipes, and skylights.
Each piece should create a shingle effect, with upper components overlapping lower ones so water continually sheds downward and outward. As we like to tell homeowners, “We’re not waterproofing your roof—we’re water-shedding it.”
For more comprehensive details about proper roof installation techniques, check out our Roof Installation guide.
Closure Strips & Butyl: The Secret Gaskets of Attaching Metal Roofing
The unsung heroes of a great metal roof installation are the components many DIYers overlook: closure strips and sealants. These seemingly minor parts make a major difference in weathertightness.
Closure strips are foam pieces custom-shaped to match your specific panel profile. Think of them as custom gaskets that seal the gaps between your metal panels and trim pieces. Outside closures fit at ridges and high points, while inside closures nest at eaves and low points. Beyond just blocking water, they prevent unwelcome visitors like wasps, birds, and rodents from making homes in your roof structure.
Equally important is butyl tape—that sticky, rubbery sealant that creates watertight connections. Apply it between panel overlaps, under trim pieces, and around penetrations. The key with butyl is proper application: work with clean, dry surfaces, peel the backing as you go (not all at once), and never stretch it thin—it needs to maintain its thickness to work properly.
In the cold Berkshire winters, we recommend warming butyl tape slightly before application—just keep it in your truck with the heater running for a bit before heading up to the roof. This improves adhesion significantly when temperatures drop.
As one of our veteran installers always says, “The panels might be the star of the show, but it’s the closure strips and butyl that keep the performance running smoothly night after night.”
Chris Battaini Roofing and Seamless Gutters proudly serves Berkshire, Hampden, Hampshire, and Franklin Counties in Massachusetts.
Step-by-Step Guide: Attaching Metal Roofing Panels Without Losing Your Mind
Now for the main event – getting those panels secured to your roof without pulling your hair out. I’ve seen plenty of DIYers (and even some pros) get frustrated when panels don’t line up or fasteners strip out. Let’s make sure that doesn’t happen to you.
1. Establish a Square Reference Line
Before you attach a single panel, you need to create a perfectly square reference line along your eave. This might seem tedious, but trust me – a crooked start means a crooked finish that you’ll notice every time you pull into your driveway.
Use the trusty 3-4-5 triangle method to ensure your line is square to the ridge. Measure 3 feet up from the eave along the gable edge, then 4 feet horizontally from that point. If your line is square, the diagonal between these points will measure exactly 5 feet. Working on a larger roof? Simply scale up using the same ratio (6-8-10 or 9-12-15 works great).
Once you’ve verified your measurements, snap a bold chalk line along the eave. This becomes your golden reference for the first panel – and everything that follows.
2. Install the First Panel
The first panel is like the foundation of a house – get this right, and everything else follows suit. Position your panel with a ½-¾ inch overhang at the eave (this creates a proper drip edge) and align its edge perfectly with your chalk line.
Don’t fully secure it yet! Start with a single fastener at the top, then step back and check your alignment. This gives you a chance to make small adjustments before committing. Once you’re satisfied with the positioning, secure it completely following your manufacturer’s fastener pattern.
3. Continue Panel Installation
Now you’re ready to work your way across the roof. Before placing your second panel, apply butyl tape or sealant to the overlap rib of the installed panel. This creates a watertight seal between panels – crucial for keeping moisture out during driving rains.
When attaching metal roofing panels in sequence, a helper makes all the difference. Have them hold each new panel in position while you check alignment and drive the initial fasteners. If you’re working solo, specialty clamps can hold panels temporarily.
After securing each panel, take a moment to wipe away any excess sealant that squeezed out at the seams. This small step keeps your roof looking clean and professional. Continue this methodical process across the entire roof surface.
If you’re interested in more DIY roofing tips and techniques, check out the comprehensive resources at Family Handyman.
Fastener Patterns for Attaching Metal Roofing
The pattern you use when attaching metal roofing can make the difference between a roof that withstands hurricane-force winds and one that peels off in the first strong storm. Different panel types require different approaches:
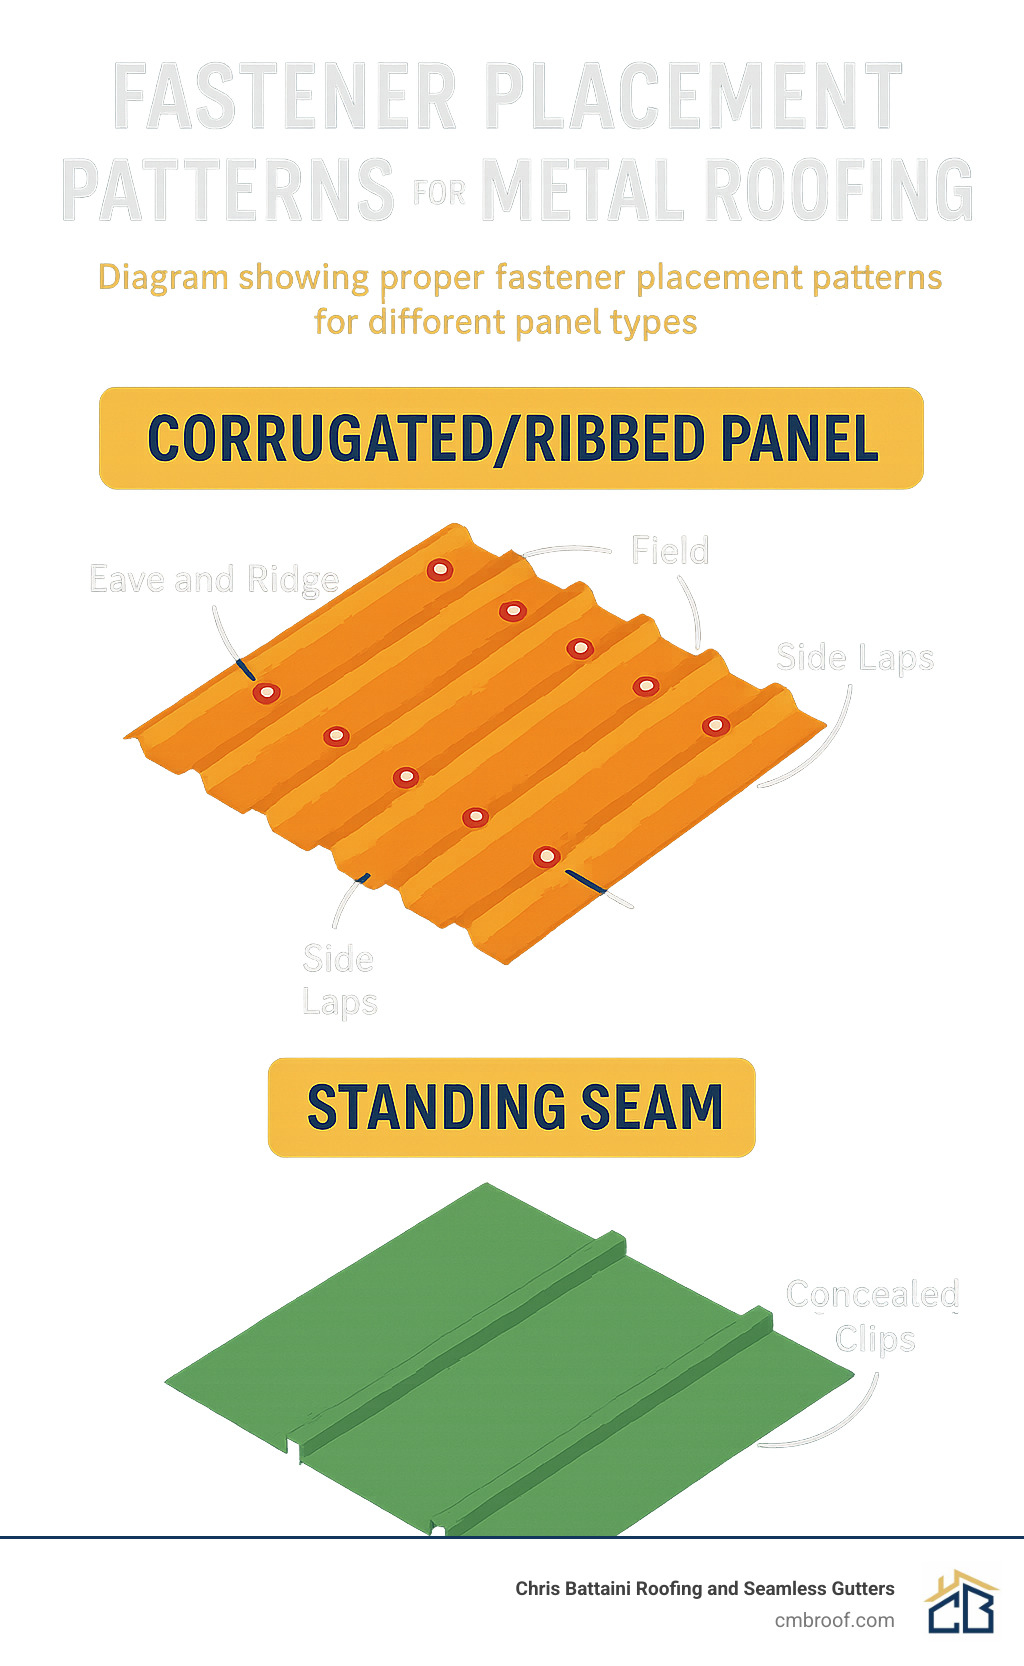
For corrugated or ribbed panels with exposed fasteners, secure through every rib at both the eave and ridge. In the main field of the roof, you can typically space fasteners every 24 inches up each rib. Side laps should be fastened every 12-24 inches for standard installations.
If you’re in a high-wind area like some parts of Berkshire County during winter storms, reduce your field spacing to 12 inches and perimeter spacing to 6 inches. That extra security is worth the additional fasteners.
For standing seam systems with concealed clips, always follow the manufacturer’s specifications for clip spacing – typically 24 inches apart. Eaves, ridges, and high-wind zones often require additional clips for added security.
Fastener Installation Technique
How you drive those fasteners matters just as much as where you place them. First, set your drill’s clutch to prevent over-driving. This simple adjustment saves countless ruined fasteners and panel dimples.
Always drive fasteners perpendicular to the panel surface – angled fasteners are more likely to leak. Pay close attention to torque: tighten until the neoprene washer compresses about 30-40%. A properly installed fastener creates a slight dimple in the metal without crushing the washer.
As my old mentor used to say, “Drive screws until the gasket is flush—neither over-nor under-tightened.” It’s the Goldilocks principle of attaching metal roofing – not too tight, not too loose, but just right.
If you strip a screw (it happens to everyone), don’t keep forcing it. Remove it completely and either use the next size larger or move the location slightly. A stripped fastener is a future leak waiting to happen.
Align, Seat, Secure—Panel by Panel
For a smooth, professional-looking installation, focus on these key details as you work:
Make sure each panel properly nests with the previous one according to the manufacturer’s specifications. The overlap should be tight and consistent across the entire run. Before joining panels, apply butyl tape or sealant to all side laps – this creates a watertight gasket effect when the panels are secured.
Don’t forget about thermal movement. Metal expands and contracts significantly with temperature changes, so avoid over-tightening fasteners which can restrict this natural movement. For longer roof runs, follow the manufacturer’s guidelines for expansion joints to prevent oil-canning or buckling.
Perhaps my most important tip: clean as you go. Those tiny metal shavings from drilling or cutting panels will rust almost immediately if left on the roof surface, potentially causing premature corrosion and ugly staining. Keep a magnetic sweeper handy and use it frequently throughout the installation.
For more comprehensive information on proper roof installation techniques, check out our detailed guide on Roof Installation.
The Fabral Blue Book is also an excellent technical resource for metal roofing installation: http://www.fabral.com/wp-content/uploads/2013/02/bluebook.pdf
Chris Battaini Roofing and Seamless Gutters proudly serves Berkshire, Hampden, Hampshire, and Franklin Counties in Massachusetts.
Advanced Details, Climate Tweaks & Common Mistakes
Let’s face it – a metal roof isn’t just a one-size-fits-all solution. Different climates and roof configurations demand special attention when attaching metal roofing. Plus, even seasoned installers can make mistakes that compromise a roof’s integrity. Let’s explore these nuances that separate a good installation from a great one.
Special Conditions
When it comes to low-slope roofs (less than 3:12 pitch), standard metal roofing techniques won’t cut it. You’ll need panels specifically designed for shallow angles, double layers of ice-and-water shield, and sealant at every lap and fastener. In some cases, mechanical seaming or soldering becomes necessary to ensure water doesn’t find its way inside.
Hips and valleys require extra attention too. Your valley flashing should extend at least 24 inches wide, with panels from different roof planes maintaining a 6-inch clearance from the valley center. Those specialized valley closure strips aren’t just accessories—they’re essential barriers against water infiltration. And if you’re in snow country like we are in Berkshire County, consider widening valleys to 24 inches or more to accommodate snow and ice movement.
Above-Sheathing Ventilation (ASV) is a smart upgrade worth considering. By creating an air gap between your panels and deck with specialized clips or furring strips, you dramatically reduce heat transfer. One client told us their attic temperature dropped by 15 degrees after we installed their metal roof with ASV! It’s particularly valuable in hot climates, but benefits nearly any installation.
Climate-Specific Considerations
Living in snow country like Berkshire County means your metal roof needs extra protection. We recommend heavier 24-gauge or thicker panels, properly installed snow guards to prevent dangerous snow slides, and ice-and-water shield covering the entire roof deck. Standing seam profiles tend to handle snow loads better than corrugated options, making them ideal for our New England winters.
For coastal areas, corrosion resistance becomes your primary concern. Aluminum panels or specialized coatings are worth the investment, along with exclusively stainless steel fasteners. You’ll also want to increase fastener density to account for higher wind loads, potentially using specialized high-wind clips and fastening systems.
In high-heat regions, light-colored panels reflect rather than absorb the sun’s energy. Consider implementing above-sheathing ventilation and allow for greater thermal movement in your panel attachment methods. Metal expands and contracts significantly with temperature changes—failing to accommodate this movement leads to oil-canning and premature failure.
Common Mistakes to Avoid
The difference between a leak-free roof and a problematic one often comes down to fastener installation. Over-driving screws crushes the neoprene washer, creating a perfect path for water entry. Under-driving them fails to create a proper seal. As we tell our crews: “Drive screws until the gasket is flush—neither over-nor under-tightened.”
Panel alignment mistakes create not just aesthetic issues but potential water entry points. Take your time with the first panel—it sets the alignment for everything that follows.
Ignoring thermal movement is another common pitfall. Metal expands and contracts with temperature changes, and restricting this natural movement leads to oil-canning, buckling, or fastener failure. This is especially important with longer panels.
Walking on panels incorrectly can create permanent damage. Always step on the flat area directly over purlins or decking supports, and wear soft-soled shoes.
Those tiny metal shavings from cutting and drilling might seem insignificant, but left on the roof surface, they’ll rust and damage the panel finish. A magnetic sweep isn’t just good housekeeping—it’s essential protection for your investment.
Using incompatible metals creates galvanic corrosion, where one metal essentially sacrifices itself to protect another. This chemical reaction can create pinhole leaks and premature failure.
Finally, skimping on underlayment is a serious mistake. While the metal panels are your primary water barrier, a quality underlayment serves as your backup system when the unexpected happens.
Final Checklist for Attaching Metal Roofing
Before considering any metal roof installation complete, run through this critical inspection process:
Perform a thorough torque check to verify all fasteners are properly seated—neither too tight nor too loose. Inspect all sealant points to ensure proper compression at overlaps and trim pieces. Confirm that all panels ordered were installed with no gaps. Complete a final magnetic sweep to collect any remaining metal shavings.
Verify all trim is properly installed and sealed, paying special attention to ridge caps, valleys, and penetrations. Finally, take detailed photos of the completed installation—these will be invaluable for warranty claims and future reference.

With these advanced considerations in mind, your metal roof installation is set up for decades of worry-free protection. If these details seem overwhelming, Chris Battaini Roofing and Seamless Gutters specializes in professional metal roof installations with meticulous attention to these critical details. We proudly serve Berkshire, Hampden, Hampshire, and Franklin Counties in Massachusetts.
Frequently Asked Questions About Metal-Panel Attachment
Do I put screws in the flat or on the rib?
This question comes up in almost every metal roofing conversation, and for good reason – getting it wrong can lead to leaks!
The answer depends entirely on what type of metal panel you’ve chosen:
For corrugated panels (those wavy-looking ones), fasteners should go right on the peaks of the ribs. This might seem counterintuitive at first – wouldn’t water run down those peaks? – but this placement actually creates the best water-shedding capability.
If you’re working with R-panels or ribbed panels, you’ll typically place screws in the flat area right next to each major rib. This provides secure attachment while maintaining the panel’s water-channeling design.
With standing seam panels, you won’t be putting screws through the panels at all! These premium systems use clips that attach to the roof deck in the flat areas, with no penetrations through the visible surface of the panel.
I always tell homeowners to treat the manufacturer’s instructions like gospel. Some panel profiles have unique fastening requirements, and the manufacturer’s guidance overrides any general rules of thumb.
How often should I re-torque fasteners over the life of the roof?
Good news – a properly installed metal roof with quality fasteners shouldn’t require regular re-torquing! That said, I recommend annual roof inspections, especially after extreme weather events like the nor’easters we get here in Berkshire County.
During these inspections, look for warning signs that fasteners need attention:
Loose fasteners that spin freely when touched are the most obvious red flag. They’ve lost their grip and need immediate attention.
Fasteners backing out of the deck indicate either improper initial installation or deck movement.
Damaged neoprene washers with cracks or deterioration can allow water entry and should be replaced promptly.
Rust or corrosion around fastener heads suggests moisture is getting in and potentially causing damage.
If you spot any of these issues during your annual inspection, it’s time to call in professionals like our team at Chris Battaini Roofing. We can assess whether simple re-torquing will solve the problem or if replacement fasteners are needed.
Can I install metal over old shingles to save money?
Yes! One of the great benefits of attaching metal roofing is that in many cases, you can install it right over existing asphalt shingles. This approach saves tear-off costs (which can be substantial) and keeps tons of roofing waste out of landfills.
However, before you get too excited about this money-saving option, consider these important factors:
First, check your local building codes. Some municipalities limit the number of roof layers allowed, usually to two total. Your building department will have the final say.
Second, your existing roof needs to be relatively flat and in decent condition. Significant sagging, bumps, or damage should be addressed before installing metal over the top.
If you get the green light, you have three main installation methods:
- Direct attachment through shingles into the decking (least preferred method, but sometimes used on simple structures)
- Installation of 1×3 or 1×4 furring strips over the shingles, creating a level surface for attaching panels
- Using a specialized recover system that creates above-sheathing ventilation (the premium option that improves energy efficiency)
Whichever method you choose, we strongly recommend using a synthetic underlayment or at minimum #30 felt paper between the shingles and metal. This prevents abrasion as the metal expands and contracts and provides an additional moisture barrier.
In our experience serving Berkshire, Hampden, Hampshire, and Franklin Counties in Massachusetts, the furring strip method offers the best balance of cost-effectiveness and performance for most homes with existing shingle roofs.
Conclusion
Attaching metal roofing properly combines technical precision with craftsmanship. When done right, your metal roof becomes more than just protection—it’s a long-term investment that delivers decades of worry-free performance with minimal upkeep.
If you’re a DIY enthusiast tackling a smaller project like a shed or garage, the guidelines we’ve shared should set you on the path to success. That said, larger residential roofs involve complexities, safety considerations, and specialized equipment that often make professional installation the smarter choice.
Here at Chris Battaini Roofing and Seamless Gutters, every metal roof installation benefits from our years of hands-on experience. We believe in the personal touch—that’s why our owner leads every project on-site, ensuring exceptional quality control throughout the process. Our comprehensive workmanship warranties give you the confidence that your investment is protected for years to come.
Whether you’re leaning toward a simple corrugated metal roof for your garden shed or considering a premium standing seam system for your home, proper attachment is the foundation of longevity. The principle is simple yet powerful: build your roof in layers, with each component working together to channel water away from your structure.
We take pride in serving homeowners throughout Berkshire, Hampden, Hampshire, and Franklin Counties in Massachusetts, as well as Southern Vermont. Our deep understanding of local weather patterns means we can recommend and install metal roofing systems perfectly suited to our region’s unique challenges.
Ready to explore how a metal roof might transform your home? We’d love to help you steer the options and find the perfect solution. Contact us today to discuss your project and find why our customers trust us with their most valuable asset—their home.
