

Why Proper Gutter Attachment Protects Your Home’s Foundation
Attaching gutter systems correctly can save your home from thousands of dollars in water damage while protecting your foundation, siding, and landscaping. Here’s what you need to know:
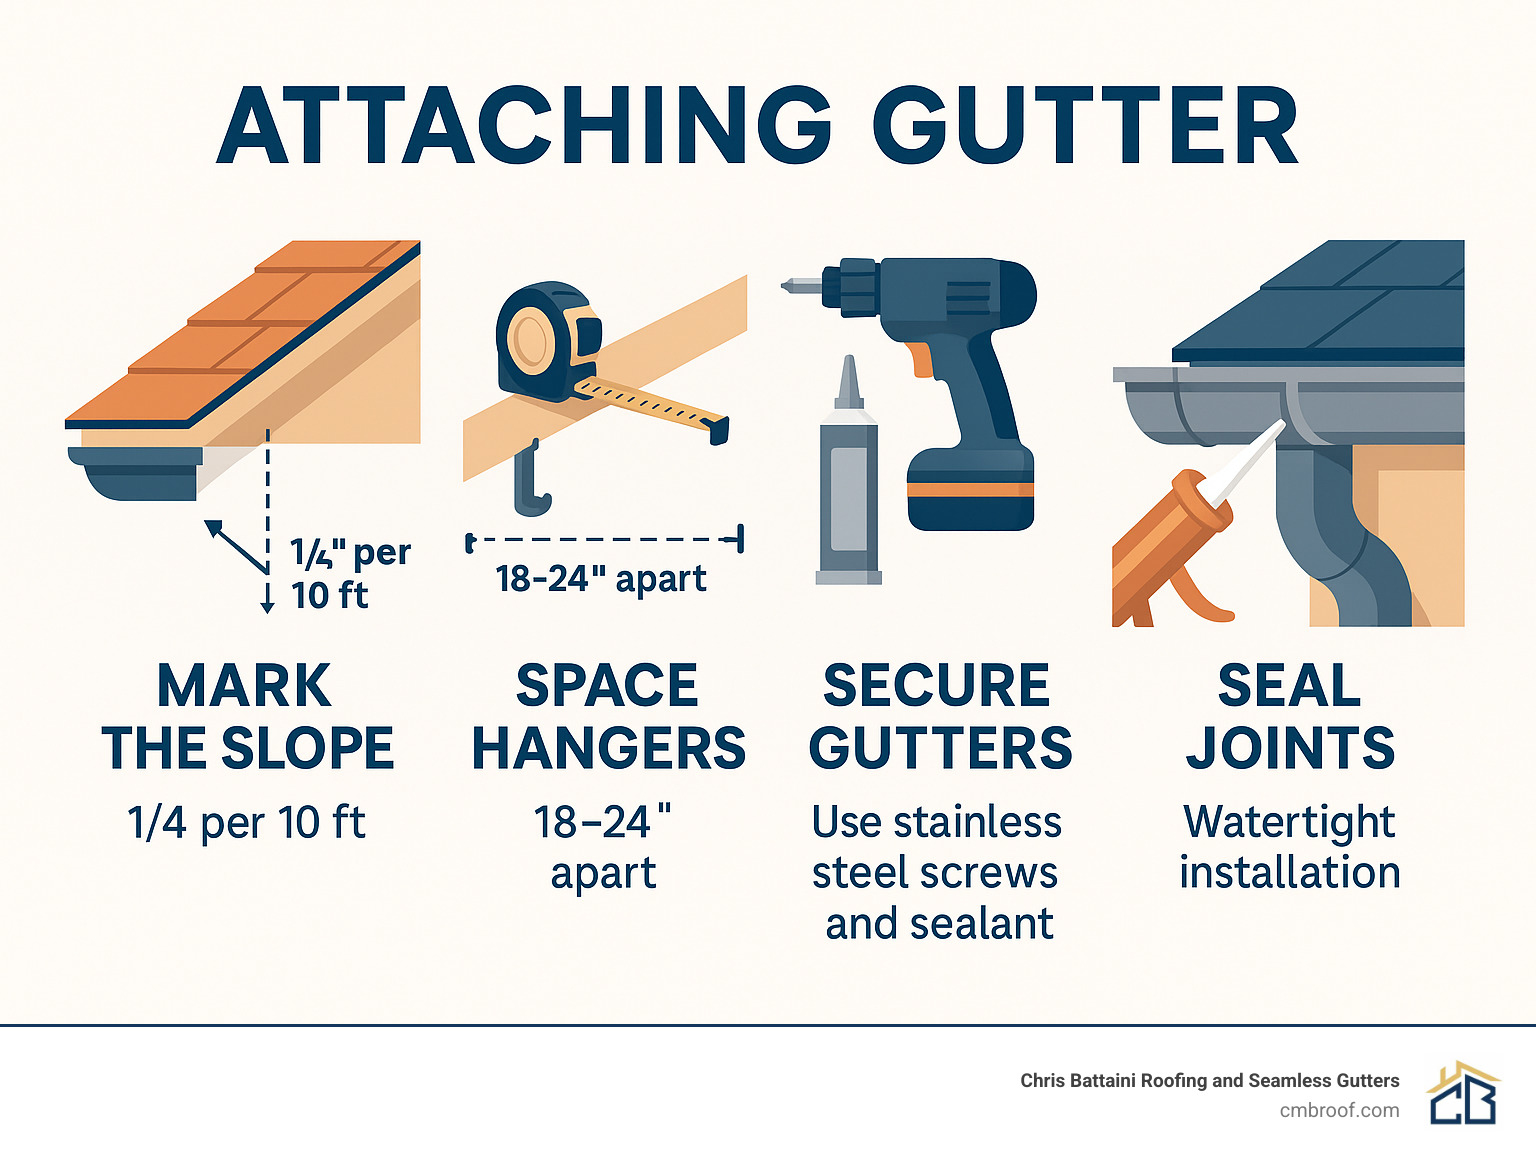
Quick Steps for Attaching Gutter:
1. Mark the slope – 1/4 inch drop per 10 feet toward downspouts
2. Space hangers – Every 18-24 inches into rafter tails
3. Secure gutters – Use stainless steel screws and sealant
4. Test drainage – Run water through system to check flow
Whether you’re replacing old gutters or installing new ones, the attachment process determines if your system will last 20+ years or fail within a few seasons. Poor attachment leads to sagging, leaks, and water pooling around your foundation.
The research shows that properly installed gutters can handle over 1,000 gallons of water during a single inch of rainfall. But only if they’re attached with the right slope, proper fastener spacing, and watertight seals.
As one DIY installer finded: “Installing gutters yourself can be a really satisfying project that saves you money and helps protect your home from water damage.”
The key is understanding that attaching gutter isn’t just about hanging metal from your roof. It’s about creating a complete water management system that directs every drop away from your home’s vulnerable areas.
Plan Before You Climb: Measurement, Codes & Materials
Before you start attaching gutter sections, take a step back and do your homework. Trust me, the twenty minutes you spend planning will save you hours of frustration on the ladder.
Start by walking around your house and really looking at what you’re working with. Check every inch of your fascia boards—those horizontal boards your gutters will attach to. If they’re soft, rotted, or pulling away from the house, fix them first. There’s no point in attaching gutter to boards that can’t support the weight.
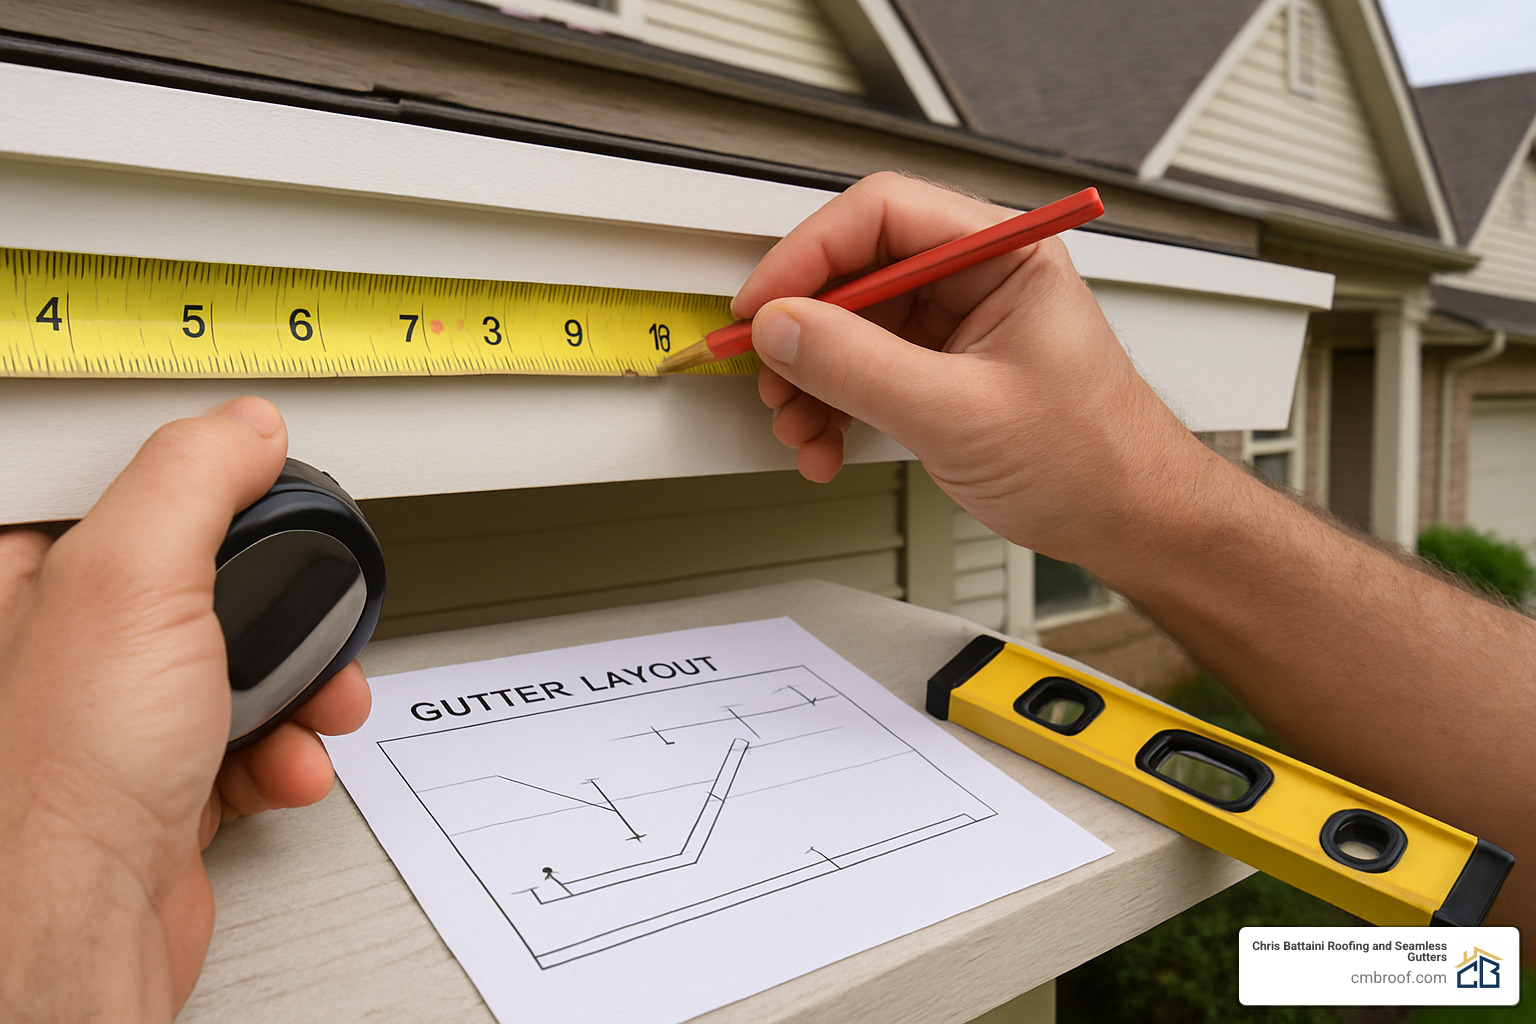
Now comes the math part (don’t worry, it’s simple). Your gutters need to slope toward the downspouts at 1/4 inch drop per 10 feet. This might not look like much, but it’s the sweet spot between proper drainage and keeping things looking level to the eye.
Here’s where many DIYers mess up: downspout spacing. You need one downspout for every 20-30 feet of gutter run. Skimp on this, and you’ll have water overflowing during the next heavy storm. For longer runs over 40 feet, slope from the center toward downspouts at each end.
When you’re planning hanger spacing, think about your local weather. In areas like Berkshire County where we get heavy snow loads, space your hangers every 18 inches. In milder climates, you can stretch that to 24 inches. Better safe than sorry.
Don’t forget to check your local building codes before you start. Some towns require permits for gutter work, and there might be specific requirements for your area. More info about Gutter Installation Services can help you steer these requirements if you’re unsure.
Here’s a modern twist that’s pretty cool: companies like Scope Technologies aerial tools can measure your roof from satellite images. These aerial reports can cut your measuring time by 80% and give you precise measurements without the ladder work. Not necessary for every job, but handy if you’re tackling a complex roofline.
Tools You’ll Need for Attaching Gutter
Having the right tools makes attaching gutter feel less like wrestling with metal and more like a satisfying project. Here’s what you’ll want in your toolkit:
For measuring and marking, grab a 25-foot tape measure minimum, a chalk line for marking your slope, and a level for double-checking your work. Trust the chalk line over your eye—what looks level often isn’t.
You’ll need aviation snips for cutting (get both left and right-cutting versions), a hacksaw or miter saw for clean cuts, and a pop-rivet gun for connections that won’t come apart. A crimping tool helps with end caps, though you can often get by without one.
The installation essentials include a drill/driver with bits, and here’s the game-changer: a ladder stabilizer. One installer told us it was “the best $25 investment” he ever made. It protects your gutters and roof while giving you a stable work platform.
Don’t forget safety gear: safety glasses, work gloves, and a non-slip ladder rated for your weight plus materials. Your family wants you back on the ground in one piece.
Material Checklist & Average Costs
Quality materials make the difference between gutters that last 20 years and ones that start sagging after the first winter. Let’s talk about what you actually need.
Aluminum K-style gutters are your best bet for DIY installation. They’re lightweight, won’t rust, and come in colors to match your house. Choose between 5-inch and 6-inch widths—go with 6-inch if you have a large roof area or live in a high-rainfall region.
For attaching gutter securely, hidden hangers work better than the old spike-and-ferrule systems. Add stainless steel screws (they won’t rust and stain your gutters), pop rivets for permanent connections, and 100% exterior-grade silicone sealant for watertight seams.
Don’t forget the finishing touches: end caps, corner pieces, downspout outlets, elbows, and downspout brackets spaced every 6 feet down the wall.
Average costs based on internet data range widely from $2-$20 per linear foot for aluminum, with premium materials reaching $60+ per foot for copper systems. These are average internet costs and not actual costs for Chris Battaini Roofing and Seamless Gutters. The huge price range reflects everything from basic builder-grade materials to premium architectural systems.

For most homeowners, mid-grade aluminum gutters offer the sweet spot of durability, appearance, and cost. They’ll handle New England weather just fine and won’t break the budget.
Step-by-Step Guide to Attaching Gutter Like a Pro
Here’s where the real work begins. Attaching gutter systems properly separates weekend warriors from true DIY pros—and the difference shows up in how well your gutters perform for the next two decades.
Start with a simple but crucial step: drive a marker nail about 1/2 inch below your shingles at what will be the high end of your gutter run. Walk to the opposite end where your downspout will go, and mark a point that gives you that magic 1/4 inch drop per 10 feet. Snap a chalk line between these two points. This chalk line becomes your roadmap for the entire installation.
Smart installers do as much work as possible on the ground before climbing back up that ladder. Cut your gutter sections to the right lengths, remembering to leave about 4 inches for overlaps and 2 inches where corners will connect. Install those end caps and outlets while you’re standing safely on solid ground—trust us, it’s much easier than trying to juggle these tasks while balancing on a ladder.
When you’re ready to start attaching gutter sections to your house, space those hangers every 18 to 24 inches along your chalk line. This spacing isn’t just a suggestion—it’s what prevents your gutters from turning into expensive, sagging metal decorations after the first heavy snowfall.
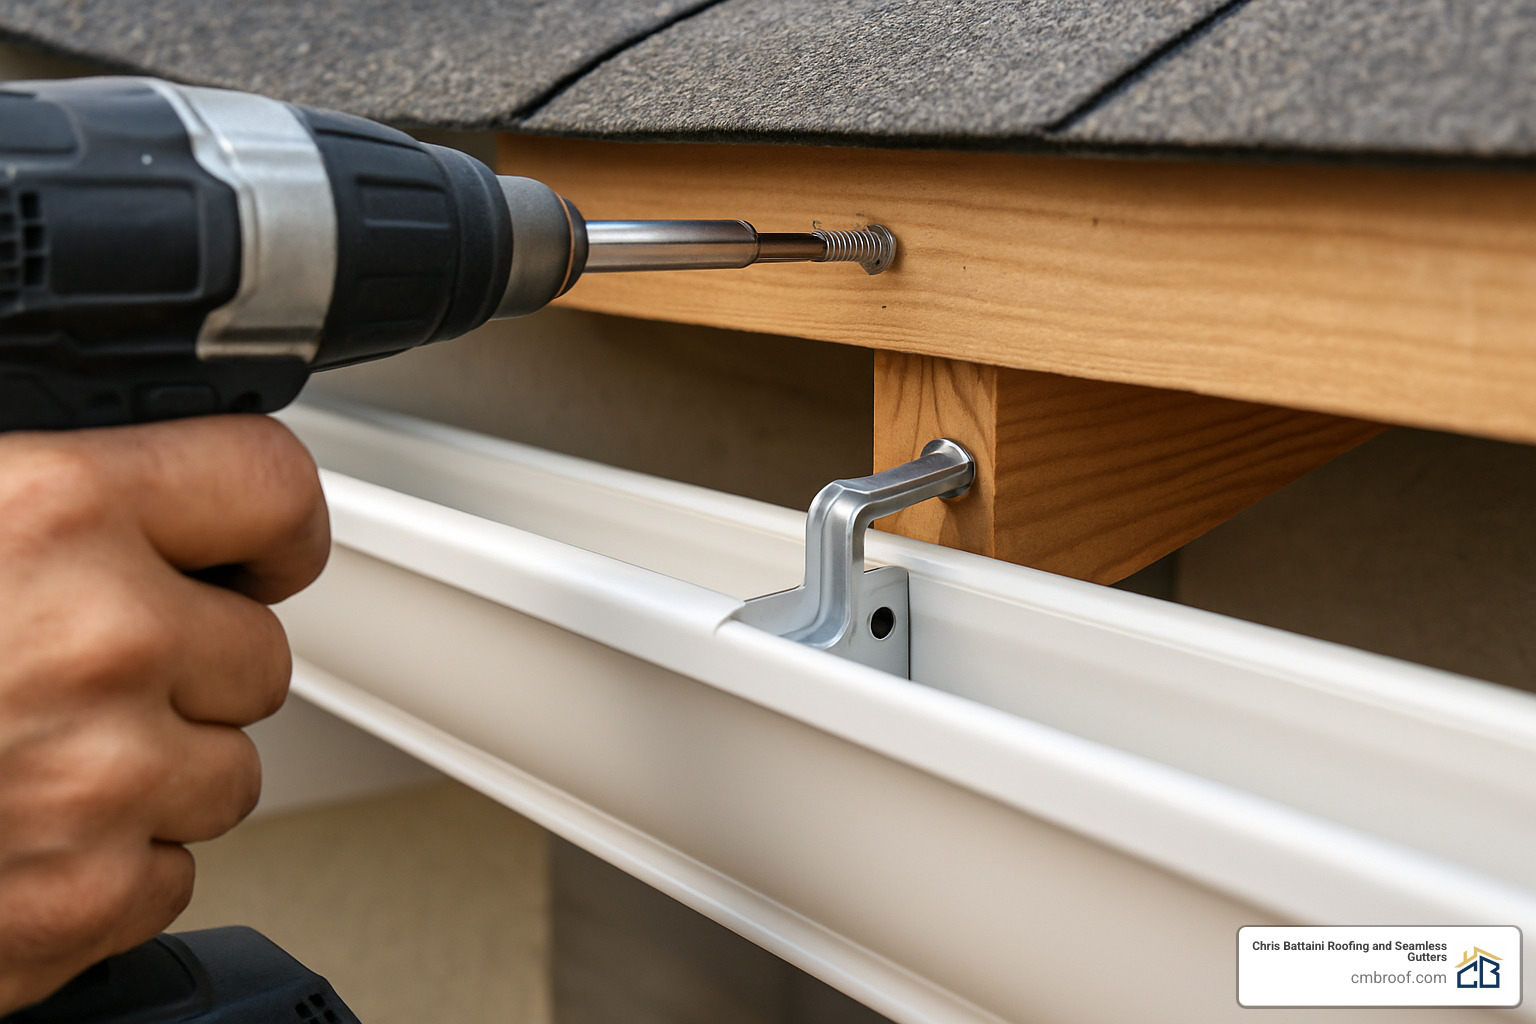
Here’s a pro tip that separates the amateurs from the experts: always secure your hangers into rafter tails, not just the fascia board. Rafter tails give you the solid wood backing that can actually support loaded gutters. Fascia boards alone? They’re more likely to give you headaches down the road.
Every joint needs stainless steel screws and a proper bead of exterior-grade sealant. These watertight seams are what keep your basement dry during those spring thunderstorms.
| Feature | Sectional Gutters | Seamless Gutters |
|---|---|---|
| Installation | DIY-friendly | Professional required |
| Leak potential | Higher (multiple joints) | Lower (fewer joints) |
| Cost | $2-6/ft materials | $4-10/ft installed |
| Customization | Limited lengths | Any length needed |
| Maintenance | More frequent sealing | Less frequent repairs |
Mark, Cut & Prep Before Attaching Gutter
Getting your measurements and cuts right the first time saves you from those frustrating trips back to the hardware store. Mark that chalk line carefully with your consistent 1/4 inch drop per 10 feet—this slope moves water efficiently without making your gutters look like they’re sliding off your house.
Cutting aluminum gutters requires the right technique. Use a hacksaw or miter saw with a fine-tooth blade, and here’s a trick from experienced installers: if you’re using a sliding miter saw, try reversing the blade for cleaner cuts through aluminum. Always smooth out any rough edges after cutting—your hands will thank you later, and the connections will fit together much better.
Those end caps need to be crimped securely before you attach them. Apply a generous bead of sealant, then secure with pop rivets for a connection that won’t fail. When you’re cutting holes for downspout outlets, a 3-inch hole saw creates clean openings without warping the gutter profile.
The smartest move? Test-fit everything on the ground first. Finding out that two pieces don’t align properly while you’re 15 feet up on a ladder is nobody’s idea of a good time.
Hanging & Fastening: The Core of Attaching Gutter
Hidden hangers are your best friend when attaching gutter systems. These clever brackets clip inside the gutter and screw directly into those rafter tails, giving you a clean, professional look without any visible hardware cluttering up your roofline.
Drive those 1-1/4 inch stainless steel hex-head screws into rafter tails every 18 to 24 inches. Since rafter tails are typically spaced 16 inches on center, you’ll hit solid wood with every other hanger—exactly what you want for maximum holding power.
Don’t forget about gutter apron (also called drip edge) if your roof needs it. This flashing slides under your shingles and makes sure water flows into the gutter instead of sneaking behind it. Overlap pieces by 2 inches and nail them down every 2 feet for secure attachment.
Keep checking your level as you work your way along the roof. Each section should line up with your chalk line while maintaining that crucial slope toward the downspouts. Make any needed adjustments before you drive home all those fasteners—it’s much easier to tweak things now than to redo sections later.
Troubleshooting When Attaching Gutter Systems
Even the most careful installers run into hiccups when attaching gutter systems. The good news? Most problems have straightforward fixes if you catch them early.
Leaks at seams usually mean you need more sealant or the water flow direction is wrong. Remember: upper sections should always tuck into lower sections so water flows smoothly downstream. Fighting against this natural flow pattern creates leak points that no amount of sealant can fix permanently.
Improper slope becomes obvious during your first heavy rain. The fix is adjusting hanger positions before you finalize all the fasteners. Small tweaks now prevent major drainage headaches later—and it’s much easier than starting over.
Sagging gutters often surprise homeowners after the first winter. Heavy snow loads or accumulated leaves can cause problems between standard supports. The solution is adding extra hangers at 16-inch spacing in problem areas. A little extra support goes a long way.
Misaligned sections should never be forced together—that creates stress points that turn into failure points down the road. Use adjustable hangers to fine-tune the alignment instead.
For stubborn leaks that keep coming back, clean the area thoroughly and apply fresh sealant. Some experienced installers swear by automotive undercoat spray for extra protection in problem spots—it’s designed to seal and stay sealed under tough conditions.
Downspouts, Corners & Watertight Seams
Getting your downspouts positioned correctly makes the difference between a gutter system that works beautifully and one that creates new problems. Think of downspouts as the hardest-working part of your attaching gutter project—they handle all the water your gutters collect and need to move it safely away from your home.
Position downspouts away from doors and windows to prevent annoying splashing every time it rains. Nobody wants to get soaked walking to their front door! Install one downspout for every 20-30 feet of gutter run—this industry standard ensures your system can handle heavy rainfall without overflowing.
Use elbow sections to create offsets that bring downspouts close to your wall while maintaining smooth water flow. These angled pieces help you steer around obstacles and create a clean, professional appearance. Secure downspout brackets every 6 feet for single-story homes, adding a third bracket for two-story installations where the extra height creates more stress.
Don’t forget about where that water goes once it leaves the downspout. Add extenders or splash blocks to direct water at least 4 feet away from your foundation. This simple step prevents soil erosion and those expensive basement moisture problems that can cost thousands to fix later.
Corner connections require extra attention when attaching gutter systems. These joints handle the most stress and see the most water flow, so they need to be bulletproof. Use pre-manufactured corner pieces whenever possible—they’re engineered for proper fit and long-term reliability.
For custom corner miters, measure twice and cut once. Seal all corner connections with UV-rated sealant that won’t break down under constant sun exposure. Secure these critical joints with pop rivets for permanent attachment that won’t work loose over time.
Complex rooflines with multiple angles and levels can challenge even experienced DIYers. More info about Seamless Gutter Systems can help you understand when professional installation makes more sense than tackling it yourself.
Secure & Direct the Flow
Smart downspout placement prevents overflow problems and keeps water moving efficiently away from your home. Avoid placing downspouts near basement entrances, air conditioning units, or high-traffic walkways where they’ll create problems or get damaged.
For properties with limited surface drainage options, consider underground drainage systems. Connect downspouts to buried PVC pipes that carry water to appropriate discharge points well away from your foundation. This invisible solution works especially well in landscaped areas where surface drainage would be unsightly.
Here’s a pro tip that prevents future headaches: orient downspout slip joints so upper sections tuck into lower sections. This simple detail prevents separation during those freeze-thaw cycles that can wreak havoc on gutter systems. Drive two screws per joint into predrilled holes for connections that stay secure year after year.
Install downspout strainers if you’re connecting to underground systems. These simple devices catch leaves and debris before they can clog your buried pipes, saving you from expensive excavation and cleaning later. They’re especially important in areas with lots of trees—like much of our beautiful Berkshire County landscape.
The key to successful downspout installation is thinking about the entire water management system, not just the individual pieces. Every component needs to work together to move water efficiently from your roof to a safe discharge point away from your home’s foundation.
Test, Maintain & Stay Safe
After attaching gutter systems, the real test begins—literally. Grab your garden hose and run water through each section, starting at the high end and working toward the downspouts. This simple test reveals everything you need to know about your installation’s success.
Watch the water flow carefully. It should move steadily toward each downspout without pooling or backing up. If water sits in any section, you’ll need to adjust the slope by repositioning hangers. Don’t skip this step—standing water leads to mosquito breeding, ice damage, and eventual gutter failure.
Check every joint and connection for leaks while the water runs. Even tiny drips can become major problems over time, so grab your sealant gun and address any issues immediately. It’s much easier to fix problems now than after your first heavy rainstorm.
Safety should never take a backseat to getting the job done quickly. Use proper ladder techniques throughout your project—maintain three points of contact, don’t overreach, and never work alone. A ladder stabilizer isn’t just recommended equipment; it’s essential for protecting both you and your roof from damage.
Personal protective equipment makes the difference between a successful project and a trip to the emergency room. Safety glasses prevent metal shavings from damaging your eyes, while work gloves protect against sharp edges and improve your grip on tools.
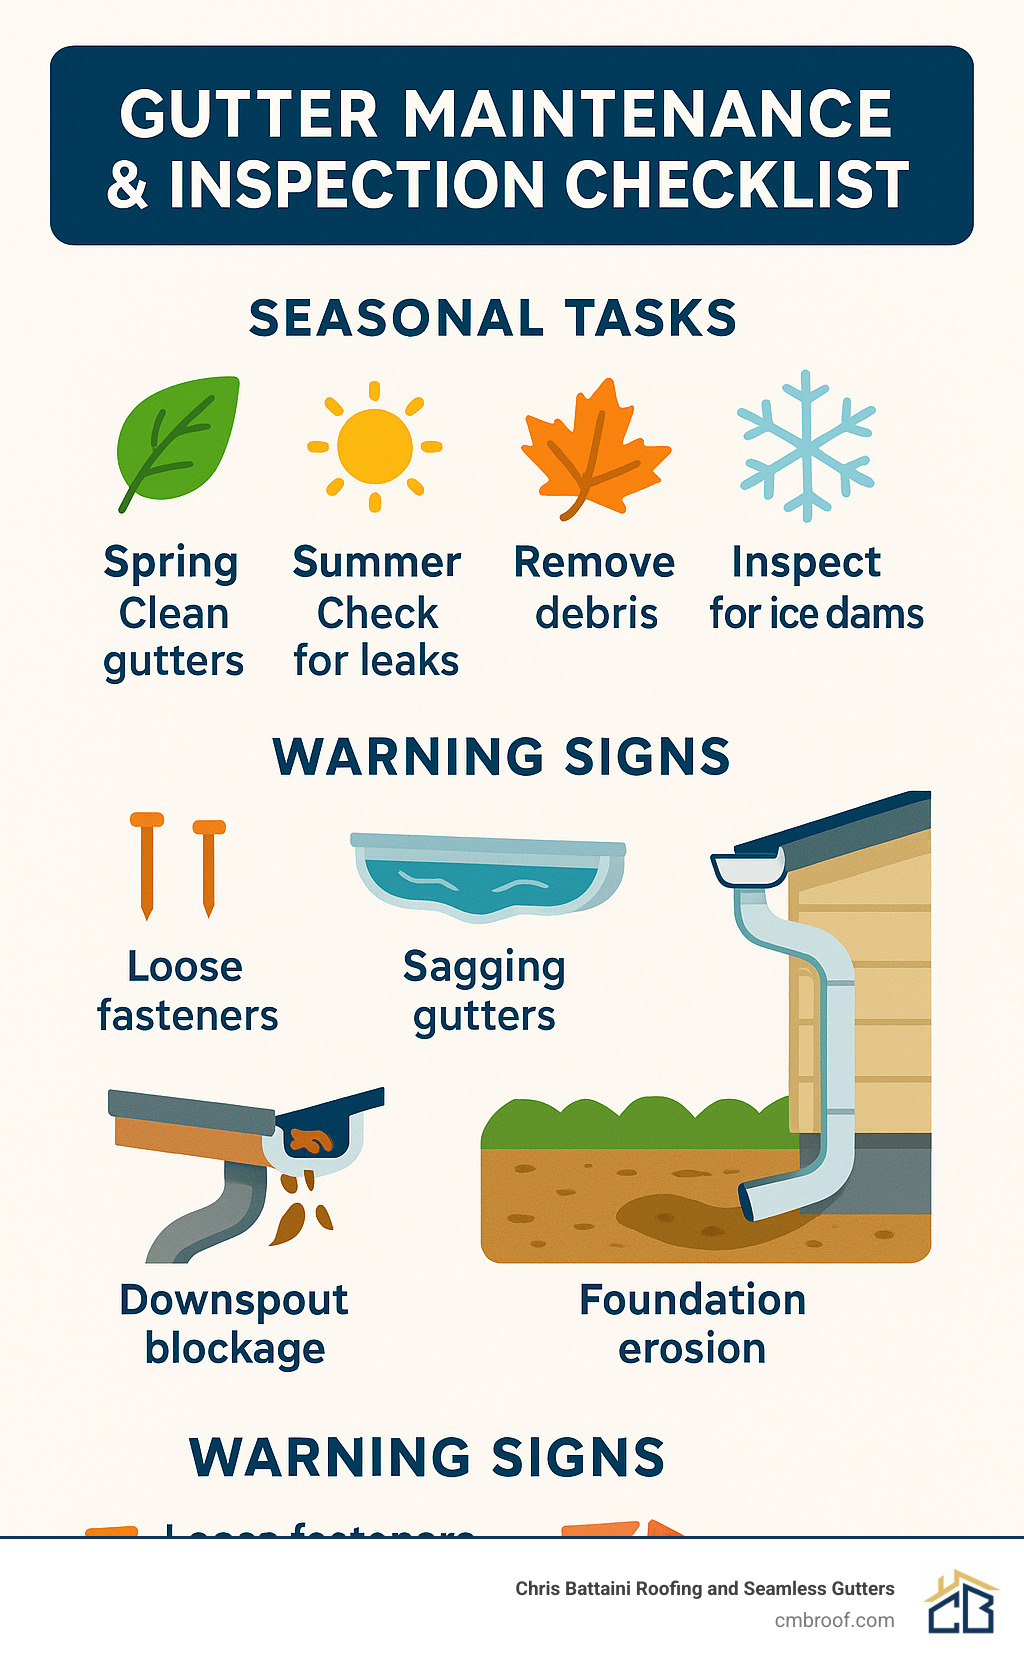
Regular maintenance starts the day you finish installation. Plan to clean your gutters at least twice yearly—spring and fall work best for most homes. Remove leaves, twigs, and other debris, then flush the system with water to ensure proper flow.
Gutter guards can dramatically reduce your maintenance workload, though they require an upfront investment. These systems keep most debris out while allowing water to flow freely. You’ll still need periodic cleaning, but much less frequently.
Your annual inspection routine should become as automatic as changing smoke detector batteries. Look for loose fasteners that need tightening, cracked seams that need fresh sealant, and sagging sections that indicate insufficient support. Check that downspouts remain securely attached and that water flows away from your foundation properly.
Snow load considerations become critical if you live in areas with heavy winter weather. Ensure your hanger spacing can handle the extra weight, and consider installing snow guards on steep roofs to prevent dangerous ice dam formation. The additional support prevents costly damage and potential safety hazards.
Foundation erosion around downspout discharge points signals that your drainage system needs attention. Add splash blocks or extend buried drains to carry water further from your home’s foundation.
Attaching gutter systems correctly means they should last 20+ years with proper maintenance. The time you invest in testing and ongoing care pays dividends in protecting your home’s foundation, siding, and landscaping from expensive water damage.
Frequently Asked Questions about Attaching Gutter
How do I calculate the correct gutter slope?
Getting the slope right is absolutely critical when attaching gutter systems—too little and water pools, too much and it looks awful from the street. The magic number is 1/4 inch drop per 10 feet toward each downspout.
Here’s how to make it simple: for a 40-foot gutter run, mark the high end 1 inch higher than where your downspout will be. That’s it! Snap a chalk line between these two points and you’ve got your installation guide.
For longer runs over 40 feet, things get a bit trickier. Slope from the center toward downspouts at each end instead of creating one long slope. This keeps your gutters looking level to the eye while still moving water efficiently.
One installer shared a great tip: “I always double-check my slope by pouring a small cup of water at the high end—it should flow steadily toward the downspout without pooling anywhere.”
How far apart should gutter hangers be?
Hanger spacing can make or break your gutter installation. The standard rule is every 18-24 inches, but here in New England, we lean toward the closer spacing because of our snow loads.
In areas like Berkshire County where we get heavy snow, stick with 18-inch spacing for extra support. Those beautiful winter snowfalls can add serious weight to your gutters, and closer hanger spacing prevents sagging that leads to drainage problems.
Always attach hangers to rafter tails rather than just fascia boards. Fascia might look strong enough, but rafter tails provide the structural support you need for a system that lasts decades. Hidden hangers are your best choice—they clip inside the gutter and create the strongest attachment with the cleanest look.
You’re typically hitting rafter tails every 16 inches on center, so you’ll have solid wood backing for most of your hangers when you space them properly.
What’s the quickest way to find leaks after attaching gutter?
Nothing’s more frustrating than finishing your gutter installation only to find leaks during the first rainstorm. Here’s the foolproof testing method that saves time and headaches.
Grab your garden hose and start at the high end of each gutter section. Run water through the system while watching carefully for any escapes at joints, end caps, or downspout connections. Mark problem spots with chalk so you can find them easily when you’re ready to make repairs.
Don’t forget to check underneath! Water stains on fascia boards often reveal leaks that aren’t visible from above. These hidden drips can cause rot and expensive repairs if you don’t catch them early.
The key is testing each section thoroughly before calling the job complete. Address all leaks immediately with additional sealant or fastener adjustments—small problems become big headaches once winter weather hits.
One experienced DIYer recommends this approach: “I test with the hose, then come back during the next real rainstorm to double-check everything under actual conditions.” Smart thinking that prevents callbacks and water damage.
Conclusion
You’ve now learned everything you need to know about attaching gutter systems that will protect your home for decades to come. The key to success lies in getting three fundamental elements right from the start.
First, that crucial 1/4 inch per 10 feet slope makes all the difference between gutters that work beautifully and ones that become a constant headache. It’s amazing how such a small measurement can prevent thousands of dollars in water damage while keeping your gutters looking professionally installed.
Second, those watertight seams using quality exterior-grade sealant and stainless steel fasteners are your insurance policy against leaks. We’ve seen too many DIY projects fail because someone tried to save a few dollars on cheap materials. Trust us—it’s not worth the risk when you’re protecting your home’s foundation.
Third, spacing those hangers every 18-24 inches into solid rafter tails gives your gutters the backbone they need to handle whatever Mother Nature throws at them. In our New England winters, this structural support becomes absolutely critical.
Regular maintenance is where most homeowners drop the ball, but it doesn’t have to be complicated. Twice-yearly cleaning and a quick inspection of fasteners and seams will catch small problems before they become expensive disasters.
For homeowners who want the benefits of professional installation without the seams that create leak points, More info about seamless gutters explains how custom-formed gutters eliminate many maintenance headaches while providing superior protection.
The time and effort you invest in properly attaching gutter systems pays dividends every time it rains. Your foundation stays dry, your basement remains flood-free, and your landscaping doesn’t get washed away during heavy storms.
Whether you tackle this project yourself or work with professionals, understanding these principles helps you make informed decisions about protecting one of your largest investments—your home.
Chris Battaini Roofing & Seamless Gutters proudly serves Berkshire, Hampden, Hampshire, and Franklin Counties in Massachusetts, providing expert gutter installation and repair services backed by exceptional workmanship warranties.
