-
10 Wendell Ave Extension Pittsfield, MA 01201
-
210 Columbia St., Lee, MA 01238

Asphalt roll roofing installation is a cost-effective, DIY-friendly solution for low-slope roofs on sheds, garages, and porches where traditional shingles are unsuitable. For a straightforward way to weatherproof a nearly flat roof, here’s what you need to know:
Quick Answer: Asphalt Roll Roofing Installation Steps
Temperature Range: 45°F to 85°F (material must relax before installation)
Minimum Slope: 1:12 for concealed nail method, 2:12 for exposed nail method
Typical Lifespan: 6-12 years with proper installation and maintenance
Roll roofing is cheaper and easier to apply than shingles, making it appealing for outbuildings. However, proper installation requires attention to detail, especially at seams, flashing, and penetrations.
I’m Christopher Battaini, owner of Chris Battaini Roofing & Seamless Gutters. With over two decades of experience in Berkshire County, I’ve handled every type of roofing project, including asphalt roll roofing installation. While it can be a DIY project, understanding the critical steps—and when to call a professional—is key to your roof’s longevity.
As an Owens Corning Platinum Preferred Contractor—a distinction earned by only the top tier of roofing professionals in the country—we bring the same attention to detail to every project, whether it’s a major roof replacement or a specialized low-slope installation.
Related content about asphalt roll roofing installation:
Proper planning is crucial for a successful installation. This stage involves ensuring safety, gathering the right gear, and preparing your roof deck and materials.

Safety is the top priority on any roof, regardless of slope.
Accurate material calculation and a complete toolkit are key to a smooth asphalt roll roofing installation.
To find your roof’s area, multiply its length by its width. For complex roofs, measure each section and add the areas together. Purchase an extra 5-10% of material to account for overhangs, overlaps, and cuts. A standard roll of asphalt roofing typically covers 96 to 100 square feet.
Proper preparation prevents future headaches.
Thoroughly clean the roof surface, sweeping away all dirt and debris. Inspect the deck for damage like rot or warped boards and repair them. The deck must be smooth, dry, and free from protrusions. Install metal drip edges at the eaves and rakes, overhanging the deck by 1/4 to 3/8 inches to direct water away.
Asphalt roll roofing is sensitive to temperature.
As an Owens Corning Platinum Preferred Contractor, we adhere to these best practices, knowing that proper preparation directly impacts your roof’s longevity and performance.
With preparation complete, the installation process requires precision to ensure a watertight finish.

These first layers are critical for protection and proper adhesion.
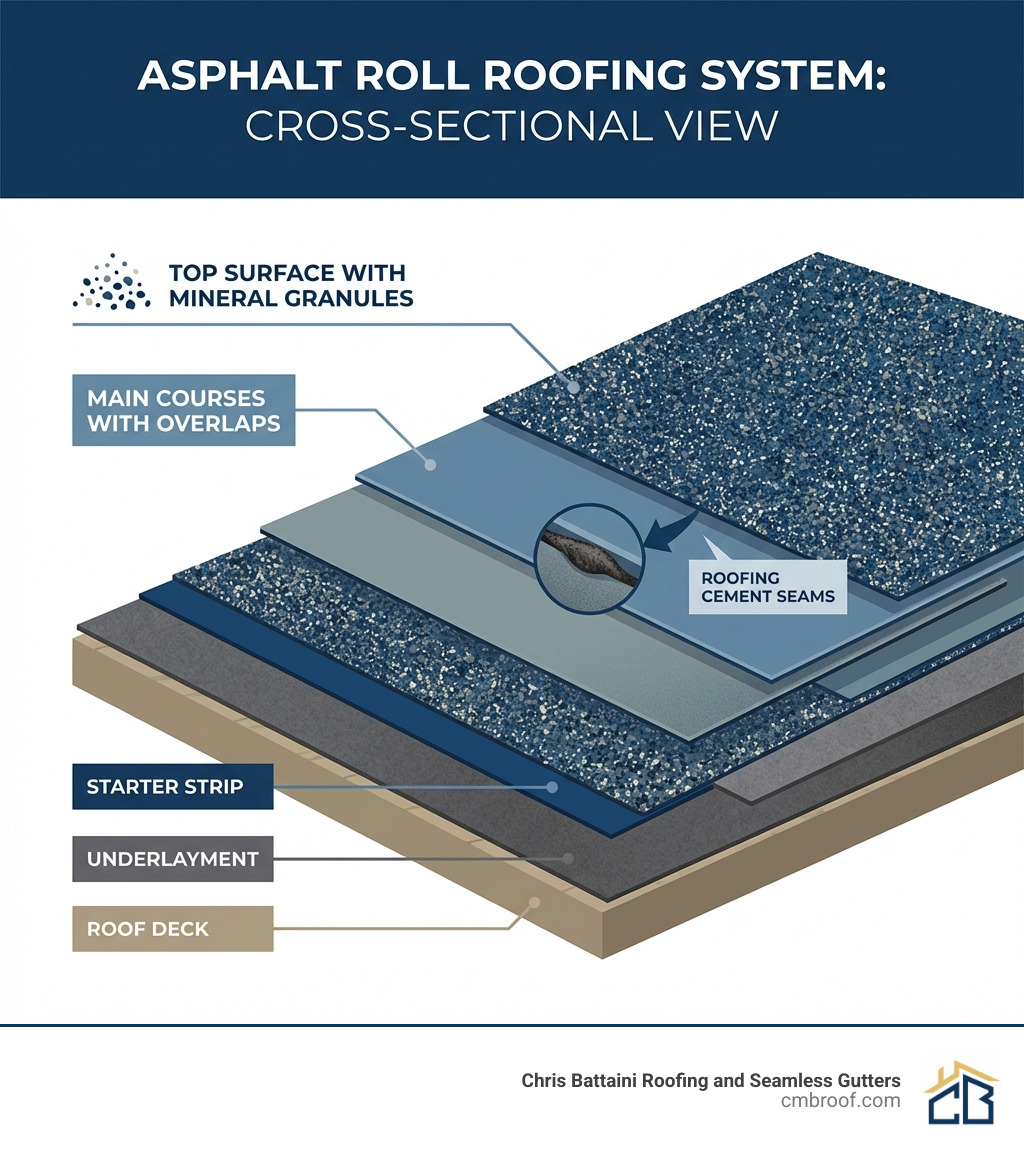
An underlayment of asphalt-saturated felt offers an invaluable extra layer of protection. Apply the felt horizontally, starting from the eaves. Each course should overlap the lower one by at least 2 inches, with end laps of at least 4 inches. Install the underlayment flat and without wrinkles.
Starter strips provide a solid, sealed base for the main courses. Place 9-inch wide strips of roll roofing along the eaves and rakes, overhanging the drip edge by 1/4 to 3/8 inch. Secure these strips with two staggered rows of nails, one row 1 inch from the edge and the second 8 inches from the edge, with nails spaced 4 inches on center.
The application method for the main courses depends on your roof’s slope.
Preferred for its clean look and better protection, this method is for slopes down to 1:12.
This simpler method is for slopes of 2:12 or steeper.
For both methods, end laps must be at least 6 inches wide and fully cemented. Nail the underlying sheet 1 and 5 inches from its end. Stagger end laps in succeeding courses by at least 18 inches to avoid aligning weak points.
Properly sealed edges and seams are essential for a watertight roof.
Spread roofing cement 1/8 to 1/4 inch thick along all laps. Avoid excessive amounts, which can cause blistering. After applying cement, press the overlying sheet firmly into it with a weighted roller (75-80 lbs) to ensure full adhesion and expel air. A small bead of cement should squeeze out from the edge.
Nails create potential leak points if not sealed. In the concealed method, nails are covered by the next course. In the exposed method, all visible nail heads must be thoroughly covered with a dab of asphalt plastic roofing cement. At rake edges, do not nail within 18 inches of the edge until the cement has been applied and the strip pressed down.
Wrinkles compromise your roof. Allowing the material to relax before installation is key. When laying sheets, stretch them gently and press firmly from the center outward to remove trapped air. Working methodically from one side to the other helps prevent wrinkles.
Properly finishing hips, ridges, and penetrations is critical for a leak-proof roof. This is where professional experience is invaluable.
Hips and ridges require special attention to prevent water intrusion.
Flashing is essential wherever the roof meets a wall or is penetrated by a vent or chimney.
Where the roof meets a vertical wall, apply lap cement and turn the roll roofing 4 inches up the wall, nailing the top edge. Install a 12-inch wide flashing strip in a bed of cement, extending 6 inches up the wall and 6 inches onto the roof. Nail the edges. Metal counter-flashing should be installed over the top to direct water away.
This multi-layered process is complex. First, install corner pieces in cement at the base of the chimney. Then, install side flashing pieces, starting with the front (down-slope) piece, then the sides, and finally the back (up-slope) piece. The roll roofing material goes over the flashing on the back and sides but under the flashing at the front to ensure proper water flow.
Valleys require a two-layer system for maximum protection.
For detailed diagrams, refer to manufacturer instructions, such as the Application Instructions for TAMKO® SLATE SURFACED ROLL ROOFING.
After your asphalt roll roofing installation, proper care will ensure it lasts. Here’s how to maintain it and how it compares to other options.
Regular maintenance will help your roll roof reach its full lifespan of 6 to 12 years.
Catching minor issues early can prevent major headaches. Look for:
Addressing these issues promptly is crucial to extending your roof’s life.
Here’s a quick comparison between asphalt roll roofing and traditional asphalt shingles:
| Feature | Asphalt Roll Roofing | Asphalt Shingles |
|---|---|---|
| Cost | Generally cheaper per square foot. | More expensive per square foot. |
| Ease of Installation | Easier and faster to apply; a possible DIY option. | More complex; typically requires professional installation. |
| Durability | 6-12 years with proper maintenance. | 15-30+ years, depending on quality. |
| Aesthetics | Functional appearance for less visible roofs. | Wide variety of styles and colors to improve curb appeal. |
| Ideal Roof Slope | Minimum 1:12 (concealed nail) to 2:12 (exposed nail). Best for low-slope roofs. | Minimum 2:12 to 4:12 slope. Not for flat roofs. |
Roll roofing’s main advantages are its cost-effectiveness and suitability for low-slope applications where shingles cannot be used. While its lifespan and aesthetics don’t typically match shingles, it is the correct solution for nearly flat roofs.
This guide covers the key steps of an asphalt roll roofing installation, from preparation and safety to flashing and maintenance. While it can be a DIY-friendly option for smaller structures, the complexity of ensuring a watertight seal, especially around flashing, cannot be overstated. Incorrect installation can lead to costly leaks and premature roof failure.
A roof is your home’s primary defense against the elements. At Chris Battaini Roofing and Seamless Gutters, we know that even a seemingly simple roll roofing project requires expertise to guarantee longevity. As an Owens Corning Platinum Preferred Contractor—a distinction earned by only the top tier of roofing professionals—we bring unparalleled experience and a commitment to quality to every job.
For a professional assessment, expert installation, and the peace of mind that comes with a correctly installed roof backed by a solid warranty, don’t hesitate to reach out. We are here to help homeowners in Berkshire County, MA, with all their residential roofing needs.
Contact us for your residential roofing needs.
Chris Battaini Roofing and Seamless Gutters proudly serves all of Berkshire County, Massachusetts.
Follow us on Facebook — https://www.facebook.com/chrisbattainiroofing
Need a reliable roofer? CMB Roofing provides licensed, insured, and professional roofing services for homeowners and businesses.
We stand by a simple promise: Clear estimates. Quality workmanship. Clean job sites.
From roof repairs and full replacements to storm damage restoration, our team delivers dependable results with durable materials, expert installation, and complete site cleanup.